
A photograph does not finish taking place in the camera. The final step is the development, or what many call (or we call) editing. As much as there are in-camera photo purists , we agree only to a point.
It is one thing to develop a photograph and another is to manipulate it. It is not the same to cut from here, put there, delete this and add that, than adjusting the exposure, the contrast or straightening a crooked horizon.
No, it's not the same.
STEPS TO REVEAL YOUR PHOTOS
- Observe the photograph
- analyze histogram
- lens corrections
- Transform
- Cut
- Adjust white balance
- Adjust exposure and contrast
- black and white
- highlights and shadows
- Clarity and focus
- noise reduction
REVEAL OR EDIT?
Before we continue, let's make the differences clear and see what each concept is. While post processing includes everything we do after taking an image (from downloading it to sending it to print or publishing it digitally), we can basically differentiate editing from developing.
Editing ( although this term is used for practically everything) is what we do when modifying an image, such as when manipulating or retouching an image, and it is what Photoshop knows how to do so well. From basic things to those miracles that we see, the effects so impressive that can be achieved even with a single click through Photoshop actions.
Developing, strictly speaking, is making the basic adjustments that the camera could do directly when taking a JPEG. In the past, with analog photography, this was done in the laboratory. Or do you think they came out of the camera so beautifully already? Not at all. What happens is that we did not know. We took the photos to print and they gave us all the work done. Now in the digital age this part is up to us.
And believe me, it's not as difficult as you may be thinking.
As you will see, here there is a mix between developing and editing, because I believe that there are some basic adjustments that do not alter a photograph itself but that must be done even if they are not properly developed, such as cropping, lens correction or straightening lines . Now let's see step by step.
Once the difference between developing and editing has been introduced, let's see one by one the steps you must take for a basic development and leave your perfect photos.
1. OBSERVE YOUR PHOTOGRAPH
It seems very obvious, but it is not. Spend some time (whatever you deem appropriate) to observe your image and reflect on what you expect from it. What did you want to convey when you clicked and did you get it. Surely you stayed very close to it, but you see that the message can be improved. The important thing is that you are clear about what kind of photo you want (more dramatic, brighter, darker, warmer, colder…).
There is no better recipe than another, but a message and the way to convey it, and that message can only be decided by the author. With this I also want to make it clear that there are no inflexible rules on how to edit a photograph. Each one and at each moment edits the photograph in a different way.
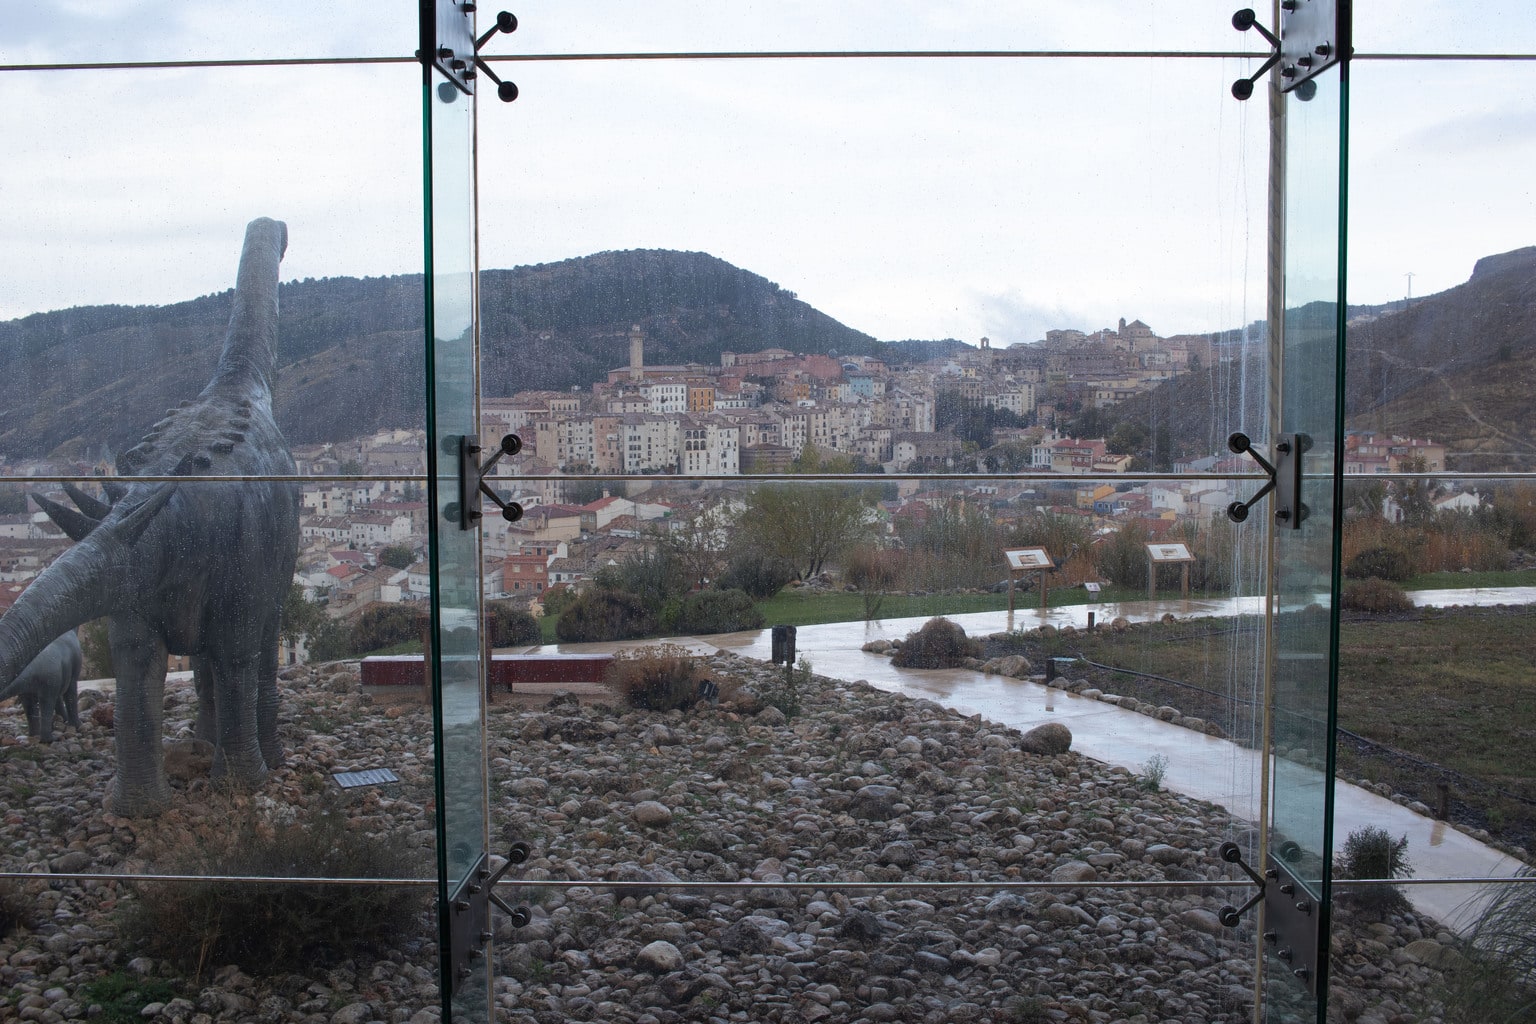
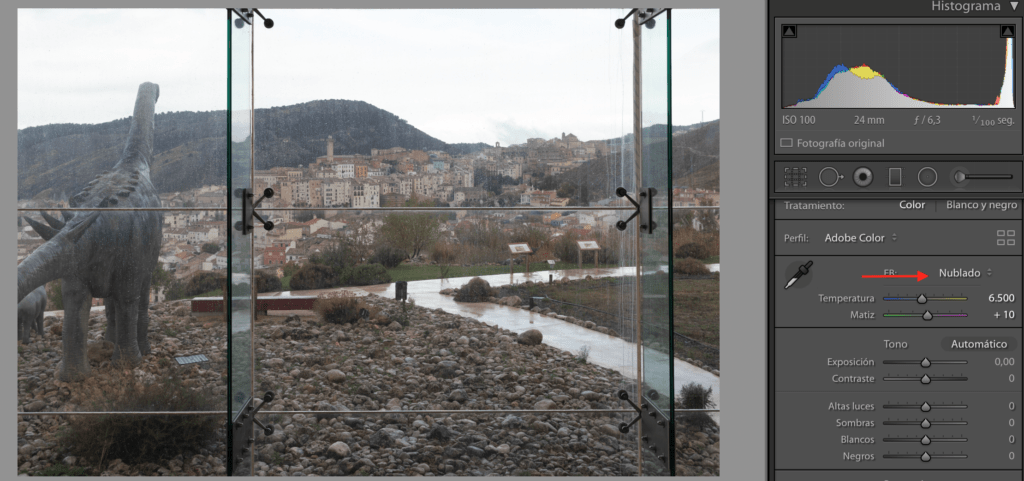
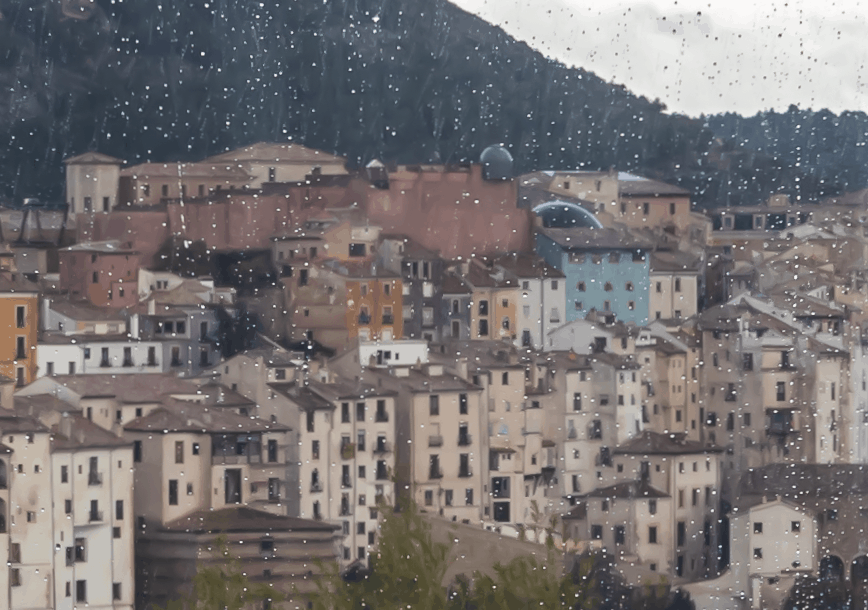
This is the photograph that I have taken as an example to illustrate this article. Choosing one with lines is not casual ? .
2. ANALYZE THE HISTOGRAM
Reading the histogram will give you a very important clue as to where the image is and where you should take it. If you've done your homework well, this should be under control, but it's not always possible. In this case, for example, we can see that it is somewhat overexposed.
3. LENS CORRECTIONS
Once we have already analyzed the photo and see what we want or need to do with it, we take action. The first thing is to eliminate the optical aberrations created by the lens, if necessary. Yes, this part would not be purely revealed but I have already warned you that it was a mix with what I considered most important.
These optical aberrations translate into concave or convex lines, both vertical and horizontal. Surely now you understand better why I have chosen this image ? .
You can also find chromatic aberrations that are manifested by color irregularities. They usually appear in the contours, when there is a strong contrast between one area and another.
Both can be corrected from Lens Corrections.
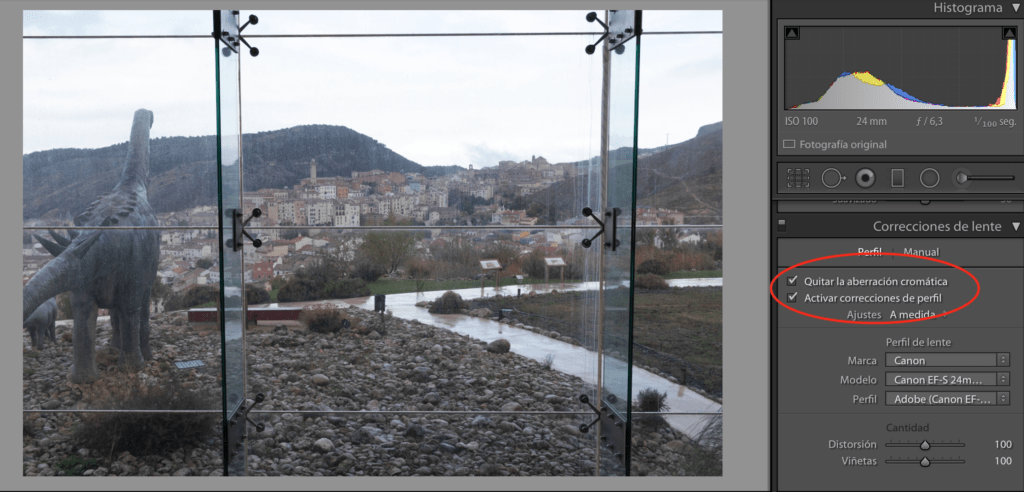
In this case we focus on Activate profile corrections, which we do automatically in the Profile tab. Although you could also use Manual in the case of not finding your objective in the selection.
4. TRANSFORM
Since I have not been satisfied with how the distortions have been corrected, this is because I did not take the photograph correctly, I proceed to Transform.
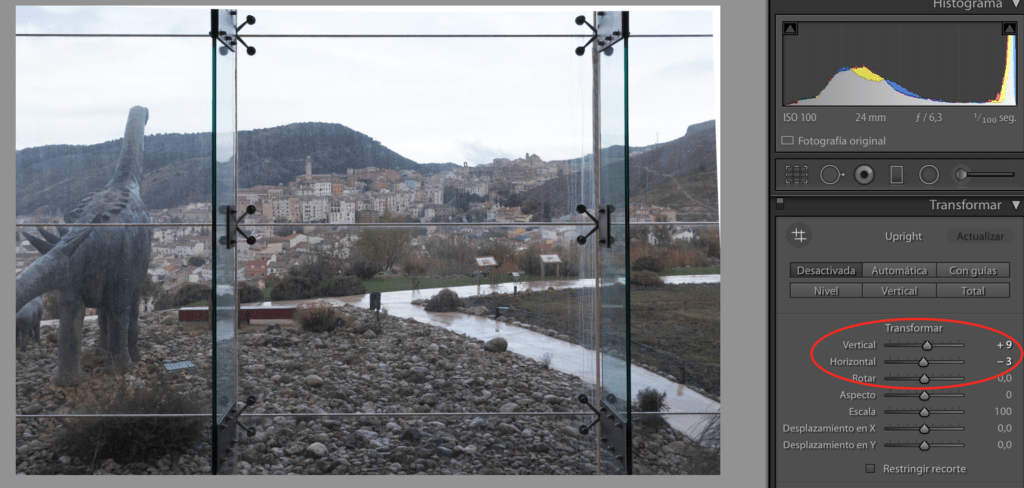
To do this I move the Rotate , Vertical and Horizontal cursors until I find the result that convinces me. The good thing is that if you make a mistake you can click twice on the cursor and it returns to the original state.
5. TRIM
Once you transform the photograph, it is very likely that you will have to crop it because white corners and/or edges will appear.
It is also possible that, although you have not made lens corrections or transformed anything, you decide to crop your photo for whatever reason. Of course, be careful with excessive cuts. That the more you cut, the more quality you will lose.
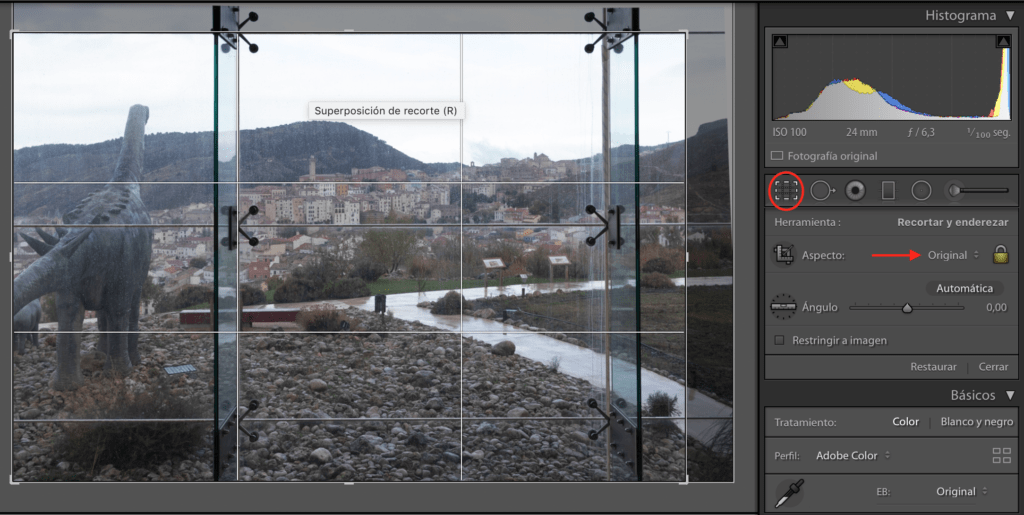
This is the time to adjust the ratio. Normally, the impressions are 3:2, like those of Full Frame cameras, but other cameras, such as compacts or mobiles, among others, capture in 4:3. That is why, sometimes, when you ask for it to be printed, you may find that it has white edges or that it has been cut off.
If you click on Original (where the red arrow in the previous image indicates) a window will be displayed with all the formatting options. You can keep the original proportion, set it to size, use a size from those offered or click on the lock and when it appears open, modify it freely.
6. WHITE BALANCE
We are going deeper into the most typical part of the revealed. When taking a picture, if you haven't paid enough attention, you probably have captured the color of the light. Sometimes it has a color that matches what you want to convey. Others not so much.
If this is the first time you've heard of white balance or you've heard it but it sounded like turning the page, today it's not happening that you reconcile with the term. Alexa discovers all her secrets in this article.
Let's get on with editing. To adjust the white balance, if you did not control it when taking the photo, you can do it in several ways. Having photographed in RAW always makes the task easier. You can click where the arrow indicates and choose a preconfigured mode. In this case, since it was cloudy we chose this option. It brings a little warmer touch but not too much, just enough to convey those brown autumn colors that were in all their splendor when the photo was taken.
I insist that there is no basic rule here, I may like this tone a little warmer and you would have preferred it to be a little colder. About tastes... What's more, I myself may in some time, if I edit it again, I will do it in a different way.
The second option is to regulate with the Temperature (cold or warm) and Hue (magenta or greenish) sliders. Move them left and right to give it the hue you want.
Finally, you can also use the dropper and put it on a neutral gray area. Everything is to try and choose the method that is most comfortable and effective for you.
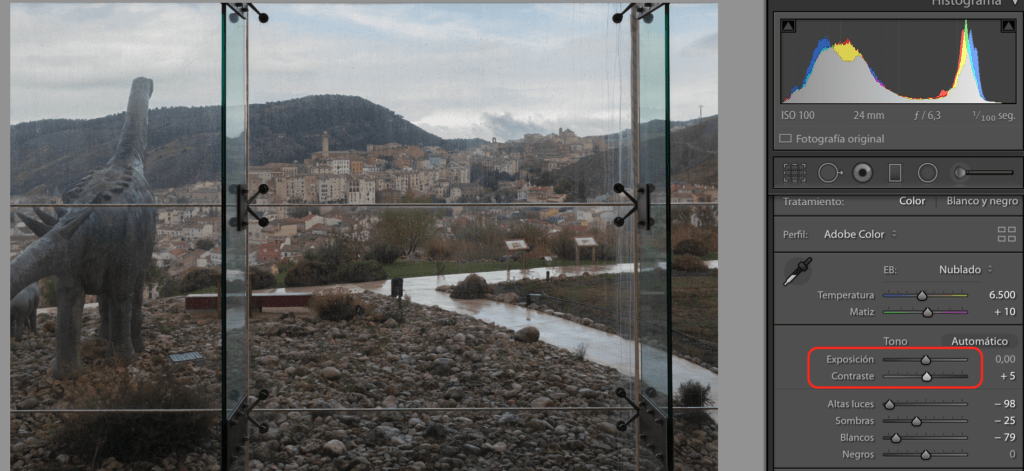
7. EXPOSURE AND CONTRAST
Fixed the white balance, the next interface setting is Exposure. This allows you to give more or less light to the entire photograph. Some people prefer to directly adjust this parameter and then the contrast or wait to carry out the next two steps because often with that it is already corrected.
In this case the image is somewhat overexposed, as we can see in the histogram, and we would correct it by sliding the Exposure slider to the left.
However, if I correct the Highlights also with the slider to the left, I like the result better, because it only corrects the overexposed area of the sky.
If you handle it well, you can also perform this step in the Tone Curve section.
Once the exposure is corrected, we turn to contrast, in which we expand the richness of high and low tones.
8. BLACK AND WHITE
As we have said, there are those who prefer to invert this step and the previous one, since when adjusting the black and white we are already touching the contrast. It's not a fixed rule, so find your favorite way to work on developing. I admit that I am a bit anarchic here and I do it based on the photo.
The good thing is that you can go back and forth and readjust as necessary. Reason why I boxed the part of Highlights, Shadows, Whites and Blacks with Exposure and Contrast. Readjust these controls until you find the desired effect.
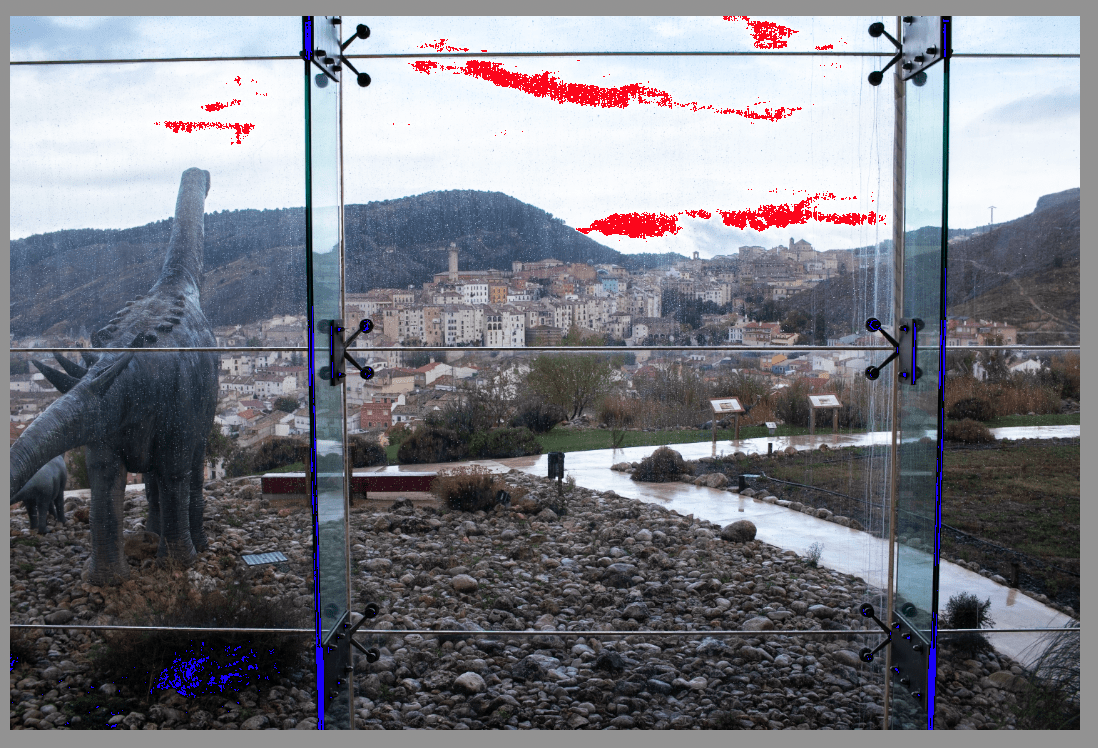
We try to stretch the histogram so that pure blacks and pure whites appear in the image. In this way we will have a more vivid image.
Be careful not to spend a lot. To prevent whites from being burned or blacks from losing information, turn on the warning. On the left arrow you activate the warning for blacks and when they are painted blue, they are losing information, something that is not very convenient unless you are creatively looking for a very high contrast and you don't mind losing all the information. Same with whites but to the right. In this case, the areas are painted red.
Here you have an example, I have modified the whites and blacks so that you can see it. The ideal is to adjust so that there are not many colored areas (or any).
Tip: to push it to the limit, you can double-click on the cursor while holding down the SHIFT key. It adjusts itself.
9. HIGHLIGHTS AND SHADOWS
With the whites and blacks adjusted, we move on to the mid tones, Highlights , and Shadows.
In the example image we have already adjusted Highlights. With the Shadows adjustment you can lighten or darken the shadow areas while the rest of the image would stay the same.
Let's see how the photo goes. As you can see, information has been recovered from the sky and it has a warmer point (personal preference).
10. CLARITY AND FOCUS
With Clarity we highlight the textures of the image. what it does is add contrast to the midtones. You have to be careful because if you go too far you add noise to the photograph.
You also have the option here to enhance the Saturation or Vibrance. The best thing to give your photo more color is to use the Intensity adjustment because it does not affect the entire photo, only the muted tones and it is more subtle and natural.
Further down, in the Detail section, you will find the Focus adjustment . This is another one that you have to handle carefully so as not to increase the noise too much. If you look at the image on the right, you can see how the photo would look if you zoomed all the way up. If you click on the image it will get bigger.
The good news is that in the Mask option you can reduce that noise that has just been generated. If you slide to the right, you can see how the grain caused by the Focus disappears, although the ideal is not to go beyond 50 when adjusting the focus, no matter how much we can resort to the Mask.
11. NOISE REDUCTION
If we have just reduced the noise by focusing, now we will reduce the noise that we brought from home, or rather, from the scene. To do this we adjust in Detail -> Noise Reduction -> Luminance , sliding it to the right again.
So that you can see how it turned out after removing the noise, I leave you an enlarged detail.
Well, we already have our revealed photo. It's not that difficult, is it? The difficult thing is to be clear about what you want to transmit or how. Once decided, the Lightroom thing is a piece of cake ;).
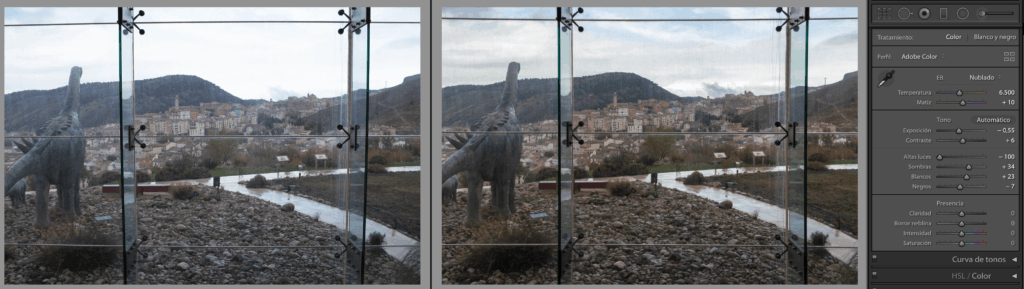
Now let's see the original photo and after development.
As you can see, the editing is really subtle. There is nothing spectacular and everything is in the same place ? . But there is a difference at a visual level that when you compare one and the other is evident.
IN BLACK AND WHITE
When editing a photo in grayscale, you can follow these steps by going through the Black and White option in the Basics section or, even better, follow Alexa's instructions in this article to reveal black and white in Lightroom.
And while we're at it, here's a video of Mario talking about the benefits of Lightroom, plus you can find a nod to one of his favorite series, guess which one?
I hope this article has been useful to you. If so, be sure to share it on your favorite social network. Surely someone thanks you (and me too).
