I don't know if someone has dedicated himself to doing a study on the average number of errors that we need as photographers to learn photography , how many millions of catastrophes, of useless photos we have had to shoot until we start to get better images, photographs without errors, how many until we are able to anticipate ourselves and solve them before they appear. And in that hypothetical study, it would also be interesting to know how many of those are focus errors. I am convinced that focusing errors would occupy a not inconsiderable percentage of the overall. Because the focus error is the one that will most certainly send our photo to the trash.
Luckily, almost everything in life has a solution, and focus was not going to be any less ? We are going to see the most common focus errors and how to fix them. And if you want to deepen the focus in photography, do not miss this mega guide that we have prepared for you so that you learn to focus well.
- Focus and reframe
- Darkness
- lack of contrast
- Reflexes
- depth of field
- Pictures
- Minimum Focus Distance
- Motion
- Forget Manual Mode
- Defocused center of interest
- Not harnessing the magic of blur
CAMERA SETTINGS
Before talking about focus errors, it is very important that you know what types of focus there are and what they are used for. So you can choose one or the other depending on the situation in front of you. These are the most common types of focus in SLR cameras:
AUTO FOCUS TYPES
- Single AF or AF-S: For non-moving subjects (adult portraits, landscape, architecture, etc.)
- Continuous AF or AF-C: For moving subjects; (the camera maintains focus once we have told it where to focus; it 'chases' the subject)
- Automatic AF or AF-A: The camera changes from Single to Continuous if the subject we have decided to photograph begins to move.
FOCUS AREA
Likewise, there is the focus area , which is nothing more than indicating to the camera where we are going to place the focus; at a very specific (unique) point; at that particular point and in the area around it (dynamic), and so on. In general, it is recommended to use the single point for objects or people that are not moving, and the dynamic for moving elements (sports, children, etc.).
FOCUS POINTS
Each model has a specific number of focus points that help us focus the image. The simplest have less, and as the camera becomes "professionalized", these increase to cover as much of the frame as possible. Most amateur cameras start with 9 focus points, which is more than enough to cover the focus of the image and help us preserve the frame.
After this quick review, let's say you have your camera set up perfectly, this will greatly reduce errors, but unfortunately you're still not safe ? Let's move on then, looking at a few "typical" focus errors:
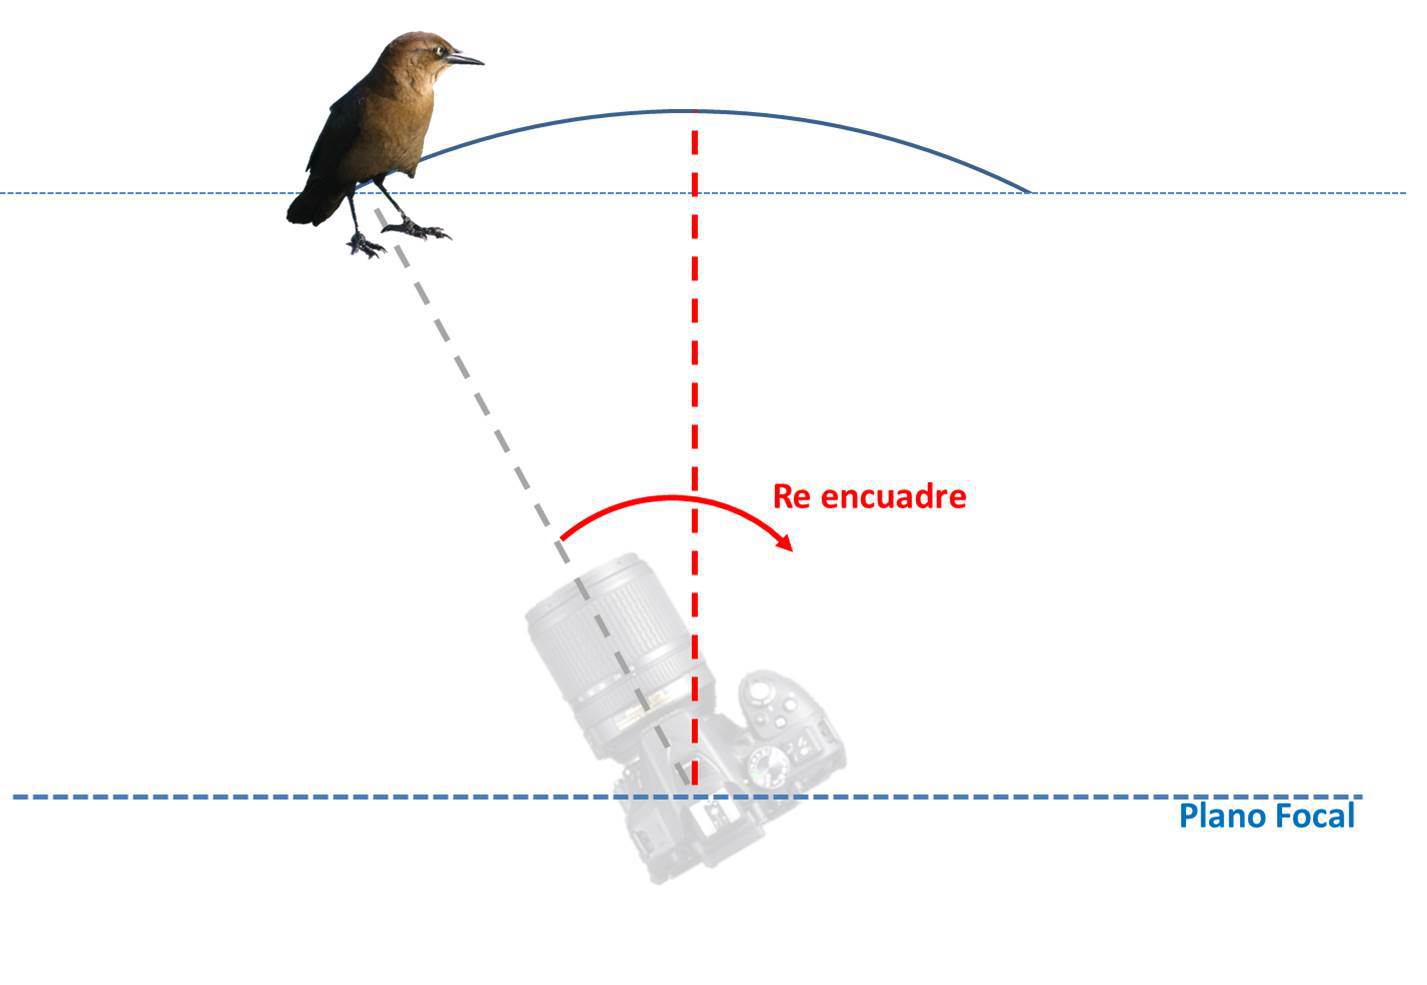
1. FOCUS AND REFRAME
Well, it seems very logical, right? We have all done it a thousand times, but sometimes it goes well and many others inexplicably wrong. This "inexplicably" focus error is called parallax error and is explained in the following image:

By reframing the image , the focal length changes and therefore the place where the focus was originally focused. This is especially noticeable when you work with shallow depths of field ( wide-open f/1:4, F/1:8, etc.)
2. DARKNESS
You will have already noticed that if the camera "does not see" it goes a little crazy looking for the focus. The best thing in these situations is to give it what it asks for (more light). If this is not possible, you will have to help her find the focus. You have several options:
- Make sure that you have activated the focus assist light that is integrated in your camera, it is very useful to help you focus in low light situations.
- Help yourself with a flashlight or a laser pointer, etc. to indicate the point where you should focus. Then lock focus and shoot.
- Focus in manual.
3. LITTLE CONTRAST IN THE IMAGE
Most cameras focus by contrast, either tones or textures, so if they find a scene with very low contrast , finding the focus can be especially difficult. For example, imagine a light brown lizard in the middle of the desert sand... Just as it is difficult for you to catch a glimpse of it, the same happens to your camera.
To do this, you only have two options, either you look for a scene with higher contrast (you change the background or the subject) or you focus manually .
4. REFLEXES
Another situation where the autofocus of your camera can feel somewhat lost, is in reflections. Lights, shapes, glass in between, clouds in a puddle...
- Look for an area of the image with good contrast to make it easier for you to find the focus.
- If you have light, you can try to focus close to where you want and increase the depth of field to have everything in focus.
- Manual focus.

5. APERTURE AND DEPTH OF FIELD
Don't forget that diaphragm is not only more or less light entering through the lens; it is also greater or lesser depth of field .
Look at the following explanatory graph:
This means that at more closed diaphragms (higher values F/14, F/16, etc.) greater depth of field or what is the same, greater area in focus in the image.
So far it's clear, right? Well, don't forget to repeat it to yourself in these situations:
GROUP PHOTO
You already have the whole family at Christmas ready for the obligatory photo, short in front, tall in the back, medium in the center. You point, you run towards the selfie, the light flashes and you already have the photo. A priori it seems that everything is fine, but the day you decide to look at them on the computer, well, you see, only the medium ones were focused ? How horrible! Do you know why that happened to you? Because you didn't set a proper diaphragm opening so that all the planes would be well focused, but above all because before doing it, you didn't read this article ?
LANDSCAPES
Normally in landscapes we want all the planes in the image to be sharply focused. For this, it is important to configure the camera with closed apertures (greater area focused on the image).
6. PORTRAITS
We have said it a thousand times, but it never hurts to repeat it. The eyes are the mirror of the soul, the part that most attracts our attention as human beings in a portrait of another human being (or animal), so a portrait without focus on the eyes is useless. Always focus on the eyes unless it's you that you don't want, because in focus it's almost worthless, that's the bad thing about focus, there's no way to fix it satisfactorily enough. You can miss a point in the exposure and save your image quite satisfactorily, but unfortunately with focus that's not the case.

7. MINIMUM FOCUS DISTANCE
Yes, there is, don't insist on photographing the tip of the pencil 1cm from the lens, because unless you have a macro lens, you won't be able to do it. Each focal length has its minimum focus distance , which means that below that indicated it will not be able to focus satisfactorily. Keep this in mind because sometimes we desperately insist on focusing something without realizing that with a little step back we would have the image quickly and perfectly focused.
8. MOVEMENT
Make sure you are working at a suitable speed to avoid shaky images. Sometimes the lack of focus is caused by movement, either from what is photographed itself or from the movement you make yourself when taking the image.
- For this, it is important that you remember the minimum speed at which you should shoot according to the focal length of your objective (1/Focal length; that is, with a 50mm the approximate minimum speed is 1/50')
- That you hold the camera correctly to avoid shakes.
- Use a tripod .
I take this opportunity to show you a video of Mario where he explains very well how the shutter speed works and its consequences.
9. FORGET ABOUT THE EXISTENCE OF MANUAL MODE
It will be the solution to almost all your problems ? So if you can't focus, don't forget about its existence, it will save you in many situations, especially those where you don't need speed when focusing.
10. UNFOCUSED CENTER OF INTEREST
You were photographing your pet miraculously posing for you for once, but in the background your little brother appeared in a garish spiderman outfit that caught your autofocus attention and completely destroyed your image. Cheer up, these are things that happen, keep an eye on the background whenever you can to try to avoid it and block the focus once you have it clear. A blurred main focus and a focused background… Can you imagine? In the trash, right?
11. NOT HARNESSING THE MAGIC OF BLUR
Not everything is sharp and not everything is focus. The magic of photography is that once you learn to master it, you can do with it everything that comes to mind, be it "correct" or "incorrect", the artistic possibilities are endless.
So don't just obsess over focus and sharpness errors, blur has the magic of focusing and directing our eyes towards sharp areas, you can create magical lights with bokeh or you can shake everything, move it, blur it, whatever your soul artistic demands of you at all times ?

And you know, if you liked it, it was useful to you and you think it might be useful to someone else, please share (Facebook, Google+ or Twitter) ? Thank you very much!

![11 WORST PHOTOGRAPHY FOCUS MISTAKES [AND HOW TO AVOID THEM]](https://photographychef.com/wp-content/uploads/2023/02/11-worst-photography-focus-mistakes-and-how-to-avoid-them.jpg)
