23 WAYS TO USE LIGHT AS A CREATIVE ELEMENT (FOR WHEN YOU LACK INSPIRATION)
23 WAYS TO USE LIGHT AS A CREATIVE ELEMENT (FOR WHEN YOU LACK INSPIRATION)
Lighting is key when it comes to capturing good images, in fact, without light there is no photo. So important is the light for photography that the same word clarifies: "photo" in Greek means "light" and "spelling" means writing. Photographing without light is like writing without ink.
The domain of light is what will define you as a photographer since, the way in which a photograph is illuminated modifies its message, that is, how the observer will interpret its content.
"There are photographic moments in which the light is" unalterable "and must be used as possible. In other situations, for example in the studio, lighting can be completely controlled. ” David Prakel - Lighting.
In today's article we will see 23 tips and ideas so you can take advantage and use the light to make the most of your creativity.
PREVIOUS CLARIFICATIONS
Before starting to read and implement the different tips, it is necessary to review some concepts so that you can make better use of each one of them:
What is the light? As I told you before, light is the raison d'être of photography and without it it would not be possible to capture a scene in an image. The light affects the objects and when bouncing on them, it is captured by the sensor of your camera, in the same way that it is captured by the human eye. Beyond all physical and technical aspects, light is that, the raison d'être of photography.
Lighting: if the light is the reason for the photography, the lighting is that of the photographer. To illuminate consists in modeling the light, directing it and bouncing it in a way of power, not only to capture it with the sensor of your camera, but also, to transmit a meaning and give character to the whole photograph. Mastering the light is what will define you as a photographer.
“The mastery of light is a prerequisite to the control of the final result in photography.” David Bailey (photographer)
The color: the color is determined by two factors: the wavelength of the light (color temperature) and by the object's own color. What does this mean? That the color depends not only on the object's own color, but also on the light that affects it. If you light a white object with a green spotlight, it will no longer look white, or at least not before the "eyes" of the sensor.
It is here where the white balance begins to take relevance because, the way in which the scene to be photographed is illuminated (natural light, fluorescent, flash, etc.), will cause the colors of the scene to be captured in a hue or of other. I recommend that you read the article “If You Scare the Term“ White Balance ”You Need to Read This Article” .
Color temperature: surely you have heard or have read the expressions "warm light" and "cold light". These expressions respond to what is known as "color temperature" and that means, in a very simple way, that the "color" that the light has is measured in degrees kelvin of the following mantra:
The higher temperatures have more blue tones (8000 K to 16000K) and correspond to cooler lights. (Ex: Sky, fluorescent light, etc.)
The lower temperatures have more red and yellow tones (1800 K to 4000K) and correspond to cooler lights. (Eg candles, tungsten lamps, etc.)
The average temperatures have a whiter shade (4500 K to 6500K) and correspond to whiter lights.
In the image below you can see how the same photograph changes completely by changing the color temperature of it:
Color Temperature
TIPS TO ENHANCE CREATIVITY
NATURAL LIGHT
Natural light is nothing more or nothing less than the light coming from the sun, therefore, the quality of this varies according to the time of day, the place where you take the shots, the time of the year and the weather.
As a photographer, the best attribute you can count on when working with natural light is patience. Since you cannot modify the light conditions, you must choose the moment in which the natural light is correct for your photographs, but keep in mind that this moment may only occur at a certain season of the year or at a certain time and For a few minutes.
Photographing with natural light will require you to be aware of certain aspects that will help you achieve the best results:
1) Take advantage of the seasons: the light varies significantly according to the time of year. Depending on the season you are in, the angle and intensity of the light coming from the sun will change according to its position.
Each season has very particular light and colors: in winter the color temperature and the angle at which it falls is lower, generating not-so-saturated colors and more pronounced shadows. In summer the color temperature is higher and the angle more pronounced, so the light is hard and the colors more saturated.
The same photograph taken at different times of the year will transmit different messages to the viewer. Look at the following image and you can understand it better:
Take advantage of the seasons2) Take pictures at all times: as the hours of the day go by, the color, intensity, angle of incidence and even the direction of light vary. There is no better time than another to take pictures, everything will depend on what is the story you want to tell.
Anyway, keep in mind that both sunrise and sunset, when the sun appears or disappears on the horizon, the so-called "golden hour" occurs. If you go out to take pictures right now you will get “more attractive” photographs.
Direct sunlight can take flat and overly contrasted photographs, so they do not end up being as pleasant to the viewer's eye. The solution for this problem is to model the light using reflectors and screens.
At night, what conveys the message in your photographs is the way you use the light to illuminate in so much darkness. Despite being one of your worst enemies, you can make it a powerful ally if you learn to illuminate the unexpected.
Now, if you only go out in the afternoon to take pictures, you may become an expert in it, but you still have plenty of time to explode. Taking pictures at all times will help you understand how the light varies from one moment to another.
Take pictures at all times3) Depending on the place: it is not the same light with which you can work in a city on the edge of the sea than on the top of a mountain: the light conditions change markedly according to the place where you are taking your photographs.
The light on the top of a mountain is direct, hard, bluish and with a lot of ultraviolet light which will make distant views appear covered with fog even if there is not a single cloud in the sky.
The sea and the beach act as a giant reflector of the sun so it is usually the location preferred by photographers thanks to the conditions of light.
In a city, tall buildings block direct light but reflect it towards unexpected places, which generates very attractive shadows and contrasts so you can capture them with your camera.
According to the place4) Depending on the weather: rain, snow, sun, clouds, etc. After the rain or during this, it will be a challenge to capture the different brightness of the light present in the scene. Cloudy days are ideal for working with soft light throughout the scene. If you are looking for hard lights and well-marked contrasts, sunny days will be ideal for you.
According to the weather5) Moods: thanks to the different stages that sunlight passes through as the hours and seasons pass, it is possible to convey a series of feelings and moods that will make the viewer feel immersed in your photography. Try to recreate in your photographs the different atmospheres of each of the scenes you work with.
Moods
AVAILABLE LIGHT
The available light is all that surrounds you at all times and that will be useful to you when taking your photographs. Your job as a photographer is to make the most of the light you have available to achieve incredible photographs.
The available light has a particularity: not all sources of light with which you can find have the same tone, intensity and temperature, so you must ensure that all of them live in harmony in your photographs.
Here I leave a list with some tips that will be useful when working with the different types of lights that you can find in your life as a photographer:
1) Flames and candles: candles, oil lamps and bonfires emit a very particular and attractive golden light due to the low color temperature of the light they emit, in fact, it is the lowest of all lighting sources . With them you will be able to achieve your own "golden hour" but without leaving your home.
Achieving stunning photographs with this type of lighting as the only source of light can be a very complicated task because of the low intensity of the light they emit: it is concentrated around the flame but quickly extinguished in the environment. The challenge is worth the effort since the results can be incredible and very dramatic.
Again, you should pay attention to the white balance of your camera if you want the colors to be faithfully portrayed without losing its original hue.
Get a good tripod , or make yours and get ready to defeat your worst enemy: darkness .
Flames and candles2) Incandescent lights: known daily as "spotlights", they emit their light by heating a thin filament of Tungsten, hence its name. As with the candles, the light they emit has an orange-yellow tone which gives the feeling of warmth and a very particular light effect in your photographs. Although you are falling into disuse due to the energy consumption they entail, you can get them at any store or hardware store.
You can use a couple of desk lamps and cheap tungsten bulbs to make your own home studio and photograph still lifes with materials that you would commonly discard. Check out the article "Bricofotografía: How to Mount Home Photographic Accessories" to get some ideas.
Incandescent lights3) Fluorescent lights: fluorescent tubes or energy-saving lamps are an ally of nature but can become a real headache for photographers. Although you do not notice, the light emitted by this type of lamps is not continuous, that is to say that they blink and their light is not pleasant at all: a greenish color.
Do not despair! Fortunately you can set the white balance of your digital camera in “fluorescent” mode to correct the tones of a scene illuminated with them.
Anyway, they are excellent for photographing small objects and are very useful when working in still lifes and in studio thanks to the extensive lighting surface, its diffused light and ease of transfer.
Fluorescent lights4) Urban lighting: cities, especially large cities, are an inexhaustible source of very attractive light so you can make the most of it. Street lights, shop windows, cars, building windows, are very attractive to the eye and have a very particular charm.
You can use the window light as nightlight windows, take advantage of the light beams of street lamps or car bulbs to get amazing photographs.
Urban lighting5) Neon: Neon lamps have been and will be a fetish for photographers who, like you, begin to understand how to illuminate a scene to achieve stunning photographs. Thanks to the amount of colors and the intensity of these, it will be almost impossible to pass in front of a neon sign and not take some pictures.
You can get very creative photographs using simple techniques such as "double exposure." You don't know what it is? Do not worry, Mario has prepared an excellent article with which you can master it: Detailed Guide to Get Started in “Double Exposure” Photography
This type of lighting is ideal on rainy days: the colors of these reflected in the puddles and in the drops are excellent reasons to photograph. Test it!
Double exposure6) Concerts: have you seen how amazing the concert photographs look? The results that can be obtained thanks to the reflectors and the smoke of the scenarios are really surprising and best of all, you will not need the most sophisticated camera to achieve them.
The concerts are an ideal place to take advantage of the lighting, if you can access and place yourself near the clear stage it is: the colors, the light beams, the contrasts, the shadows, the smoke are luxury ingredients for a spectacular photograph.
I recommend that you take a look at the article “Tips and Tricks for Mastering Concert Photography” if you want to become an expert in these types of photographs.
Concerts7) Flash: the flash is one of the most versatile, powerful and easy to transfer light sources that you can count on. You can shoot them directly on the subjects or objects to be photographed or you can bounce it or blur it as you see fit.
Once you learn to master it, the flash will be your adventure companion thanks to the possibilities it offers when it comes to lighting a certain scene.
There are different types, brands and models but do not worry, you will find everything you need to know to understand how it works in the article: “Everything You Need to Know About the Flash” and if you already have yours and know how to use it I recommend that you Take a look at the "Tricks for Better Use of Flash . "
Flash
SPECIAL TECHNIQUES
If it is lighting and lighting, there are certain techniques that you can not miss when taking your photographs. Not only can you use the light to illuminate a certain scene but you can make it the protagonist of the whole photograph. How? Reading the following articles:
Getting Started Guide: How to Make Your First Photo "Lightpainting" ( Examples )
How to Get Long Exposure Photos ( Examples )
Long exposition
LIGHT CONTROL
There are situations where you can model the light at your leisure, as in the photography in study, and others where you must arm yourself with patience and wait for the light to be where you want it to be, such as in the photography of landscape .
Whatever your situation, and taking advantage of the knowledge about the light you just acquired, I leave you a series of tips and ideas so you can use light as a creative element when composing your photographs:
1) Approach the windows: if you want to give a different look to your photographs but you do not have accessories or studio lighting to do so, you can take advantage of the natural light that enters through the nearest window.
Approach the windows2) Dare to model the light: Be the genius behind the scene not just the photographer! Dare to use reflectors, flashes and jellies when making your shots. If you don't have the necessary equipment, don't worry, you can make it yourself .
Light modeling3) Do not fear the flare: an unwanted flare or reflection can ruin a beautiful photograph, but a flare well used as a creative element will make your photographs become more attractive.
Don't fear flare (reflexes)4) Incorporate the sun into your photographs: do not think of the sun as a source of natural light: try to include it in your photos as another element when it comes to reinforcing the message or the feelings that these transmit to the viewer.
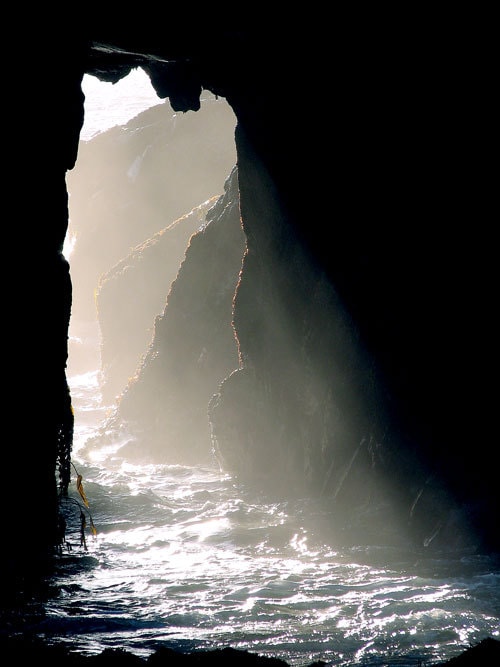
Incorporate the sun into your photographs5) Light as the protagonist: light is not only the raison d'être of photography but it can also be the protagonist of them. When choosing what will be the elements that you will include in these, do not forget that light is an excellent protagonist. You do not believe me? Pay attention to the following image.
The light as the protagonist6) Encourage the abstract: abstract photography is the type of photography where there are no rules: encourage breaking them and taking your creativity to the extreme . Abstract photography is the ideal field for you to use light as the central creative element in order to capture shapes, colors, designs and textures and achieve incredible photographs.
Go ahead to the abstract7) Look for the contrasts: the light spreads in a straight line, which is why there are shadows and with them the contrasts. The more lateral the light with which you are working, whether you can manipulate it or not, greater textures and contrasts you will be able to achieve. If the photo below had been taken at noon, all the charm would have been lost. The light would reach every corner making photography something flat and without textures.
Search the contrasts8) Reflections: in a mirror, a water chaco or on a polished surface, the light will be reflected with an inverse angle of incidence, always. Pay attention to the following image: you will notice that the windows are perfectly reflected in the water but the opposite of the original ones. This is another of the properties of light that you should know when it comes to understanding how light behaves.
Reflexes9) Learn from the work of others: one of the best ways to learn is by observing the work of others but not only by looking at photographs, but by analyzing them. Surely you see many photographs every day, but have you done it carefully? Good photographs are loaded with messages, lines and designs, take your time to observe and learn from them.
Learn from the work of others
There is no perfect light, but each type of lighting is perfect according to the moment, the place and the message you want to convey. The way in which a photograph is lit loads most of the message.
Your challenge as a photographer is to learn to adapt to the light conditions that you cannot model and master those situations where you control everything.
Creativity is like luck, it must be accompanied. If you sit in your chair waiting for a wonderful idea to magically fall, you are unlikely to get the results you are waiting for. The best way to enhance creativity is to work the light, spoiling, taking photos and analyzing the results in search of the perfect shot.
Did you like the article? Recommend it please.