

Today I am going to introduce you to an interesting photographic technique called “bokeh”, very easy to produce, and with which you will be able to capture incredible photographs, as good as the ones I show you below.


Like? Hmm… I sure do. Well, don't be impressed, getting something like this is extremely easy. In today's article I will explain how you can get your first photos with the Bokeh effect and I will share with you some other trick or trick to achieve very creative effects.
WHAT IS THE BOKEH EFFECT IN PHOTOGRAPHY?
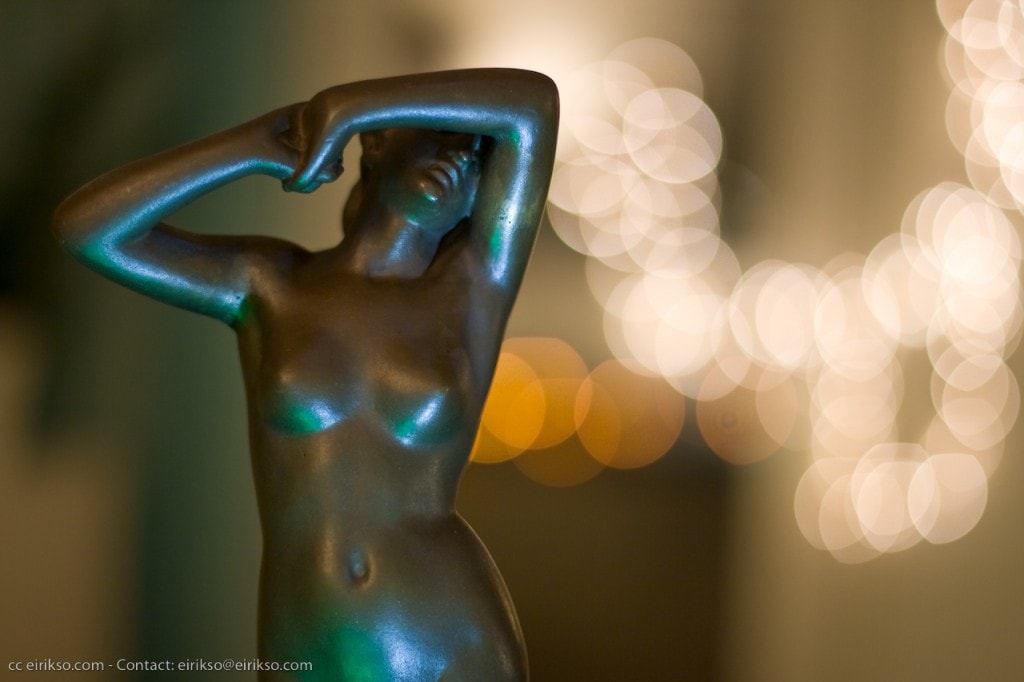
The bokeh effect is a photographic technique through which we focus well on the subject and leave the rest of the planes, both in front and behind the subject, out of focus. We see this effect in typical portrait photography where the subject is in sharp focus and sharp, while the background remains blurred.
Bokeh is a Japanese concept meaning blur.
What happens is that within this technique, those photos in which lights appear within the out-of-focus area tend to be called the bokeh effect. So, whenever you hear of bokeh, it's most likely a photo with a main subject in focus and blurry lights in the background.

Enough theory (although necessary). Let's get to practice. Do you want to make your first bokeh? Follow the instructions that I will give you below.
HOW TO TAKE PHOTOS WITH BOKEH EFFECT
Please follow the following recipe as "to the letter" as possible. The less you deviate from the original recipe, the easier it will be for you to achieve the effect in question.
INGREDIENTS TO ACHIEVE THE BOKEH EFFECT
- Camera, preferably a digital SLR ( here I will tell you about my favorites, in case you are still looking for one ).
- Lens with a large aperture diaphragm (I recommend the King of Lenses ).
- Tripod.
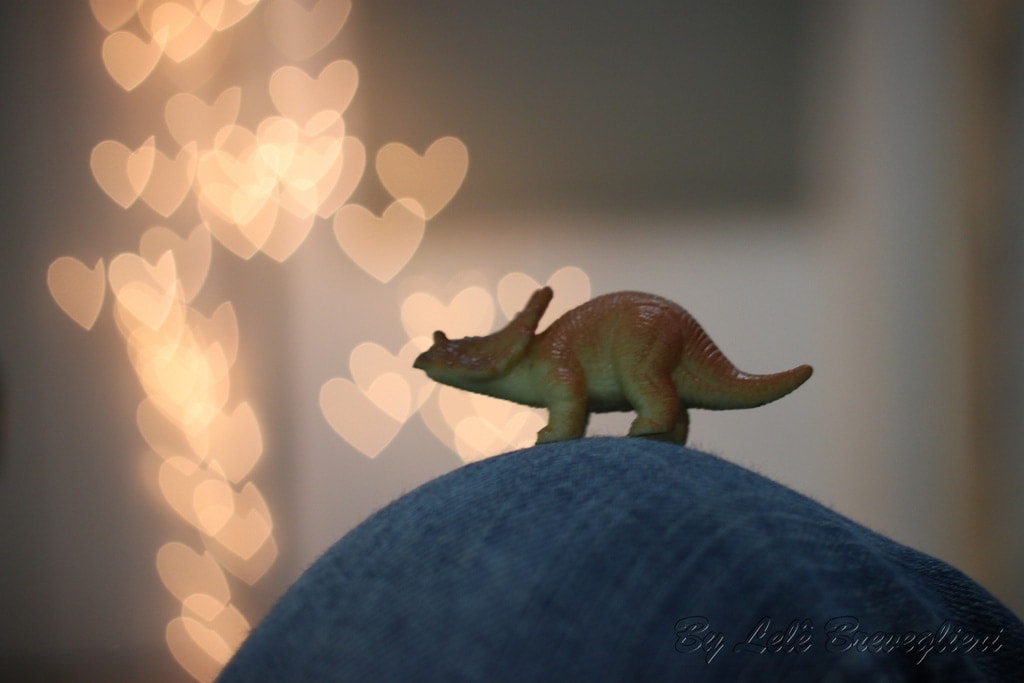
- Christmas tree lights (or similar), which will serve as the background.
- Teddy, doll, cup of tea, your pet, your little brother, or even the grandmother, who will act as the main subject.
- Sufficient physical space: It is convenient to do the exercise in a spacious living room or room, which will give you freedom to compose the photo to your liking.
- Dimly lit environment.
- You want to enjoy.

STEPS FOR THE ELABORATION OF A GOOD BOKEH
- To start place the lens on the camera. The trick is in the choice of the objective. The larger the aperture/diaphragm of the lens, the easier it will be for you to achieve the Bokeh effect. I use (and always recommend) a 50mm lens with an aperture of f/1.4. Basically the smaller this f/ value is, the better.
- On your SLR camera, select the Aperture Priority semi - manual mode from the mode dial (for Nikon it is “A” mode, for Canon and some other brands it is “Av” mode).
- Once in Aperture Priority mode, try to change the f/ value to as small a number as possible as I was saying before. If you work with the King of Objectives you can reach f/1.4 without problem.
- Place the camera on top of the tripod for some stability. Depending on the light conditions you have, you may run the risk of getting a blurred or blurry photo, hence the need to carry out the exercise with a tripod. Good, the camera is set up. Now you have to set the scene.
- Place the lights in the background. You can put them in the way you want, horizontal, vertical, hanging from a Christmas tree, on top of a sofa, or however you find it more practical.
- The subject. I have left it for last because if it is your grandmother she can get fed up while you prepare the scene and leave. Even if you were going to use a doll or a stuffed animal, it is best to leave it for last because that is how you place it depending on where and how you have the background lights on. Here it is convenient to follow the rule of thirds (which says that the subject must never be centered, but rather on one of the two sides of the frame, either a little to the right or to the left) so that the subject will be at one side and the lights on the opposite side. This way you make sure that the main subject does not cover them. You can also play creative games if you like, like the example of the lights that seem to come out of the cup.
- Now you go back to the camera, focus on the subject and shoot. Ready.
TRICKS WITH WHICH YOU CAN IMPROVE YOUR PHOTOS WITH BOKEH EFFECT
- Trick 1: If you don't have a large aperture lens like the f/1.4 I'm talking about, try to use any lens you have within your reach but with a long focal length, for example 200mm, 300mm or something like that. You will get a fairly similar effect, although not the same.
- Trick 2: In bokeh, one of the things that most often attracts attention are the colors of the lights, but... do you dare to make a bokeh in Black and White? Obviously you would shoot normally, in color, and later you would convert the photo to Black and White on the computer. Experiment it, it usually gives good and creative results.
- Trick 3: The more distance there is between the subject and the background lights (distance in depth) the more blurry the lights will be. So try to put the lights as far from the subject as possible.
- Trick 4: If you cut a card in the shape of a heart (or any other shape you like) and place it in front of the lens, you will make the lights acquire that same shape. Not the rest of the elements or subjects. Just the lights. Click here to see what I'm talking about .
WHY WE LOVE BOKEH?
For everything it conveys. Bokeh photos seem to contain a concentrate of feelings and emotions. The combination of dim light that surrounds this type of scene with the diffused lights in the background give photography a powerful magical effect that leaves us all spellbound. Definitely, if you are looking to transmit stories of tenderness or love, remember to introduce the bokeh technique in your photo, you will obtain a guaranteed result.
