

If you have been submerged in this exciting world of photography for some time , it is sadly possible that due to some mistake you have lost more than one image, accidentally deleting it when you looked at it on the computer screen, due to a bad import, because it has been damaged the computer, your memory card leaked or because you saved it who knows where... Anyway, unfortunately, a thousand things can happen to you even before taking a picture. And one thing is bad luck, and another is malpractice , against bad luck we can do little, but against forgetfulness we can fight (and a very clueless person tells you that he has almost, almost succeeded). Let's see how ?
WHAT IS A WORKFLOW?
We translate it as workflow , and it is all the ordered process that we must carry out in a general way whenever we work with our images. That is, from the moment you prepare to go out to take pictures until you save them in a definitive folder. A consistent workflow will streamline your work and ensure you don't lose your images along the way.
OBJECTIVES OF A WORKFLOW
By now you are still wondering why you should use a workflow. It is very simple, a workflow seeks to identify and mechanize the different steps necessary from the preparation of the material to the final editing of the images. A workflow can be applied to anything, it is not only applied to photography, it is constantly applied in companies (accounting, logistics, etc.) and seeks to simplify and mechanize the different processes to minimize the margin of error for those who carry them out. In this case you.
In short, a Workflow or workflow looks for:
- Mechanize and automate the different steps of the process
- Simplify the work process
- Establish control mechanisms to avoid and correct errors
WHERE DO I BEGIN?
One of the first things you should learn is that the workflow that works for little guy doesn't have to work for you. That is to say, a search on the network for workflows in Lightroom or Photoshop will not work for you without understanding that it not only applies to the way of working in these programs, but that it begins and ends at home, long before going out. take pictures and, above all, that each photographer has their needs and must find their own system and workflow.
The first thing you should do is separate and identify the different steps that involve taking pictures (before and after), for example:
- Preparation of the material before leaving: Checking (Checklist) charged batteries, empty memory cards, tripod, etc.
- Review of the camera settings prior to taking pictures (check that we are not working manually with old parameters), working in the format we want, white balance, etc.
- How to act when you get home: Charge the batteries, clean the lenses, store the material correctly, download the images, etc.
- Image editing : You can create a workflow within the general workflow when working with images. This is one of the trickiest parts of the process.
- Image storage : where, how and why. In what format, in what place, with what name. Where will the originals go, the edited ones, with what quality, etc. Ask yourself everything before you start and try to answer all these questions to avoid possible mistakes or that you have to work triple.
Here's a very basic (very, very simple) example of how you might start a workflow. From the general titles the different branches and steps would emerge (you have many templates in Microsoft Word or any similar program).
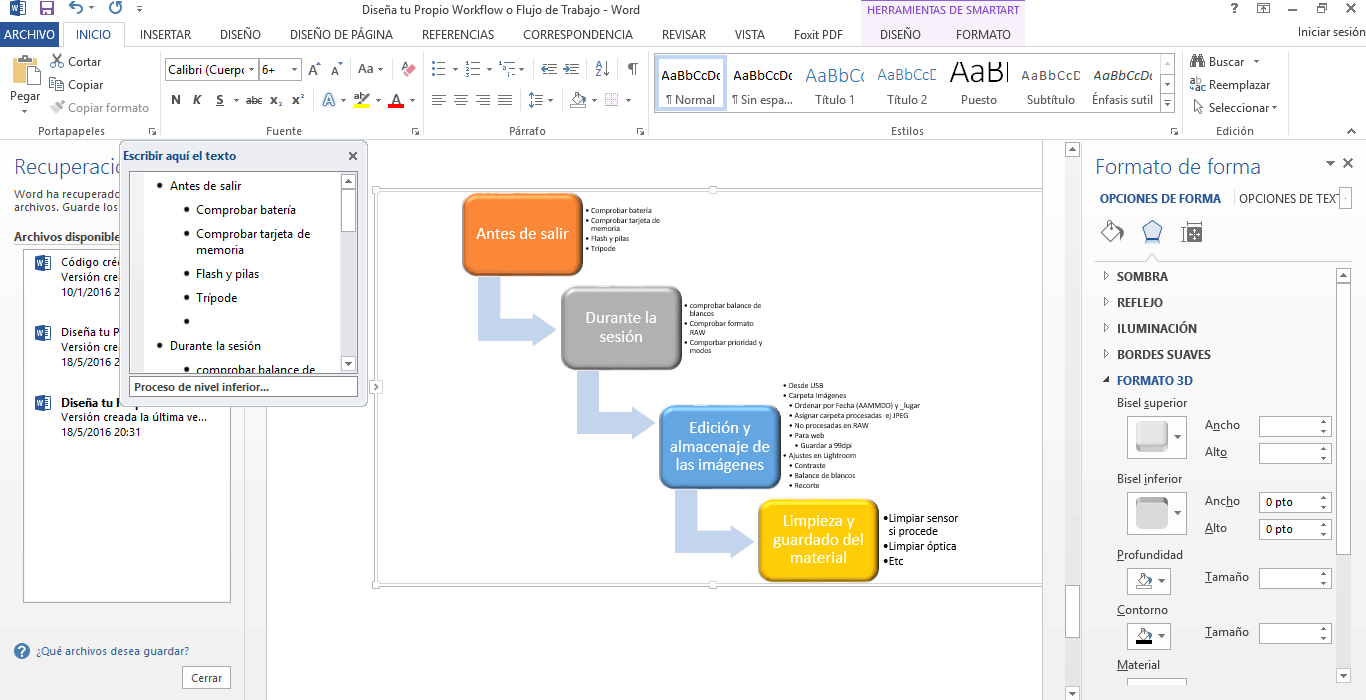
IMAGE EDITING AND STORAGE
This is, in my opinion, one of the most delicate parts of the whole process, so I am going to try to expand it a bit and give you some basic advice with which to start working. However, remember that each photographer must design their own workflow and what seems correct to me may be fatal for you ? For this reason I will limit myself to giving you some fairly basic general instructions and, based on them, you do, you undo and expand what you like ?
- Download the images : Define how and where you are going to do it. If you are going to download them directly to a folder, if you prefer to do it in your editor, use a program like Adobe Bridge to keep them organized, etc.
Depending on the use you are going to give to your images, you can have several folders or subfolders with the images in different formats and qualities . For example, a folder to upload photos to social networks, the internet or share, another with the originals, another with the final edited copies... To your liking, but you should always do it in a structured and orderly way.
-
- Familiarize yourself with your editor: Whichever editor you use, it is important that you are familiar with its functionalities, especially those that can be mechanized and make editing and archiving easier for you. My personal recommendation is that if you don't have much idea which one to choose and you can afford it, try Lightroom , which not only has a good storage system but is also an editor with all the settings that you may need as a photographer in general. .
- The order is essential , because a few images are easy to find, but when you start storing Gigs and Gigs of images here and there and you want to recover some, if you don't have them well ordered, it will be impossible for you. And between not finding anything and having definitely lost it, there is little difference ? For this you can create the folders that you see necessary, for example: Images->Travel->Rome->161022_Roma_0001.jpg or whatever suits you best, but it is a good idea to put a date and place at least, or what will later help you to find them easily.
- You should also consider where you are going to save the set of final images. On the computer, on an external hard drive, or on both? What will you do when they fill up? What will you do with the insurmountables? How will you organize? Asking yourself in the long run will save you a lot of trouble and work in the future.
Never automate the deletion of images after importing. Do it directly from the camera once you have verified that the import has been done correctly. This will prevent you from running out of all the images if an error occurs with the import. (This is a mistake I learned firsthand ? ).
- Have a plan B handy . A workflow must also include the solution to possible errors that do not directly depend on the process (what to do when faced with a damaged memory card , if the import is stopped halfway, if the computer stops working, etc.). Many times our nerves play tricks on us and we touch things that we shouldn't or crush something that we could have saved with some planning ? .
BACKUPS
Another classic, because nothing ever happens until it happens. Because it never seems to you that your computer can fail until it fails. Having at least one extra copy of each image in a safe place will save you drama many times without solution.
Likewise, I recommend that you invest in at least one external hard drive to store them on. The most puritanical will have at least two, in case one fails, you always have the other. Or one for the original images and another for the edited ones, as you see ?
ALSO MAKE COPIES ON PAPER
It is a bit archaic in this super digital age that we have had to live in, but let's not fool ourselves, unless there is a fire, paper does not fail. Making albums is a good idea, it forces you to select the images, to edit them and it's a way to give them a bit of life, and to show them to your friends or family without killing them with boredom ?
PUT IT ALL IN WRITING
Don't think you're going to memorize the steps the first time. Write down everything, even what seems most obvious to you, make a concise and orderly outline and follow it step by step until you have mechanized it.
- Feel free to customize, change the initial process. One thing is theory and another is practice, and in many cases you only learn and improve through mistakes.

How about? Do you dare to create your own workflow? Personally, I think it's worth the small initial effort and it saves you a lot of time and mistakes in the future because, even if it doesn't seem like it, 90% of the mistakes we attribute to bad luck are actually a bit our fault ? and we could have avoided them with some prevention.
If you found it useful and/or interesting, share it so that more people can benefit from the information. Thank you very much and until next time ?
