
Have you always wanted to take a picture like this, but did you think it was extremely difficult? Well, I'm sorry to tell you that you were in error ... In this tutorial I explain the steps so you can do the test at home and see that it is not so complicated. It only takes a little patience, time and some materials. You dare?
MATERIALS
- Tripod.
- Black fabric.Make it matt, without glare, so that it does not reflect the flash light.
- Incense sticks (they could also be cigarettes, but they are less healthy and smell worse ...). You can hold them with a sand container or similar or an incense holder.
- External flash
HOW TO PREPARE YOUR HOMEMADE "MINI STUDIO"
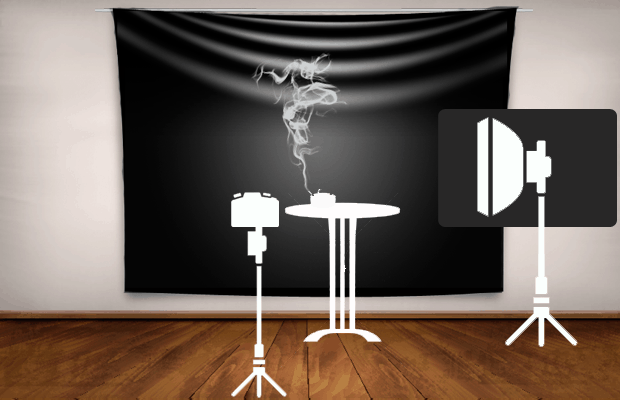
Place the black cloth as a background and in front of it the tripod with your camera, if possible, with a macro lens. If you don't have a macro, try the one you have, you can also get it. The flash you have to place it aside, forming 90º with the camera, so that it does not illuminate the background, in addition, it will be much better, to prevent it from reflecting on the fabric, place the black cardboard between the fabric and the external flash. Between the bottom and the camera, obviously, place your smoke source. In case I have not explained myself well, here is a scheme for you to see better:TECHNICAL ASPECTS
Ideally, a manual approach , so I advise you to use the tripod. The tripod is fixed and, if you don't move the wand, the focus will be for different shots. If you prefer autofocus, a trick is to bring an object closer to the smoke line and focus, so it will be easier for you. (Eye, remove the object before firing! ) And one tip: if you use a remote shutter, you will avoid any camera shake. You must set the ISO as low as possible and the mode in opening priority.Ideally, between (f / 8 and f / 11), but do several tests to check if the exposure is adequate or not and readjust the parameters until you get the desired effect. If you look at the histogram, in these cases the image should be in the black zone (the left part). And be careful not to burn the smoke so that it does not lose volume. Avoid having currents in the room, otherwise it will be very difficult to control the focus. If the smoke pattern is very static or linear, you better wave your hand nearby to remove it or blow on it. Once you manage to adjust the parameters you can give the smoke a glass and shoot as many times as you want to capture infinite shapes, no image will be the same as the previous one. Of course, be careful that you will not be hypnotized by the smoke dance ...IMAGE PROCESSING
What do you want to be more creative and achieve an image similar to this? Do not panic, you do not have to change the fabric or darken the smoke, it is much easier, you just need to process the image with the image editor. Go to Image> Adjustments> Invert You will get a result similar to this, with the smoke of a reddish or brown tone. Now go to Layer> New Adjustment Layer> Gradient Map and select "Black, White" in the gradient editor. In this way you will get the image like the one above Harle, with the black smoke. But you can continue to be more creative and color the smoke. Click on the black color control in the lower left of the gradient scale and choose a purple (or whichever you prefer) to change the color. From here, let your imagination fly and color the smoke as you wish. You can use a solid or gradient layer by selecting the Color or Tone blending mode. You can also paint with colored brushes on the smoke working on a layer in Color mode. But you already have your smoke! Do you want to show us? You know that the theory is forgotten, but the practice is not, so I hope that if not today, in the next few days, you will release your camera and light an incense. You've already seen that it doesn't seem so difficult, right? If you have found this tutorial useful, I invite you to share it, as some of your contacts may also be useful. Thanks a million for reading here and see you next time!