
![EVERYTHING YOU NEED TO KNOW ABOUT FLASH FOR PORTRAIT PHOTOGRAPHY [UPDATED]](https://photographychef.com/wp-content/uploads/2023/02/EVERYTHING-YOU-NEED-TO-KNOW-ABOUT-FLASH-FOR-PORTRAIT-PHOTOGRAPHY-UPDATED.jpg)
Mario's note: If you are interested in portrait photography, the article is mandatory reading: Vicente Nadal in it explains the different forms of lighting and types of flash to get the most out of your portrait session.
Do you want to make good portraits ? Read the article, come on.
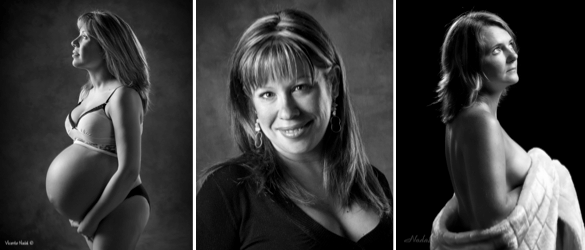
CLASSIC SOFT LIGHTING
As a general rule to photograph portraits we will need a soft light and that it is somewhat far from us and somewhat above. Direct camera flash will always be the worst option. The best results will be obtained if we put an external flash located some distance to the right or left of our model and slightly higher than his head. We can also bounce the flashes to the ceiling indoors to create a diffuser effect. In this case it is very important to take into account the color of the walls and the ceiling because they will tint the photos with their color.

DRAMATIC AND CONTRAST LIGHTING
The light can come from almost where we want, even from behind and from above, creativity has no limits. The further back, and higher, the more contrast we generate.
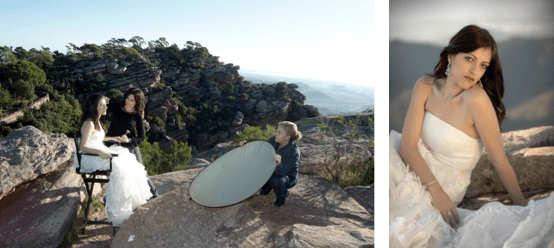
DAY LIGHTING WITH FLASH OR REFLECTORS
Outdoors during the day we can use the flash or another reflective surface to soften the shadows and fill them in. To improve the softness of the flash (whether day or night) we can bounce it against a large white surface, a cardboard, a large piece of porex or even an umbrella (what I normally use). There are reflective discs of different diameters and shades for this effect. Then we will see more accessories in this regard.
DIY, ACCESSORIES AND ACCESSORIES
There are intermediate situations such as when we cannot separate the flash from the camera or we do not have a shoe flash that has a tilting head. In these cases we will have to use ingenuity to soften and direct the light. We are going to see some situations and what actions we can do as well as some accessories that can come in handy, I hope I don't miss anyone ?
COMPACT CAMERAS AND PHONES – DIY
The simplest case of flash lighting is when we take photos with our compact camera or with our phone. In this case we have a very small light source, almost punctual, and that is very close to the objective. On phones both lens and flash elements are touching normally.
This is the worst scenario that we can have because the light that it offers us is totally frontal and punctual. This will give us portraits with harsh and rather unaesthetic shadows.
Can we fix it or improve the result? Yes, of course you can, with a little ingenuity almost anything can be achieved... even if your friends look at you like a weirdo.
Since we cannot separate the flash and move it away from the lens, we will have to settle for softening the light. The simplest method is to put in front of the flash any translucent surface, such as parchment paper, a few centimeters from our flash.
You have to be careful because the less light passes through, the more problems we will have to illuminate our portrait.
A DIY hack could be the following:
- Take an ordinary plastic cup.
- At the base, make a window through which the flash of your camera will just peek. Be careful to make the window so that it doesn't obscure the target's field of view.
- With an elastic or adhesive tape fix some translucent material.
- Do some tests. You'll probably have to do some sort of adjustment.
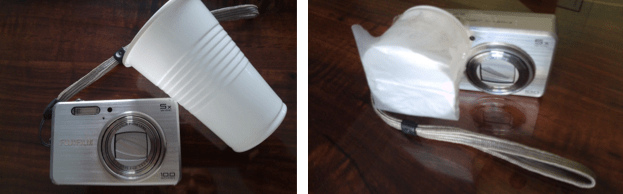
In short, any translucent element that stands between the flash and our portrait will cause a softer light... if only a little.
As you can see, a compact camera or a phone are not the ideal means to take a portrait with flash, but that does not mean that you cannot try it and have fun while doing it.
SLR CAMERAS AND BRIDGE CAMERAS – COMPLEMENTS AND ACCESSORIES
On these cameras the flash is usually the retractable type, which rises a few inches when activated. Even so, it is still a very small source of light and too close to the target.
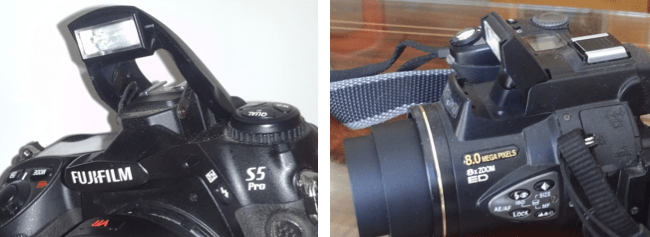
Here we could also place a piece of cellophane or parchment paper held with tape to soften the light.
On SLR cameras and some bridge cameras you can turn off the flash pre-flashes (usually manual) and make it flash just once at the time of the shot.
With this setting we could use a photocell to remotely trigger another flash at the same time ours is activated. There are photocells that incorporate a shoe to connect the slave flash. If this is not the case, we will need this second flash to have the option of connecting by syncro cable as well as by hot shoe. Another option would be to have an accessory shoe with a sync cable.
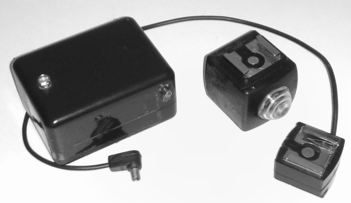
This second flash can even be the main one or fill it in for the background or to reinforce side lighting.
There are flash units that can behave as slaves and that react to the firing of another of the same family: external flashes from Canon and Nikon brands can be slaved to the flashes that these cameras have integrated into their SLR models. So we can create a small portable studio without having to invest a lot of money.
Right photo: Slave flash on travel tripod. You can see the sync cable plugged into its socket. We also see the translucent plastic diffuser that comes standard to soften the light. Its effect is greater if we raise the head of the flash.
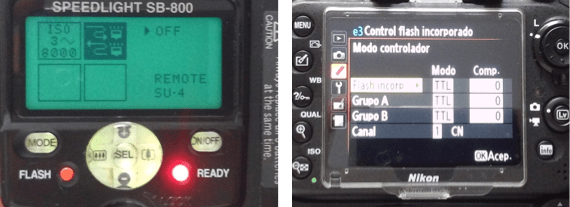
The Nikon SB800 flash can be Master or Slave. On the right the Nikon D600 configuration screen to communicate with other Nikon flashes. From here you can control the power, the firing mode and the communication channel.
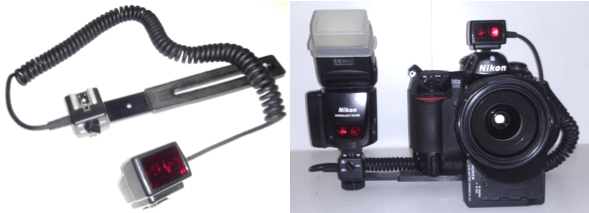
A fairly cheap and little-known accessory is a spiral TTL sync cable that is placed on the flash shoe and at the other end has another shoe for our flash. This cable allows us a multitude of options, from mounting the flash on a strip next to the camera but further away or holding it with your hand moving it away (an assistant can do it) while you take the photo. Being TTL, it transmits all the information from the camera to the flash and vice versa.
But for me the king of accessories is the radio receiver for flash. With this accessory you can control several flashes at the same time and decide which one is fired.
The emitter is connected to the camera's hot shoe or X contact and emits a radio signal to activate the other flashes. The advantage of using the radio is that it is not affected by the pre-flashes that our camera does to measure the TTL light, being able to combine the use of a mounted TTL flash and other external ones in manual. Currently there are radio equipment with TTL but with a considerably higher price.
In fashion photography, photos are usually taken with ring-shaped flashes. These have the advantage of giving a very uniform light in all directions without any shadows. There are accessories that allow our hot shoe flash to soften its light by creating a window (called a softbox) around it or even mimic a ring flash.
Although these accessories are not cheap, you usually always have the possibility of finding tutorials on the internetto create similar effects.
To finish, I would like to leave you with a very interesting video that explains with live examples some of the most common schemes for lighting a portrait:
As always, I hope you enjoyed this read. Feel free to share this article if you think others might find it useful.
