

This is an article by guest author Javier Rosano in which he tells you in detail, and through a practical case study, how to take a panoramic view of the Milky Way. But before I leave you with it, as I see that you like night photography, you will surely love this mega guide that we have prepared for you with tips, tricks and a lot of inspiration. And now yes, I leave you with Javier.
When visiting a historic site (still standing or in a state of ruin), I've always loved imagining what life was like there in its heyday. Through night photography I find a way to achieve it, to travel in time; forgetting about the human alteration in the environment (thanks to the darkness) and bringing those forgotten places back to life through the use of light. A way to remember the reason why they were built and contemplate the same sky that could be observed at that time, connecting in some way with that period.
Although I love to photograph, I also like to explain what is behind each photograph, so that everyone who is interested can learn. For that I have a website where I share all my images and describe in detail how they were made.
WHAT DO YOU NEED
I want to share with you how I took this panoramic photograph with the milky way, from the planning, the night out and the subsequent processing. It is not intended to be a complex guide for panoramic night photography. Rather, it is designed so that, with a minimum knowledge and a little experience in night photography, you can start taking your first panoramas.
In addition, to carry it out, you do not need any additional material that you may need to take any night photography. In this way, you will only need a camera with manual mode, a wide lens, a tripod, flashlight and flash. The equipment that I used was a full frame camera and a bright wide angle lens , with a focal length of 14 mm and f/2.8. But you can do it with a different team and you will get similar results.
PLANNING
As I'm sure you already know (and if I don't tell you), planning is an essential part of night photography. Thanks to it, you make sure that the external factors (weather, position of the different elements in the sky, phase of the moon, etc.) are adequate.
To take this panoramic photograph, several circumstances had to occur:
- Moonless night (so that the darkness of the sky was maximum and the milky way was seen with the maximum possible detail)
- Visible galactic center (the most characteristic area of the road for having a high degree of detail)
- Proper position of the Milky Way, both by orientation and by height in the sky
Although it seems very difficult to find out when everything happens at the same time, thanks to the different applications available, both for mobile and for computers, it is very easy to find the right day. The Photographer's Ephemeris, photo pillsand Plan It!for photographers are the ones I use the most.
PANORAMIC CAPTURE OF THE MILKY WAY
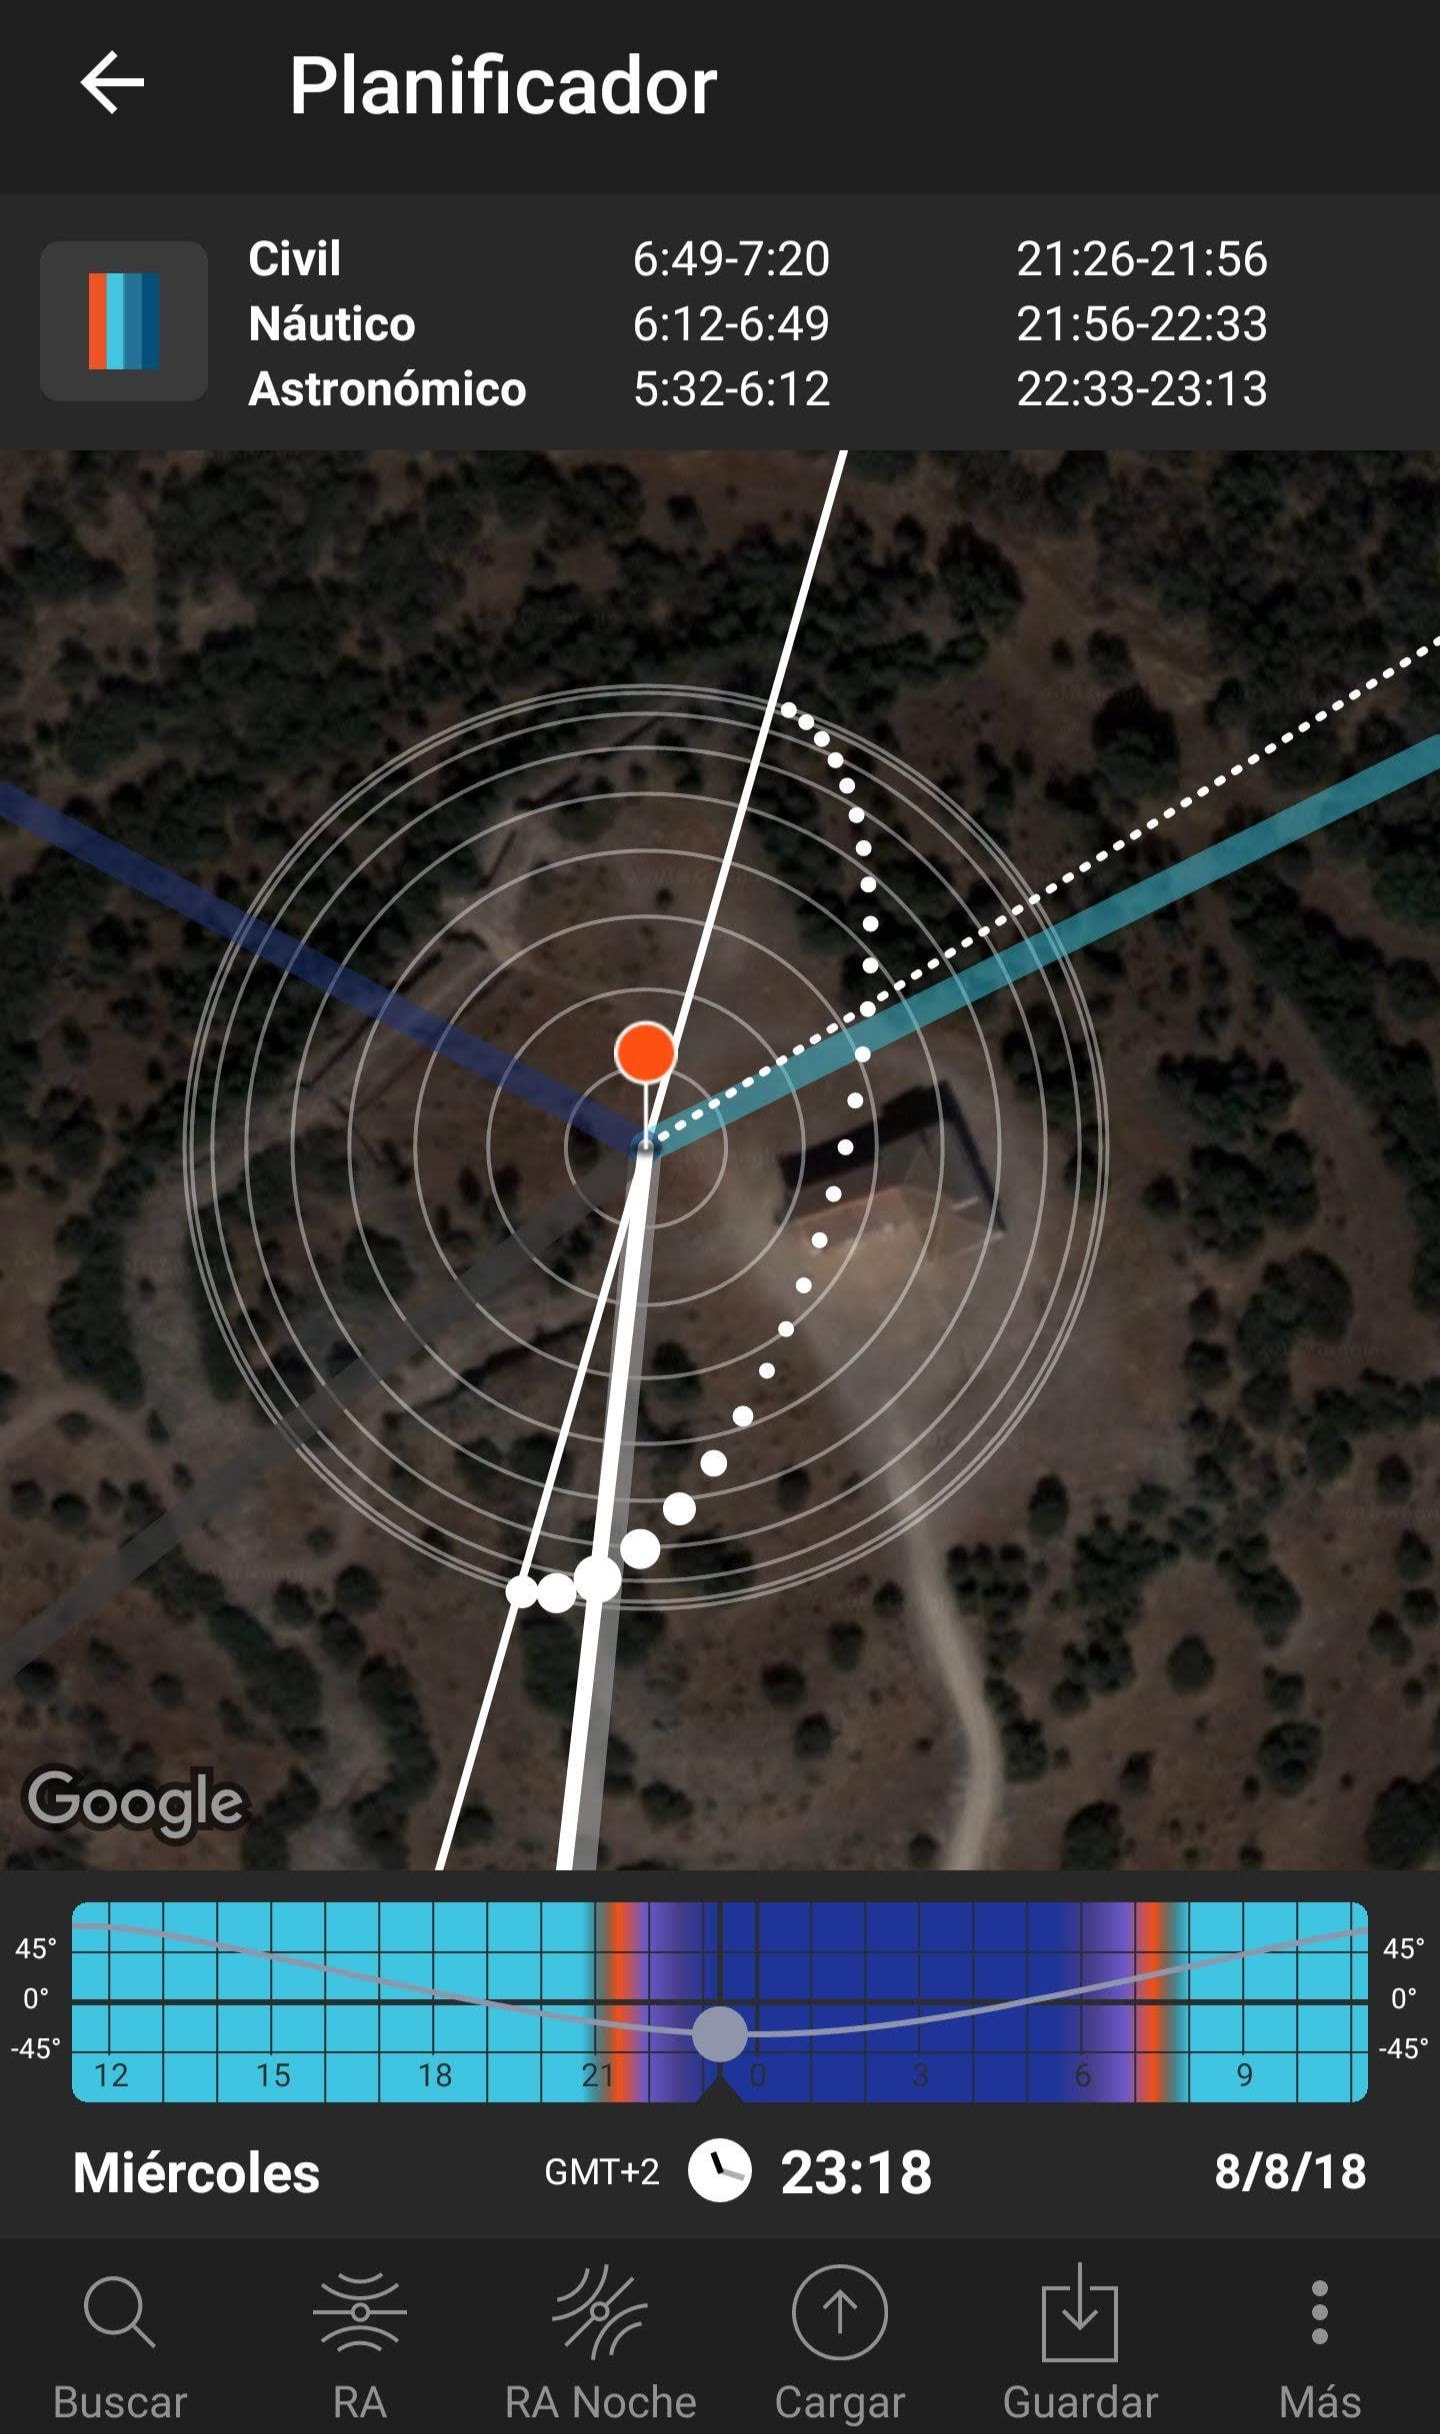
Once the day and time have been chosen, it is time to go to the location. As always, I went with some time in advance to be able to detect any danger, as well as to find the best place to put the tripod, both in orientation with respect to the church and in distance from it.
THE FRAMING
A position close to the hermitage would have made it increase in size in the frame. But the track would have been very high, separating a lot from the horizon. On the contrary, if I had been further away from the church, the path would have been lower, but the size of the hermitage would be very small compared to the rest of the elements.
To finish fine- tuning the framing, I tried to keep the hermitage in the center of the arch that the route was going to draw. To achieve this, I used the different applications for the computer or mobile that I have mentioned previously, through which I could see where the Milky Way would intersect with the horizon. For example, there are applications that have the option of augmented reality, which superimposes the information from the sky at a certain moment on what you see through the camera.
PLACE THE TRIPOD
Before starting to photograph, if your head only allows you to modify the panning (movement on its own axis, right-left and left-right), there is a very important detail that can ruin the final result: check that the base of the kneecap is completely horizontal. Otherwise, the final photo will not be level and you will have to crop it to correctly position the horizon, thus losing part of the photo. If your head doesn't have the pan option, you'll need to make sure that all photos are perfectly level and that the horizon is always at the same height. Use visual references with the previous photographs to verify that you do not raise or lower the frame.
Regarding the framing, a horizontal format would have allowed us to reduce the number of photographs to be taken on each side of the church, but it would have forced me to take two rows to be able to correctly capture both the ground in the foreground (bottom row of the panorama) as the full arc of the Milky Way (top row). Thanks to the 14mm focal length of my lens, and to the location chosen for the tripod as I mentioned before, with a vertical framing I needed a single row of photographs.
Found the point where to put the tripod, all that remained was to wait for nightfall. After astronomical nightfall, darkness is maximum, so the Milky Way would stand out more in the sky.
LIGHTNING
To take advantage of the time until the astronomical nightfall arrived, I began to do the lighting tests. In this case it was not going to be very complex, since my intention was to bring light to the main façade of the hermitage, as well as to create the projection of light from inside the church. Although the rest of the scene would be left unlit, the light pollution in the area assured me that the shadows would have some information.
When the astronomical nightfall arrived, I began with the definitive photograph, beginning with the central part, where the hermitage would be located. For that first photograph (photo 1 in the montage indicated below) I used a warm LED flashlight to illuminate the main façade from the front. Thus the only shadow areas would be the side walls, creating volume but without having hard shadows on the front wall. Also, and with a flash with CTO gel (orange) from inside the hermitage, I illuminated the interior arch and projected the beam outwards.
SETTINGS
The camera settings for this shot, and which would be maintained for the rest, were 14mm, f/2.8, 30 seconds, ISO 6400, white balance (WB) 3050 and, of course, RAW. It is important to work manually so that the parameters do not change during the capture of the following photographs, so that the final result is homogeneous.
THE DIFFERENT SHOTS TO OVERLAP
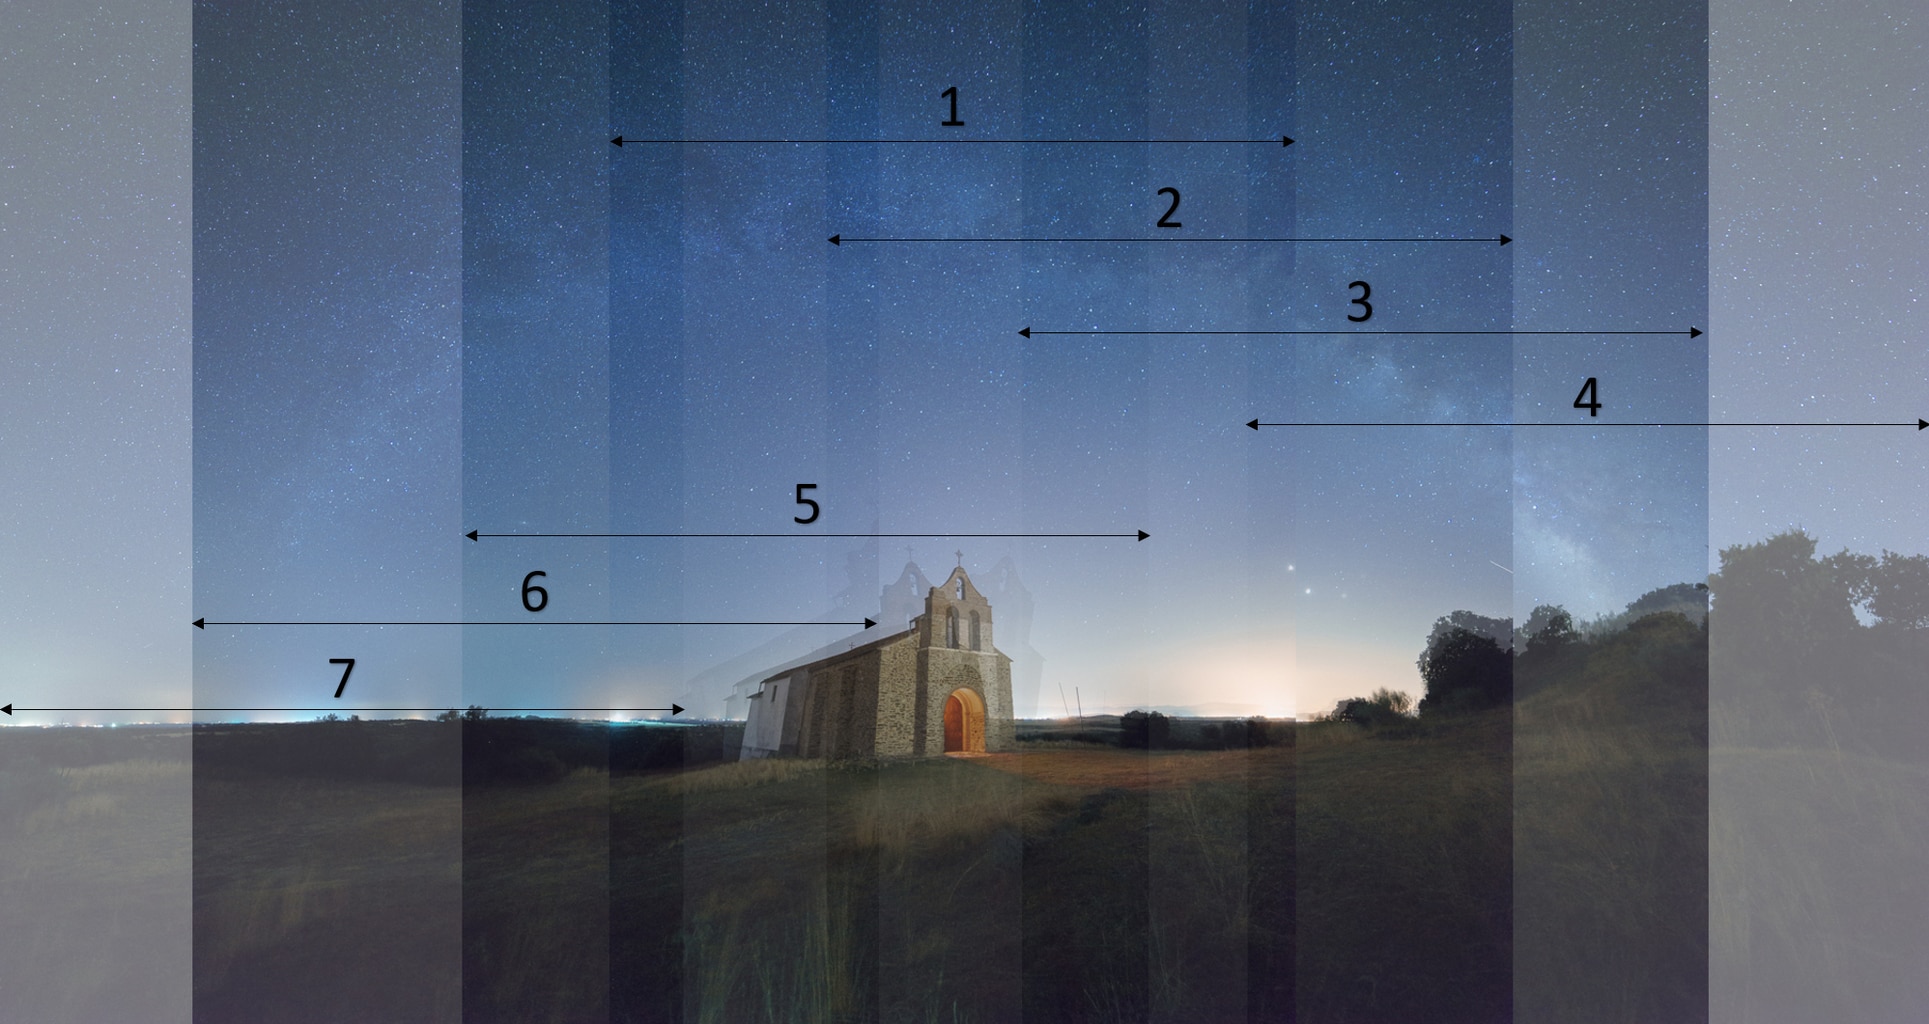
Once the central photograph was finished (thanks to the tests carried out before the astronomical nightfall it did not take me long), the turn of the rest of the shots that would make up the panorama began. Starting to the right and overlapping about half the frame with the previous photo, I needed to take up to three more photos to fully capture the right half of the Milky Way (photos 2, 3 and 4). In addition, a space had to be left between the cut of the road with the horizon and the edge of the image, so that the composition would not be too tight on the sides. Finally, and again overlapping half of the central photograph, I repeated the same process for the left side of the road (photos 5, 6 and 7).
In the following image you can see the superposition of the seven photographs that will later make up the panorama. Each of them has an opacity of 65%, so that the overlap between them can be appreciated. As you can see, there are several stripes (the darkest ones) in which up to four photographs overlap.
HOW MANY PICTURES TO TAKE?
The amount of overlap between photographs is always a balance between ensuring the final result and the time you want to spend on each panorama in the field. If the overlap is high, you can even not use any of the photographs if, when viewing it at home, you don't like the result (because of a plane passing by, accidental lighting of the scene, etc.). If the overlap is small, the software that will join the images may have a harder time finding the common points or may not be able to perform the join at all.
For example, using photos 1, 4 and 7 (the central one and the extreme ones), the software is not able to find common points despite the fact that there is a small overlap, as can be seen in the following image. In addition, the deformation caused by the use of a wide angle makes joining work difficult. As can be seen, the track exits from the upper edge in the photographs at the ends (4 and 7), instead of from the side.
INDICTED
Once home, the processing work began. With Lightroom he developed the seven RAW files, applying sharpening, noise reduction, lens profile corrections and, in this case, slight white balance adjustments, looking to cool it down a bit more. The above two images are made up of the files already exported from the developer. I didn't do much processing in Lightroom, leaving it for later work in Photoshop once the panorama was stitched together.
The next step was to use a panorama creation program to stitch the different shots. The best known are Lightroom itself or PTGui. If the overlapping of the photographs is adequate, this phase should not pose any problem.
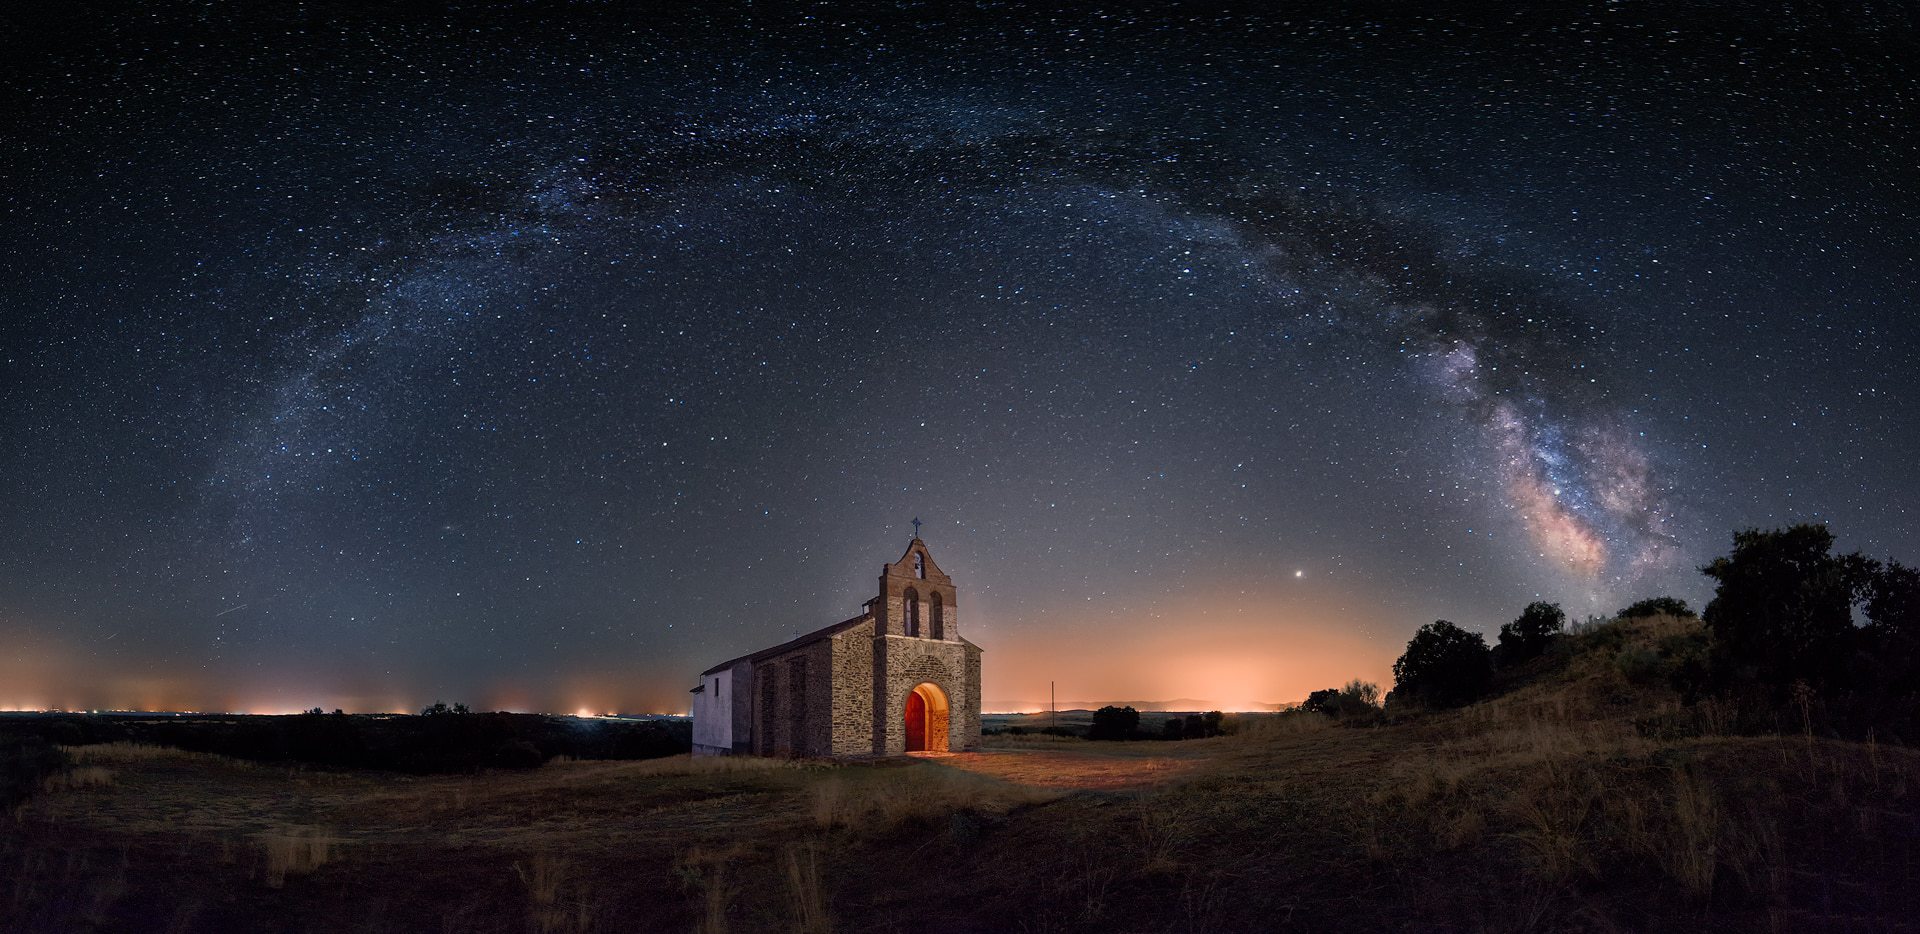
With the panorama of the Milky Way already assembled, it was time to process it in Photoshop. This is the most subjective part of everything described, so it will depend both on how far you want to go (higher or lower degree of processing), and on your personal preferences (night aspect, white balance, contrast, saturation, etc.) . I applied the same workflow that I use for non-panoramic night photography. Mainly getting more detail of the milky way, applying levels to give it a more nocturnal look and bringing out some detail in the shadows.
This is an article by Javier Rosano, who has been a fan of photography for twenty years. Although he started with the landscape (a field that he has not abandoned and with which he continues to enjoy), what really hooked him was night photography. After several courses and some frustrating first outings, he managed to capture his ideas in the photographs. Now he is dedicated to helping people get control of night photography, giving courses, private workshops and doing supervised outings. You can follow him on his website and on Facebook.
If you also want to participate as a guest author, click here.
Did you like the article? Thank Javier for his advice by sharing the article on your favorite social network so that others can also enjoy his recommendations and experience. Thank you and see you soon!
