HOW TO GET STUNNING PHOTOGRAPHS WITH NATURAL LIGHT
HOW TO GET STUNNING PHOTOGRAPHS WITH NATURAL LIGHT
In this blog we have talked on many occasions about the importance of flash, how to improve your photos with this tool and the need to use it in studio and especially at a professional level. However, there is another much more powerful, eternal or ephemeral tool, depending on what terms speak, but equally powerful: the natural light. Sometimes we focus too much on image quality, sharpness, etc ... and forget that natural light offers wonderful results if we can play with it. Yes, it's true, sometimes you don't have this light and you have no choice but to use the flash ... But what if you can have it? Would you know how to use it to get stunning photographs? Keep reading and you will learn a lot of tricks to control something as beautiful as sunlight.
FOUR ASPECTS ABOUT LIGHT
The first and most important thing is that you know the four most important aspects of light and that you learn to handle them to obtain the best results or at least the desired results.
A) Direction: the light can be front, side, zenith or rear. Let's see them one by one.
Front light: if you place the subject in front of the light source (such as a window) and you stand between them, the subject (or object) to be photographed will receive the headlight. You will get an image without textures but in return you will be able to capture more details.
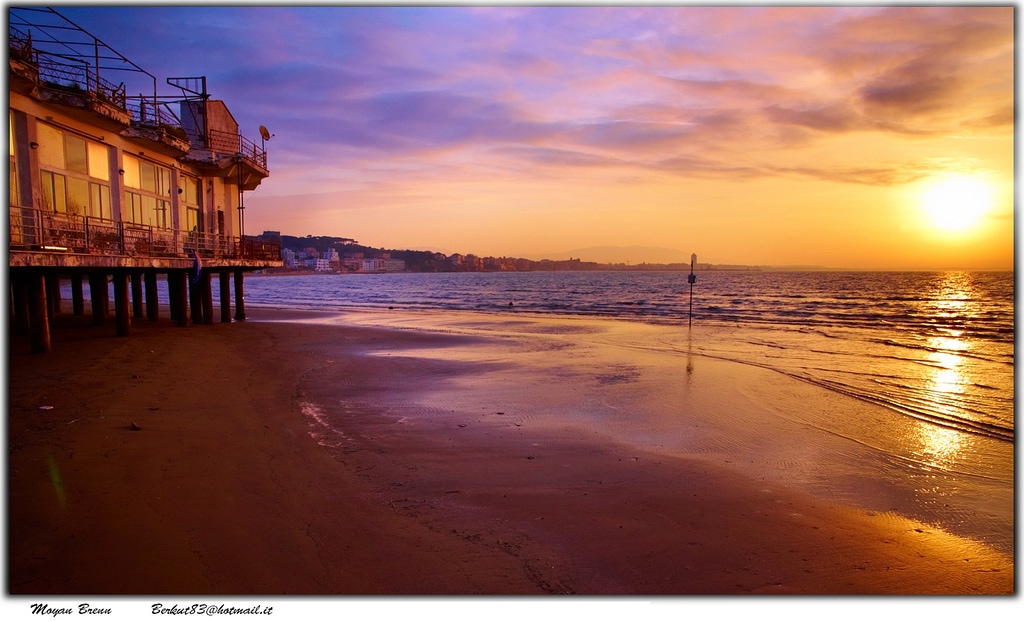
Side light: the subject receives the light from the side, so you can increase the volume and highlight textures.
Rear light: when the subject is between the light source and you, you can achieve silhouettes and other effects such as an aura around the figures you are photographing.
Aerial light: this type of lighting is what comes from above. It can help you achieve different effects, although in portraits it causes unflattering shadows. Hey, a trick : if you put yourself at a height higher than the subject and make him look up, you will get a headlight from a much more attractive perspective.
Types of LightThis photograph, despite being taken with a smartphone, is a clear example of overhead lightB) Intensity: there are two factors to consider, the first one is to check if there is the light necessary to set the aperture of the diaphragm and the firing speed that we want. The second, does this light give us the environment we are looking for for our photography? You should know that you can play with the intensity of the light you have and modulate it according to your wishes. Here are some tips :if you are indoors, you can zoom in or out on the subject depending on the amount of light that suits you, you can also put a white and smooth curtain on the window or door, or use tissue paper or any Another diffuser Outdoors, look for shadows or objects that can reduce the excess light that bothers you or, on the contrary, use reflectors as filler when necessary.
C) Quality: on many occasions the amount of light is not as important as the quality of it. And this is measured according to your preferences, what you expect from that image. There are two types of lights: soft or hard . Hard light is what causes high contrasts and well-defined shadows. It brings more drama to the scene. Soft light, on the other hand, achieves much more blurred shadows.
Soft light exampleExample of lateral light, finalist of the weekly «Miradas» challenge of Ruben and SilviaD) Temperature: most likely, you already know what I mean, if not, don't worry, I'll explain it to you. Temperature refers to the color that predominates in an image over the rest (said in a very short way). If an image has a more reddish or orange temperature, it will transmit warmth, unlike if the color temperature tends to blue that causes us a cooler sensation.
How can you control this factor? Well, in two very simple ways, one with white balanceof your camera, another taking advantage of the light of the first or last hours of the day, or the hours of the middle. The sunset and sunrise offer us more orange, pink or golden lights, while at the end of the morning or first afternoon, we get the opposite result. Another trick is to use filters , color diffusers or reflectors .
TIPS AND TRICKS TO MASTER NATURAL LIGHT
If you master these four aspects that I just mentioned ... you're almost an expert! Anyway, here are some tricks and tips so you can get such impressive pictures without resorting to flash or other artificial lights:
1. If you are in an interior place, look for a window !!! : who says window, says skylight, door, or any element that allows outside light to pass through.
Outside light coming from a window
2. Play with the shadows of the window: sometimes blinds or other elements can create very attractive shadows.
Shadows caused by light coming from a window
3. Study the light: if you know how light behaves in a certain space, it will help you know what the perfect moment is to get the image you want.
4. Plan your activity based on the light: we have already commented that the light changes throughout the day. Think about the effect you want to obtain and organize your agenda for your session at the ideal time.
5. Get the necessary material: filters, diffusers, reflectors ... Do not use artificial light does not mean you can not use these accessories
6. Shoot in RAW mode: it will be easier to make the necessary adjustments on your computer, if you do not know what I mean read this .
7.Photography from different angles: in this way you can check the effects of light on your subject and choose which one you like best. ( A trick to photograph babies: use a pouf or cushion and you can move it without knowing it!).
8. Increase the ISO: if the light is insufficient you can raise the ISO value of your camera, but remember, the higher the ISO, the more noise your image will have.
9. Greater aperture of diaphragm: do not forget that the larger the opening, the more light will enter.
10. Use a tripod: if the object is static or you can get the subject to be, the shutter speed decreases, for that you will need a tripod that prevents the photo from being shaken (that is, moved).Here is a selection of tripods that Mario recommends .
Try to implement all these tips and you will see the excellent results that natural light can offer. Believe me, its beauty is nothing comparable to that of the flash.
To say goodbye, I leave you with some examples. I hope you found it useful! At the end of the article there is a button to vote / recommend it on Facebook, Twitter and Google+, in case you liked it.