HOW TO JOIN (VERY EASY) YOUR NEXT OVERVIEW IN LIGHTROOM
HOW TO JOIN (VERY EASY) YOUR NEXT OVERVIEW IN LIGHTROOM
Before I start talking to you about panoramic photography or Lightroom, I will explain something about Lightroom, in case you identify with me. I do not know if it will be your case, but I think that many amateur photographers when we started we came up and we want to start building the house from the roof.
When I started to take an interest in photography, this blog didn't exist, blogs didn't even exist ... And that's why I didn't have anyone to tell me four things to avoid wasting my time and money. There are few frustrations I've had throughout my photographic journey ...
And I started buying the most expensive camera that I could buy at that time to ... tachááááán use it in automatic mode . Then I continued using Photoshop, I didn't even want to hear about Lightroom, I wanted the best of the best and it seemed to me that Lightroom wasn't going to live up to my demands.
As you know, I was wrong. Lightroom is one of the best discoveries I've made as a photographer. It is complete, simple, goes to the point and has become an indispensable tool for me. Photoshop I have not reopened more than on a few occasions.
Not only that, but every time it incorporates bigger and better applications. One of my latest discoveries is the possibility of using it to perform the famous stitching in panoramic photography or, what is the same, gather several photos to get a panoramic format .
And, as the main objective of this blog is to share among all our knowledge to make our lives easier and more enjoyable, today I come to explain how to take a panoramic picture with Lightroom. You fancy? Well, let's see it.
SOME BASIC NOTES ON PANORAMIC PHOTOGRAPHY
We have a complete and magnificent detailed guide on how to take a panoramic photograph , so I will not extend too much on this subject, I only give you some basic tips as a reminder to take them into account before launching to get your wonderful panoramic image.
You will need a tripod.
Find a landscape that seduces you.
A focal length of 35 or 50mm would be ideal and, if you don't have it, with whatever you have :-).
If you are going to add a human element , be very still;).
Frame vertically, so you will get an image with fewer aberrations.
Use a diaphragm aperture sufficient to have a good depth of field.
Although the ideal is to use the hyperfocal .
Edit all images with the same settings (in Lightroom you can copy and paste settings from one photo to another easily).
It works in manual mode, both exposure, white balance or focus. This way you will not vary the parameters of taking one photo to another.
Try to overlap by approximately 30%. What is left over, will be eliminated by Lightroom;).
Check out these tips for an impressive panoramic photo :).
STEPS TO JOIN A PANORAMIC PHOTOGRAPH IN LIGHTROOM
It's so easy that you'll fall at the feet of Lightroom;).
The first thing we are going to do is select the images that will be part of our panorama. Ideally, all images share the same editing settings.
For this, it is best, once selected, that you edit one of them and when you are satisfied with the results, copy and paste those settings to the rest (as they are few I think it is a good option).
I haven't said it before, but all these settings are in the Develop module. I assume that you know him, but if you doubt the development, take a look at this article beforehand .
Once you have all the photos with the same settings, select them all in the lower carousel:
Then go to Photography -> Combination of photos–> Panorama
Once the Panorama option is selected , the following screen will appear, where you will see that Lightroom has already performed stitching or joining images:
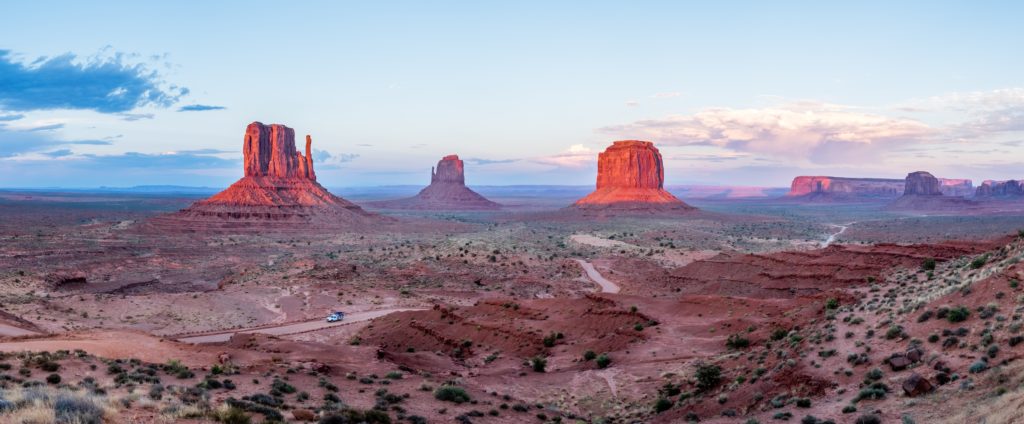
As you can see, some areas of the image are lost. That is because it is not a great panorama; the terrain was irregular, the light quite bad, etc., but since the purpose was simply to illustrate the article a little, I expected you to be benevolent with the result;).
On this screen you have several settings options:
The type of projection: spherical, cylindrical or perspective.
Automatic trimming: if you want Lightroom to eliminate the blank areas of the image automatically (you can click no and do it manually if you prefer).
Automatic adjustments: Lightroom adds some basic adjustments to improve the image at your discretion.
This would be the result of the union of my five photographs:
How about? Easier simple, right? And if you dare to practice it? You can keep a very cool image to hang on the sofa, or the headboard of your bed, or in the hallway ... you know how we bet not to let all the work be lost in the dark world of your hard drive.
Dare to practice, to go out, to make mistakes (like me) and to enjoy. Go out to look for a good landscape or stage, take the tripod, place the camera vertically (not like me ), configure the settings and focus manually and shoot 4 or 5 consecutive images that overlap in part.
You already have your panorama, now you just need to edit them a bit (if you want), and put them together in this simple way that I just explained and you already have your photo :).
I hope this article has been useful to you. If so, share it with that person you think may be interested. Thank you very much and see you next time .