
Today I bring you a very manual article. I will tell you step by step how to make your own reflectors at home and, in addition, with a surprise. It's very easy, you need very simple materials and you don't have to be a very skilled person to achieve it. It is easy, easy.
WHAT IS A REFLECTOR AND WHAT IS IT FOR?
But before getting into the matter, I better explain what a reflector is and what it is for. A reflector is a surface that reflects light, so that it adds more light to a motif or fills annoying shadows. It serves as a second source of light. If you want to know more, here you can see that it is not just a professional thing.WHAT DO YOU NEED?
These are the materials you need to make your reflectors:- Cardboards: two consistent cards the size you want, I'm going to make 50cm in diameter, which is what black and white cards give me. You can also use a thin but consistent cork iron .
- White cardboard , or white continuous paper.
- Black Cardboard
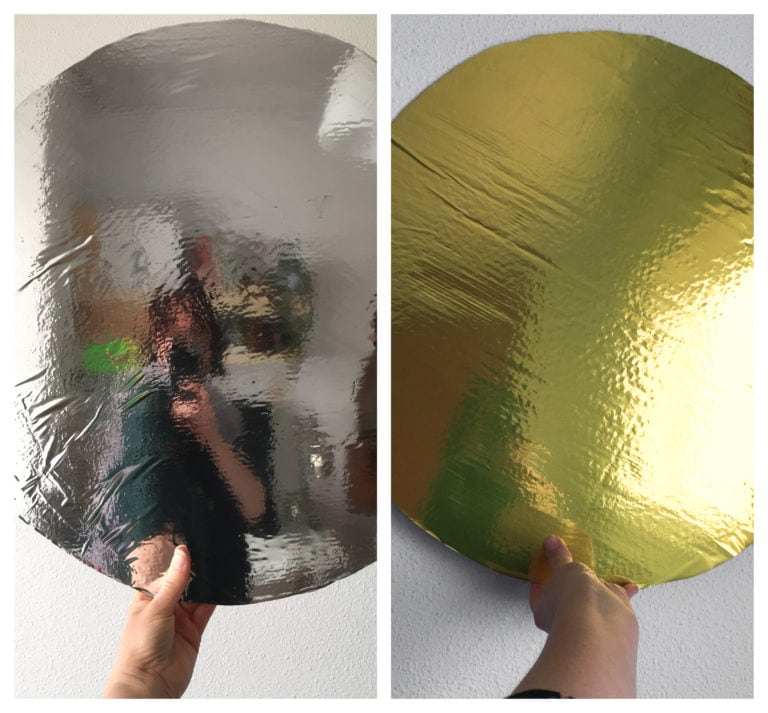
- Silver paper
- Gold paper I did not know when I bought it, but the gold on the back is silver, so that roll would have served me both. In case you want to ask before buying more .
- Glue: you can use the glue you want, I have done the test with three types of glue and the truth is that the best one has worked for me has been the bar. But for tastes ... as if you manage with double-sided tape.
- Cutter and scissors.
- Pencil or marker.
- Fine rope (optional). The rope is to mark the circle. If you have another way to make it great, I made a homemade compass with it and the pencil.
HOW TO DO IT?
Let's see step by step how to make the reflectors:1. MARK THE CIRCLE
Mark the circle on the cardboard (or the shape you want for your reflector) to the size you have chosen. These are 50cm in diameter and I have used, as I said before, a string to make a homemade compass. You can use a mold or the same system, whichever you prefer.2. CUT OUT THE CARDBOARD
It is best to cut it with a cutter, being careful not to cut yourself, yes3. COPY THE MOLD AND TRIM
Once you have cut out a cardboard, you can use it as a template for the next one. Put it on the other cardboard, mark with a pencil or marker and cut back with the cutter. You already have your two cardboard circles (or the shape you have chosen)4. GLUE ONE SIDE GLUE
Be sure to smear the entire glue surface well, especially the center and the edges. As I said, you can use the glue of your choice. I have tried three types and I prefer the comfort and results of the glue stick.5. PASTE THE REFLECTIVE PAPER
Spread on a flat surface (table, floor, etc.) the paper you want to start, for example, white cardboard. And put the cardboard on the face that you have glued on. Press well so that it sticks everywhere, if you want you can turn it over and go over it with a cloth or napkin all over the surface so that the edges stick well.6. TRIM THE REMAINING PART
With a cutter, trim everything left over from the cardboard. Another option that I have tried is to cut the cardboard first and then paste, but it gives worse results (see image below of the finished reflector and the arrows), unless you have managed to mark and cut a perfect circle both on the cardboard and on the cardboard or reflective paper.7. REPEAT OPERATION BACKSIDE
Now glue the part that has been left free of the cardboard with glue. I remind you to insist on the edges. Spread the black cardboard and paste on it the cardboard you just smeared with glue. Remember to go over the surface with a cloth by pressing gently to make sure it sticks well.8. REPEAT PREVIOUS STEPS
Now, with the other cardboard repeat the same operation, on the one hand with the silver reflector and on the other with the golden reflector.10. SURPRISE
And the surprise that I promised you in the title. I have to admit that it was casual, but with the cardboard that I have left to cut the circle I have realized that I could make a diffuser. To do this, I used white tissue paper (which I already had at home but who had also gone to buy it delighted). I have put glue on the edges of the circle, I have glued the tissue paper spreading it well and I have put a little jealousy in a section because, as it has been unforeseen, I had not measured and it was very fair.HOW DO THEY WORK?
To see what they can do, I give you some examples:AND WHY DO IT IF YOU CAN BUY IT?
Indeed, it can be purchased and, in addition, it is a fairly cheap accessory. So why make it homemade? Well there are several reasons:- The good thing about making reflectors is that you can make them the size or shape you want.
- You will spend a fun time.
- You will have the satisfaction of having made them. That is priceless, however imperfect.
- What to some may seem very cheap, for others it may not be so cheap. So another reason is the economic one.
- It can save you from a hurry, if you need them and you don't have time to buy them, you can always make the reflectors yourself.
