
All work in Photoshop happens on layers. How to work with layers, what it is, what layers are - we will consider in this article.
Layers in Photoshop have the same function as layers in the physical world. Imagine a stack of photos or stationery files. Sheets with images, inscriptions, geometric shapes can be stacked and changed their places, discarded, report new ones.
Another example of layer interaction is changing the opacity of the top layer.
Place the second one above the first layer - it’s good if the pictures are different. By shifting the “Opacity” / Opacity of the top layer to a smaller side, you will make the image more transparent and you will see an overlay of one image on another.
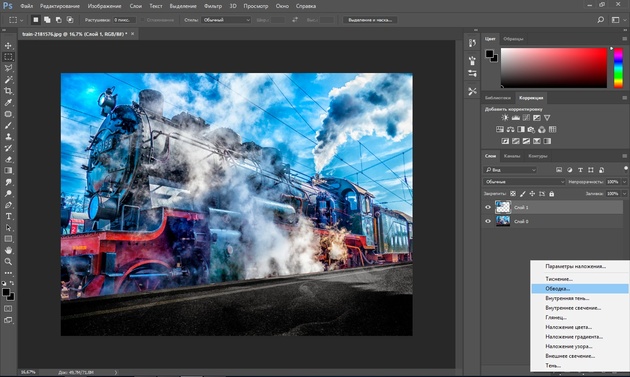
In order to circle the outline of the layer in Photoshop, you need to go to the “Blending Options” / Blending Options (bottom panel in the layer palette).
There, select the item "Stroke" / Stroke .
in the window that opens, select the necessary parameters and get a frame around the layer. In the figure, the stroke is applied to the layer onto which we copied a portion of the image.
You can also easily create a shadow or glow around a layer.
To resize a layer in Photoshop, just set the cursor on it and press the key combination Ctrl + T , thereby highlighting it. You will see a frame with nodes. By dragging these nodes, you can reduce or increase the layer. In order not to distort the image, you need to transform by holding the Shift key . After the transformation is completed, press Enter . In addition to increasing and decreasing, such transformations as “Distortion” / Distort and “Warp” / Warp are provided . They allow you to change the perspective and shape of the image. You can call them after pressing Ctrl + T by right-clicking in the context menu. Management is carried out by moving grid nodes.
Layers can be combined into one image. To merge layers in photoshop, you need to select the desired layers in the layer palette while holding Shift. Then right-click and select Merge Down from the list . If you want to merge all the layers, then select "Merge Visible" / Merge Visible .
Work with layers in Photoshop
If you run the program, then you won’t be able to start working in it until you create a new layer or open any image. Layers are placed on the palette of layers, in the figure below it is marked in red. There is also layer management. Elements of the layer palette:- 1. Filters for selection in the list of layers by feature.
- 2. A list for selecting a layer blending mode.
- 3. Manage the transparency of the layer.
- 4. Layer settings that allow you to save colors or transparency of pixels, fixes the layer in a specific place.
- 5. Control the density of the fill layer.
- 6. List of working layers. The Eye icon allows you to hide or show the visibility of a layer.
- 7. Pictograms:
| ties layers | |
| layer styles (stroke, shadow, etc.) | |
| mask layer | |
| list of adjustment layers | |
| allows you to combine layers into a group | |
| create a new layer | |
| remove layer |
- 8. Bookmarks. Here you can work with the list of layers, or with color channels of a separate layer.
What can be done with layers?
You can create layers, change the blending mode, change the layer styles (make the layer stroke or shadow), make it more transparent, copy, duplicate, transform, merge the layers into a group, drag higher or lower relative to other layers, make them visible or hide, pin layers to each other after another (in this case, the layer effects will be applied only to the attached layer), merge (in this case, all layers merge into one image). Further we will consider everything in more detail. You can learn more about Photoshop in the Fotoshkola.net course, Photoshop. Layers and masks . "How to change the name of a layer?
Any image in Photoshop is a layer. If you open a photo, then its name will become the name of the layer. The new layer, by default, will be called “layer 0”. In each subsequent layer, the numerical part of the name will change in ascending order. To change the name of a layer, double-click directly on the name, highlighting it in blue. Then enter the new name using the keyboard. This is necessary for multilayer collages, retouching and other work, in order to avoid confusion. It is better if the layer name is targeted, reflecting the task that this layer performs in your work. You can create a new layer in Photoshop using the Shift + Ctrl + N keys or by clicking on the icon in the bottom panel of the layer palette, as described in the table above. To delete a layer, you need to select it (just move the cursor and select the layer with a single click), then press Delete on the keyboard or the icon at the bottom of the layers palette. For image processing, it is best to work with a duplicate layer, leaving the original layer intact. If something goes wrong in your work, you can quickly restore the image from the original layer. Duplicate layer by pressing Ctrl + J . You can copy a layer in Photoshop or a portion of it by selecting the image of the layer with any selection tool. For example, the "Rectangle Area" / Rectangle Select Tool . Then press Ctrl + C (copy) and Ctrl + V (paste).Layers can interact with each other. For example, by changing the layer blending mode, you can achieve interesting effects.
If you create a white or black layer above the picture and change the blending mode from “Normal” / Normal to “Overlay” / Overlay , then the picture will lighten / darken.
Adjustment layers
This type of layer allows you to process the image without making changes to it. All actions take place on the adjustment layer, but the effect is visible on the processed image. Adjustment layers are called up in the lower panel of the layer palette by clicking on the icon. There are many methods for retouching and color grading images using adjustment layers. Several of these layers can be applied to one image at once. Below is an example of applying an adjustment layer “Hue / Saturation” / Hue / Saturation . To make a layer invisible, just click on the “Eye” icon opposite the layer. When composing collages from several images, you can apply the adjustment layer to only one of them. Although, as a rule, this layer affects all the images below it. To apply it to only one, holding Alt , click between the adjustment layer and the image layer. An arrow appears on the adjustment layer, pointing to the layer to which the adjustment is attached. To avoid confusion, the list provides a function for grouping layers. To group layers, select them in the list while holding Shift . Then press the key combination the Ctrl + the G . A group of layers can be hidden in the same way as a regular layer. To do this, click on the “Eye” image opposite the group of layers or one layer. Grouping layers is convenient to use when creating collages. Below is an example. Children, wall, background, road, shadow - different images used for one collage. Light is drawn on separate layers assembled in one group. To move a layer in the list below, grab it and drag while holding the left mouse button. Actions with layers is the principle of Photoshop, and the faster you master them, the easier it will be to work in the program. Working with layers in Photoshop is very simple. Practice your knowledge more often, and soon you will be surprised at your own work. You can learn more about Photoshop in the Fotoshkola.net course, Photoshop. Layers and