
We have talked on many occasions about bracketing or bracketing, today I am going to do a step-by-step tutorial, so that you can do it by following these simple instructions.
Although there are different types of bracketing, in this article I am going to focus on the exposure bracket. I will tell you how, when and why to do it.
WHAT IS BRACKETING?
Bracketing or bracketing is a technique that consists of taking different identical shots, modifying only one setting and then joining them.
WHEN AND WHY TO PERFORM AN EXPOSURE BRACKETING?
Exposure bracketing is used in high contrast scenes. Perhaps it will have happened to you that you have taken a landscape photograph where the mountains were too dark and the sky well exposed, you have tried to measure in the mountains and the sky has burned. The eyes are wonderful, but the camera, however high-end it may be, has its dynamic range limitations and is capable of either capturing highlights or capturing shadows well. But not both.
It also happens on many occasions that you want to photograph a room in a house with the views and either you can see the views, or you can see the interior of the room, because the contrast between the interior and exterior light is too high.
To overcome this technical limitation of the camera we use exposure bracketing. With it we take a well-exposed photo for the highlights and another well-exposed one for the shadows and, to make it even better, another well-exposed one for the mid-tones. In this way we collect information from all the tones in the image and then we put them together in an editing program so that all the areas look good.
HOW TO DO AN EXPOSURE BRACKETING STEP BY STEP?
You are most likely wondering... "all this, how is it done?" Well, we are going to see right now, step by step, how to do an exposure bracketing. Although before, I have to tell you that you can do it manually or with the help of the function that some cameras present, as we will see right away.
- Position the camera on the tripod with the framing you want.
- Select Aperture Priority Mode.
- Adjust the settings so that the exposure meter reads 0 and take a picture.
- Without moving the tripod, adjust to underexpose -2 EV. That is, take a photo in which the part of the lights is correctly exposed.
- Carry out the same operation, but this time exposing the shadows correctly, you can set the exposure meter to +2 EV.
-
Underexposure (-2 EV) -
zero exposure meter -
Overexposure (+2 EV)
- Download the three images in the program that you are going to use to join the three photos. In this case we are going to see the example in Lightroom but you can use other programs.
- Select the three images and from the Develop module and follow the Photo > Photo Combination > HDR path
- The following window will open. I recommend that you click on Auto Align, because if the tripod has moved the slightest, this function aligns all the photos. The second option of Automatic adjustments is optional, it's up to you. If you activate it, the program will make the adjustments it considers, but you can modify them later if you want. Then you have Amount of Ghost Elimination that what it does is eliminate those elements that slip into the photo due to carelessness or because they cannot be avoided, it detects and eliminates them. It is also useful if there are moving subjects. With a controlled situation you can select None.In a landscape where you can't control if a bird appears, a little person in the background or any other reason, you can try different options. To the taste of the consumer ? . Then press Combine and wait for the file to be generated.
- do not despair It will open a .dng file that is like a RAW. You may be disappointed when you see that there is hardly a difference with the intermediate exposure image, and it is that with the naked eye there is not, but there is a trick. Take a look at these images, they look almost the same, right? On the left we have the image taken with an exposure meter at zero, on the right the result of joining the three shots (the .dng file).
- The program has done a part, now it's your turn. Take a good look, one of the files with which you have assembled the HDR allows you to modify the exposure up to 5 steps. However, if you look at the .dng file created, you will see that you can change the exposure up to 10 stops. And this is the trick, now your image has much greater dynamic range and you can recover the information in the darkest or brightest areas.
-
Original Image Exposure Slider -
.dng image exposure slider
- Edit the image. Now you have to develop the photo to your liking and get the best out of it with the possibility that HDR offers you, adjusting lighting, shadows and everything you need. Let's compare again, on the left the image that we would have taken with a single shot. On the right, the result of our example. As always, you'll be able to further refine the edition depending on what you need or want.
BRACKETING OR BRACKETING FROM THE CAMERA
The bracketing or bracketing function of some cameras is the same as what I just told you about, but the camera provides a little help. I give you the Canon EOS 77D as an example, which is the one I have, but if you have another Canon model with this function, the process will be very similar or the same. If it is from another brand, you will find how to do it in the instruction manual.
- camera on tripod
- Aperture Priority (or Velocity Priority) Mode
- Multi-shot option activated
- "Camera" menu (red zone), 2 Comp. Exp. /AEB (AEB stands for Auto Exposure Bracketing)
- Turn the dial to adjust the bracketing steps. The ideal is to rotate up to two steps as in the image above. Your camera may have more steps, you can do different tests to see which result convinces you the most.
- Press SET/OK
- Make sure that when you go to take the images, of the three lines that now accompany the exposure meter, the center line coincides with zero and take three photographs that are the ones that you have told the camera to take with -2, 0 and +2 ev.
- Join them in the editing program you have decided on. Remember to also follow steps 9, 10 and 11 of the previous section. Next, I leave you with the comparison of the correctly exposed image according to the camera (left) and the edited HDR file (right). So it does show, right?
-
Original with correct exposure according to camera -
Exposure bracketing result
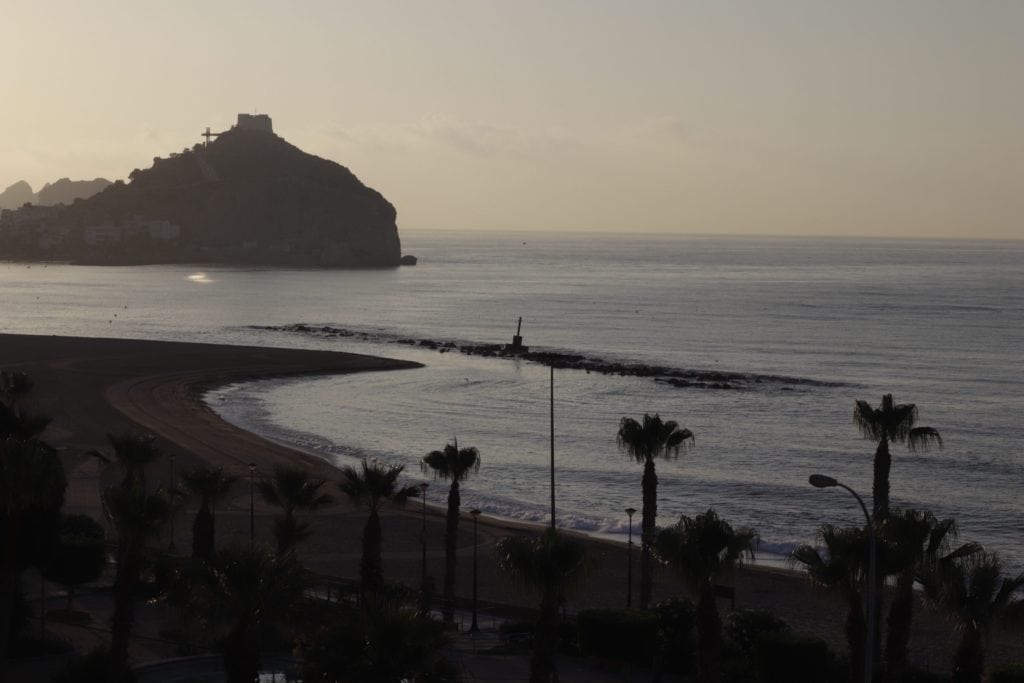
Let's see another example made with the camera bracketing option, these are the three shots:
And this is the comparison of a single photo with the correct exposure set by the camera (left) with the result of the bracketing (center) and, finally, the first shot applying an HDR filter. In the central photo we have more detail in all areas and a more natural result. I have given you this example so that you can pay attention to what I was telling you at the beginning about avoiding motives that move. In this case, in the bracketing, the sea presents an area in the lower left half where a cut can be seen.
-
Shoot with correct exposure -
Bracketing result from the camera -
Correctly exposed shot with HDR filter applied
However, if when setting up the HDR we select the High option in Amount of ghost lighting , the result improves:
So far today's tutorial. Has it been easy for you? Do you have any doubt left? Tell us in comments ?????? And if you found it useful, don't forget to share it. Thank you and until the next tutorial!
