LEARN (EASY) TO CONTROL SHUTTER SPEED ??TO IMPRESS YOUR AUDIENCE
LEARN (EASY) TO CONTROL SHUTTER SPEED ??TO IMPRESS YOUR AUDIENCE
Today I bring you one of those articles that come in handy for the self-taught, and that are essential for everyone who starts in photography. It is possible that a SLR camera, or EVIL , fell into your hands , and the eagerness to let your creativity fly will lead you to take photos with the simple gesture of pressing the shutter button, without reading the instruction manual or without knowing what shutter speed or aperture means. For example.
Now, there comes a time when you want to pass the Automatic Mode and you want to take real photos, not the ones your camera chooses, but the ones that are born to you from your artistic vein. Those photographs that you see out there that take your breath away and that you don't know how they have taken. Maybe a better camera? Will it be the goal? Not at all, it is the domain of light. Creativity and art are fine, but you have to have some minimal notions of technique to make the most of your artistic vein. Therefore, I come with the third vertex of the triangle of light.
If you dominate the triangle of light, you practically master photography. We already have an article that speaks in depth of ISO , another very detailed one of the opening and, although we have treated it in many articles, we needed to get fully into the shutter speed and tell you everything you need to know to leave the public with the open mouth. Go for it. Get comfortable After this article there will be a before and after in your photographs .
WHAT IS THE SHUTTER SPEED?
You will know (if not, you are discovering it), that photography needs light to be able to be taken. This is the first photographic lesson. Without light there is no photograph. Therefore, every camera has a mechanism that opens and closes to let the light into the sensor so that the picture can be taken. It is called shutter. This device can be of different types, but this does not interest us now. What you are interested in knowing is that the time during which the shutter is open is called the shutter speed. The shutter speed involves two aspects:
Light input: the longer the shutter is open or, in other words, the slower the shutter speed, the more light enters the sensor. And vice versa, less time, less light.
Motion capture: during that time, not only does more or less light enter, but the sensor records everything that is happening in front of the camera. If something moves during, for example, 2 seconds that it is open, it will capture that movement. And if it is a very fast speed, for example 1 / 4000s, it will freeze it. It will record only that stopped moment.
Let's see it better with a graph. The numbers below the arrow represent the seconds or fractions of a second which is how the shutter speed is measured.
FOR SAMPLE, A BUTTON
Now let's look at two examples of photographs, one with a slower shutter speed (captures the movement) and another with a fast shutter speed (which freezes the movement). They say that a picture is worth a thousand words, right?
In this first image we see a photograph taken with a shutter speed of 4 s. That is, the shutter has been open for 4 seconds and everything that moved at that time, the musician and the violin, are moved in the picture. It is a slow shutter. Now, the microphone and the background blind are sharp because a tripod has been used . If this had not been used to stabilize the camera everything would be moved. As you can see, slow shutter speeds can lead to moving photos that don't work or can be used to achieve a creative effect, as in this case.
Image taken at a shutter speed of 4s.
Now let's look at the other end, a very very fast shutter speed (as fast as many cameras can shoot). It is about 1 / 4000s. It is a way to freeze the movement, to capture what at first glance we are not able to see how fast it happens to our eyes. Luckily, technology allows us to enjoy images like this and, best of all, to capture them. No, you don't need the best camera in the world, my old and simple Canon 450D can shoot at that speed;).
Image taken at 1 / 4000s.
Next, let's look at a sequence of a moving paper mill captured with different shutter speeds. This way you can see the difference with the same moving object. In all cases it moved at the same speed, the difference is the shutter speed with which it has been photographed. While in the first image you can hardly perceive the moles in the last one it seems to be static.
What are you getting it from? Well, let's continue so you can discover all the secrets of the shutter speed and, when you finish reading this, you have the possibility to go out to practice it and enjoy what you like most: photography.
STEPS
Dance steps, steps at night or steps of what? You will be wondering now what I am talking about. Well, about something that you still know but don't know that you know;). We have said that the shutter speed is measured in seconds. When we jump from a fraction of a second to another it is called a step. That is, imagine that you are photographing at 1 / 125s but your cat's paw has been moved because it is playing with a ball of wool, you decide to use a somewhat faster shutter speed, 1 / 250s, for example. Well, you've taken a step down. That is a step. The jump between one value and another. We go up one step when the speed is slower (more light enters) and we go down one step when we use a faster speed (less light).
It happens the same as with the opening. Let's see it with a graph:
Some cameras also work with half steps or thirds of passage. Following this same example, I would like to say that:
Half step In half-pass cameras you will find between the values ??1 / 125s and 1 / 250s, another value: 1 / 180s. Then I leave you with the half step scale. In dark the steps, in clear the half steps.
Third step. In the cameras that also offer thirds of passage you can find between 1 / 125s and 1 / 250s, two values, which are 1 / 160s and 1 / 200s. I also bring you a scale of a third step, so you can see it very clearly. In dark the steps, in clarito the thirds of passage.
This allows more flexibility because sometimes you don't need to skip an entire step. The steps are explained here , in case you want to expand the information. Note that it is also applicable to aperture and ISO sensitivity.
LEARNING TO HANDLE SHUTTER SPEED
When you work in Automatic Mode, you have no option to modify it. The camera evaluates the scene and decides what to do, whether you like it or not. That is why we are not very friendly in this way except for very rare occasions. Luckily, and necessarily for photography, SLR cameras, EVILs and other cameras have other shooting modes that allow you to modify the desired parameters, such as shutter speed, which is what interests us today. Well, let's look at the modes that allow you to decide the shutter speed:
Manual (M): you decide all parameters, speed, aperture, ISO, etc.
Speed ??Priority (S or Tv): it is another way of working the shutter speed but ensuring a correct exposure when you do not have time to adjust or when you are learning. The camera, once you decide what shutter speed you want, will determine the aperture for proper exposure.
Bulb: you decide when the shutter opens and when the shutter closes by pressing the button at any time you want, it allows very long exposures.
If you have read this carefully, you know that at faster speeds, less light and the movement freezes; and, vice versa, at slower speeds, more light and movement is captured. Now it's time to learn to control when to use slower or faster speeds.
WHEN TO USE SLOW SPEEDS AND WHEN FAST
Although there are no magic recipes or infallible formulas, because everything will depend on the scene, your pulse, the focal length, etc., normally, above 1 / 60s, that is, with speeds like this or faster, you can get sharp subjects and scenes. Now, as the subject moves quickly, you will have to use much faster shutter speeds. It will not be the same as trying to capture a splash, than your nephew playing towers.
If what you want is to transmit that movement, then you will have to use slower speeds, which can reach some cameras in the 30s, or go to Bulb Mode , which if your camera has it, as I mentioned above, allows you to open and Close the shutter when you decide. Very useful, for example, in night photography.
Now, remember that when working in Manual Mode you have to find a balance between Speed, ISO and aperture. Let's say that if you change the shutter speed, you will have to compensate with one of the other two parameters. That is, you take a picture and it is correct in terms of exposure. Now you decide to go down a step or two because you have left a little moved; consequence: less time, less light. You will have to go up one step (or two) the opening or the ISO. Always taking into account the side effects of each other. If all this seems too much to you, it is best to pause and practice. You can't go outside with your camera, nothing happens, at home. You don't have the camera? Well, use a simulator. You have no excuse .
Remember that you can also use the Speed ??Priority Mode, which will come in handy on many occasions, especially when you are learning. In that case, it is very useful to observe how the rest of the parameters behave when you modify the shutter speed.
TRIPOD
I am going to dedicate a brief section because, after certain speeds, if you only want a part of the scene to move and not all of it, you have no choice but to use a tripod. With what speeds it will depend on your pulse, whether you have a firm pulse or not, or even the focal length. I, for example, below 1 / 80s without stabilizing the camera did not achieve a clear photo even if everything is static. I have a grandmother's pulse.
Regarding the focal, there is a trick or a rule:
1 / focal length
That is, freehand, if you use a 200mm focal length, you have to shoot at least 1 / 200s or at higher speeds so that there is no trepidation. Or use a tripod;).
However, all this is indicative, because more factors influence (magnification size, lens with stabilizer, the cropping factor, whether you hold the camera well or not, etc.). Naming them all and deepening would be to link you more. The best thing is that you try and find your formula. One tip is that you enlarge the photo on the screen to make sure that it is clear, that sometimes in small it is not well appreciated and then you take the support when you see it on the computer.
WHAT PHOTOS CAN I TAKE BY MODIFYING THE SHUTTER SPEED?
I have already given you many clues, but it is very likely that you are not yet aware of all that it implies and the world of possibilities that opens before you as you learn to control this parameter. Let's see what types of photography you didn't think you could achieve, you can get by controlling the shutter speed, either with very fast speeds or with very slow speeds. Here are some examples:
FAST SPEEDS
Photograph a Water Drop
Smoke photography
sports
Very moved children
Birds and other animals in motion
SLOW SPEEDS
Lightpainting (If you want you can see 11 inspiring examples )
Stars
Car trails
Swept
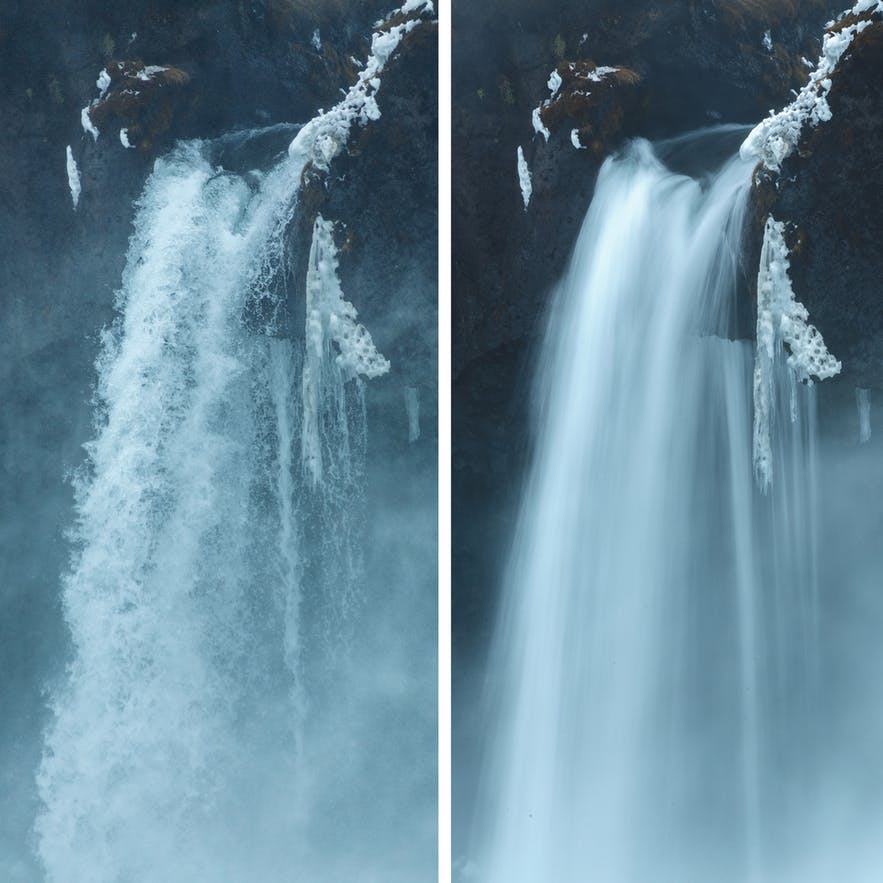
Silky Water Effect
Finally, I am going to leave you some photographs, that naming you the topics is fine, but I better leave you an image gallery so you can see what you can get. I'm sorry, yes, it's about getting your teeth long; I want you to feel tremendous desire to prove that of the shutter speed .
And here the article today. I really hope you find it useful and don't waste as much time as I did in my beginnings to understand this based on trial-error.
If you have found it interesting, please share it on your favorite social network, surely someone else helps you understand this basic and rich concept at the same time. Thank you and see you soon.