Shooting for beginners
Auto Modes and Ease of Use
Before us is not an ordinary SLR. This is not a professional tool, the handling of which needs to be studied long and hard. Nikon D3400 is designed to be as easy to learn as possible for everyone. With this we will begin the practical part of the article. The device has all the necessary features for shooting on a fully automatic machine. There is a “green” mode in which all the shooting parameters are determined automatically. The photographer can only point the camera at the subject and press the shutter button. There are also plot programs, when turned on, the automation takes into account the specifics of the scenes being shot. For example, in the “Landscape” mode, she prefers to cover the aperture to provide greater depth of field, and in the “Sport” mode - to shoot at fast shutter speeds so that fast-moving objects remain clear. During the use of the camera, there were no questions about the operation of the automatic mode and scene programs. In most shooting situations, I myself would have adjusted the shooting parameters in the same way as the automation did.
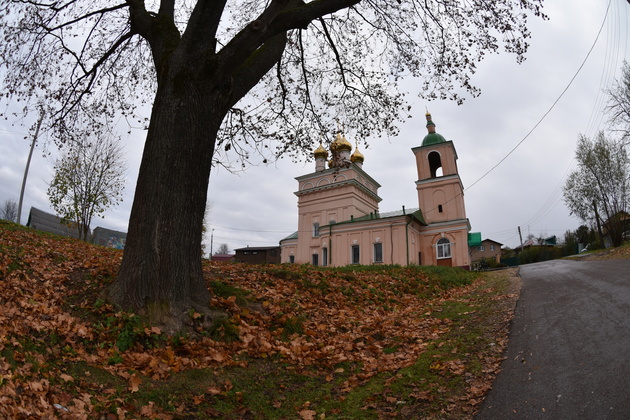
A difficult shooting situation with a large difference in brightness: there is a dark tree in the foreground and a bright sky in the background. Automation correctly set exposure parameters. The shot turned out to be quite bright, details are preserved both in dark and in bright areas. By the way, the picture was taken on a Nikon 10.5mm f / 2.8G ED DX Fisheye-Nikkor fisheye lens. It provided the widest viewing angle.
NIKON D3400 / Nikon AF DX Fisheye-Nikkor 10.5mm f / 2.8G ED Settings: ISO 100, F8, 1/80 s, 15.0 mm equiv.Download RAW
Focus mode settings and autofocus zones, ...
... which are available when shooting with subject programs.
Making exposure compensation is displayed on the screen.
Shooting against a bright sky often results in the main subject being dark.
NIKON D3400 / Nikon AF-P DX 18-55mm f / 3.5-5.6G VR NIKKOR Settings: ISO 100, F8, 1/200 s, 51.0 mm equiv.Download RAW
The problem is solved by introducing positive exposure compensation.
NIKON D3400 / Nikon AF-P DX 18-55mm f / 3.5-5.6G VR NIKKOR Settings: ISO 100, F8, 1/100 s, 51.0 mm equiv.Download RAW
In low light conditions, automation behaves correctly and predictably. To take this shot, I did not have to make any additional settings.
NIKON D3400 / Nikon AF-S DX Zoom-Nikkor 17-55mm f / 2.8G IF-ED Settings: ISO 800, F2.8, 1/125 s, 82.0 mm equiv.Download RAW
NIKON D3400 / Nikon AF-S DX Zoom-Nikkor 17-55mm f / 2.8G IF-ED Settings: ISO 800, F2.8, 1/200 s, 45.0 mm equiv.Download RAW
NIKON D3400 / Nikon AF-P DX 18-55mm f / 3.5-5.6G VR NIKKOR Settings: ISO 1000, F5.6, 1/125 s, 82.0 mm equiv.Download RAW
Guide Mode
The Guide mode deserves special attention. This is a real photo school in your camera! In this mode, you select the plot to be shot, and the camera tells you what settings to use, what tricks to apply. Of course, the recommendations are simple, basic. But this is exactly what a novice photographer lacks. How to blur the background? How to make everything sharp? How to shoot a fast moving subject? But how to blur the movement? The Guide mode will teach you this and much more. Honestly, I myself was carried away by him. It looks like a photo quest with interesting tasks. This is the mode that I definitely recommend trying to anyone in whose life the Nikon D3400 will be the first SLR camera!
Guide mode start menu. It provides access to shooting tips, setting basic camera parameters, viewing pictures and processing them. All settings and functions are presented in a simplified form.
Example background blur instructions:
Button "?"
The device has an advanced system of help and tips. In addition to the Guide mode, which is entirely devoted to teaching photography, in any mode, the help function is also available, called by the “?” Button. If the corresponding icon on the camera screen starts flashing, the camera has something to tell you. Click the question button and read the message. Surely it will help improve shooting results. Help will help you understand all the settings. Moving through the menu, we can request a description of any item by clicking on the button with a question mark.
Example tooltip displayed on the shooting screen
Example tooltip displayed in the camera menu
Camera image processing capabilities
Nikon D3400 offers a fairly wide functionality for editing and even converting pictures in RAW format. To try the processing capabilities and correct the basic defects in the pictures, they will be quite enough. A novice can even apply “decorations” to his work (for example, “Miniature Effect”). All processing menu items:Among the functions available in the processing menu, there is also an overlay of images. Its effect is similar to the effect of multiple exposure, but it is convenient in that it is applied not when shooting, but already after the fact to any two RAW images.
NIKON D3400 / Nikon AF DX Fisheye-Nikkor 10.5mm f / 2.8G ED Settings: ISO 100, F14, 8 s, 15.0 mm equiv.Download RAW
NIKON D3400 / Nikon AF DX Fisheye-Nikkor 10.5mm f / 2.8G ED Settings: ISO 100, F14, 8 s, 15.0 mm equiv.Download RAW
NIKON D3400 / Nikon AF DX Fisheye-Nikkor 10.5mm f / 2.8G ED Settings: ISO 100, F14, 8 s, 15.0 mm equiv.


