
Panoramic photography is as admired as it is shunned. It's funny, I know that many people don't try it thinking that it is very difficult and… nothing could be further from the truth! Today I'm going to show you. There are different ways to pan and achieve amazing results. Some of them so easy you wouldn't believe it. The level of difficulty only depends on how much you want to complicate yourself.
WHAT IS PANORAMIC PHOTOGRAPHY?
Panoramic photographs are, as the name implies, photographs that allow you to appreciate a larger portion of a scene than a normal photograph. The secret of this type of photos is the proportion of its framing, since it allows the viewer to convey the sensation of immensity, in a very efficient way and almost impossible to achieve using other frames.
Achieving this type of photography is relatively simple, although like any technique, it has its secrets. Next, I will name some of them and the way in which you can get the most out of them.

WHY TAKE A PANORAMIC PHOTOGRAPH?
Of course, in photography everyone can do what they want, it would be missing more. Even so, I am going to give you some reasons to encourage you to take panoramic views:
- You can get it with any camera. You do not need any special equipment, you will check it throughout this article.
- Allows different aspect ratios. It is an open format. Although the 16:9 ratio is the most popular, you can also use other aspect ratios like 21:9, 12:5. The most common or popular are 2:1, 3:1, 4:1 and 5:1. The most characteristic thing is that its longest edge is twice as long as the shortest edge.
- Pay homage to the cinema and its 16:9 ratio. The square format so fashionable by IG has its own and plunges us into nostalgia, but... what about the nostalgia of cinema?
- It is ideal to decorate your house. Surely some corner of your house is waiting for a photograph of you and... what better than a spectacular panoramic view? A headboard, a corridor, the wall behind a sofa, the back of a desk... are perfect places for the panoramic format. Here are some ideas for printing your photos .
WAYS TO GET A PANORAMIC PHOTO
Panoramic photography is not a new type of photography but, as you will discover in the article dedicated to framing in photographs , it is just one of the many formats that you have available when making your compositions and to which cinema and screens guide us. they have accustomed
Thanks to their "long" proportions, that is, the width of the photographs is much greater than their height, panoramas are very pleasing to the human eye and allow a much larger scene to be shown than other types of formats. But how to achieve such proportions?
You can achieve this type of framing using two totally different techniques.
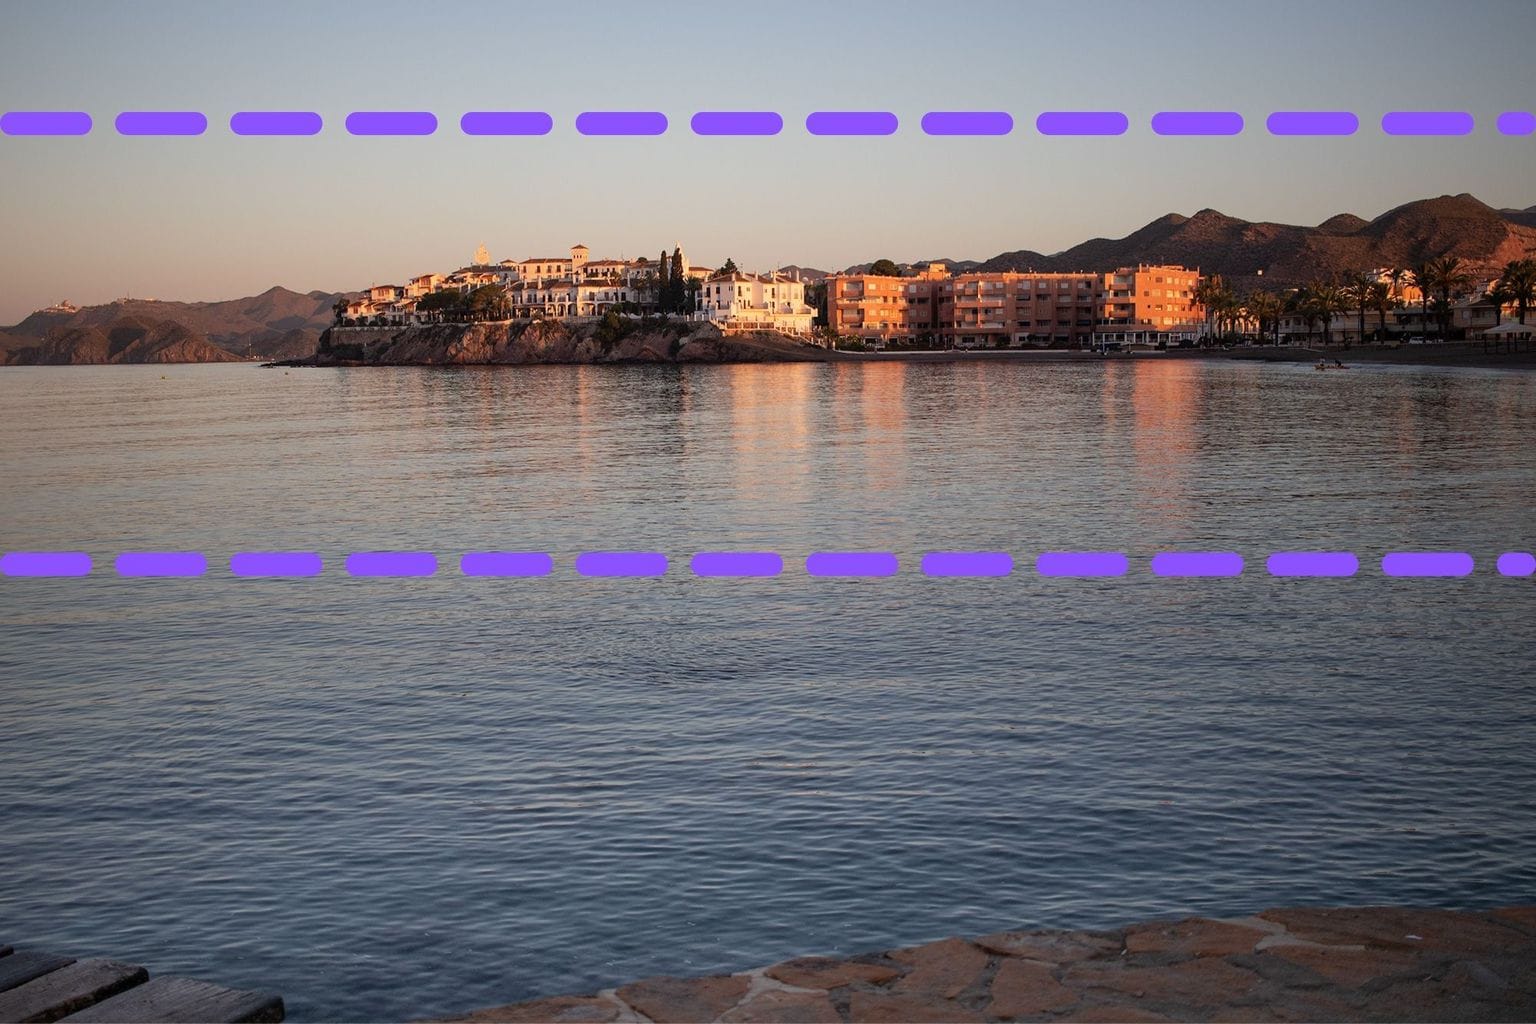
PANORAMIC PHOTOS FROM A SINGLE SHOT
These types of panoramas are achieved by cropping a photograph of "normal" proportions so that the width is much greater than the height (or vice versa if it is a vertical panorama).
You can use any program to crop the photo. You will find the Crop tool even in the simplest editing programs .
To obtain the best results, it is essential that you are very clear about the result you want to achieve in the final photograph. Why? Because reframing a photo of normal proportions to transform it into a panorama will require you to compose the photo in a different way. That is, you must leave enough space to be able to carry out the cut later.
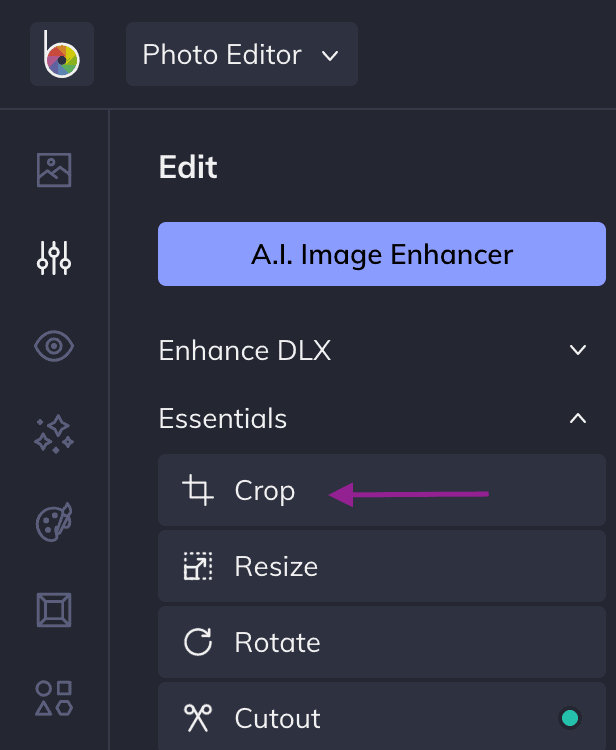
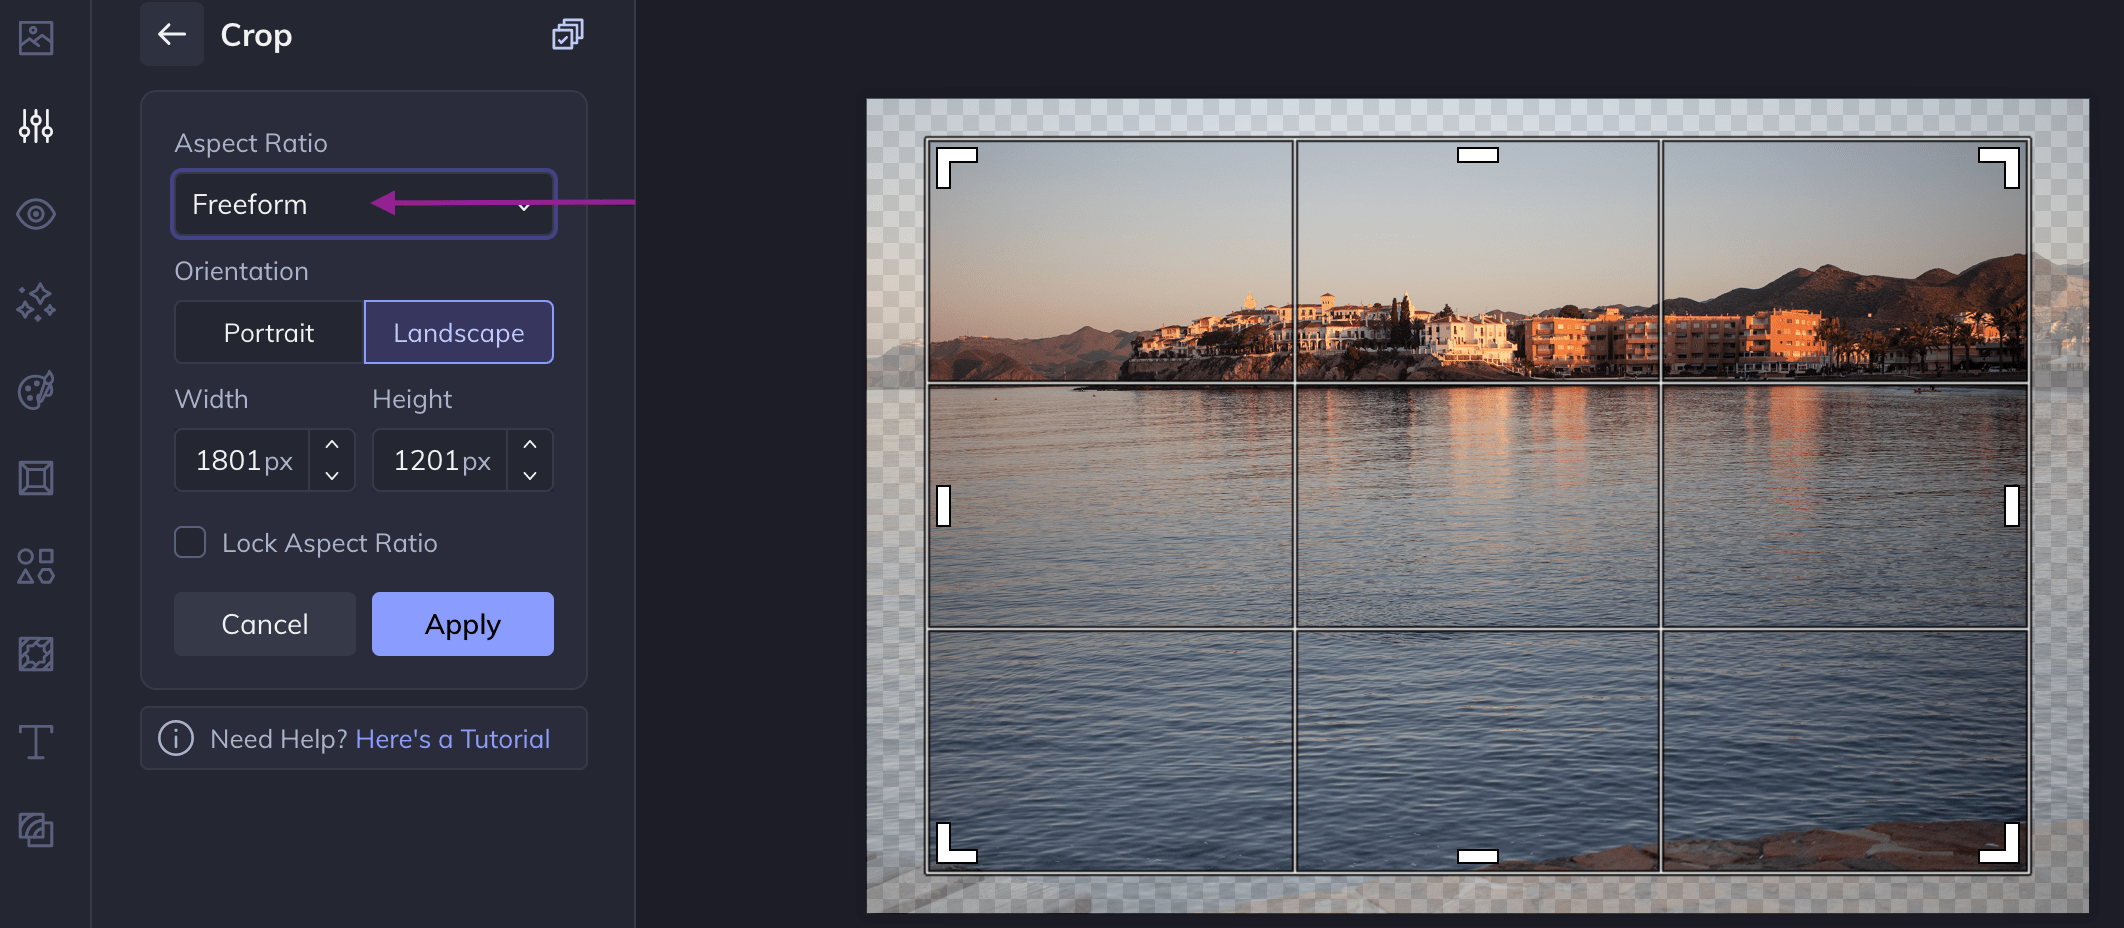
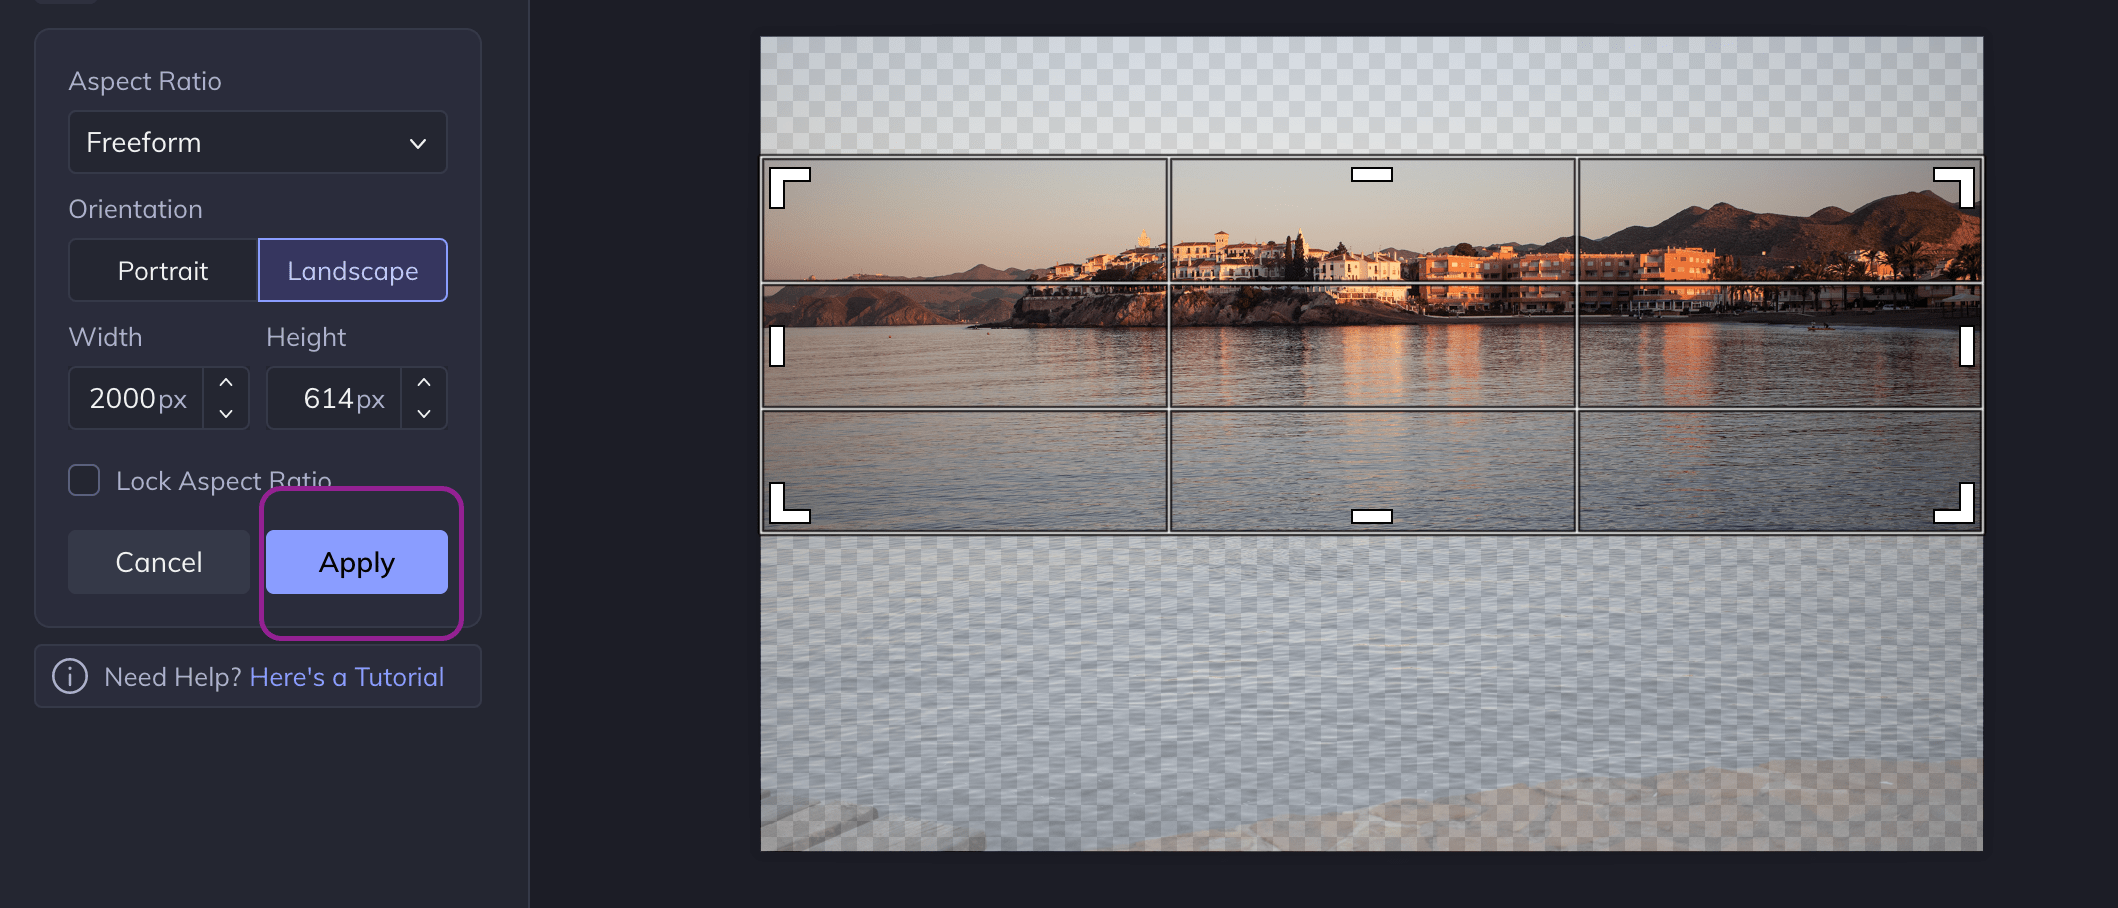
Let's see an example of how to crop or reframe in Befunkywhich is a free online program.
- Select the Crop tool (see right icon).
- Determine free ratio (or pan if any).
- Establish where you want to cut and save or download.
PANORAMIC PHOTOGRAPHY FROM DIFFERENT CAPTURES
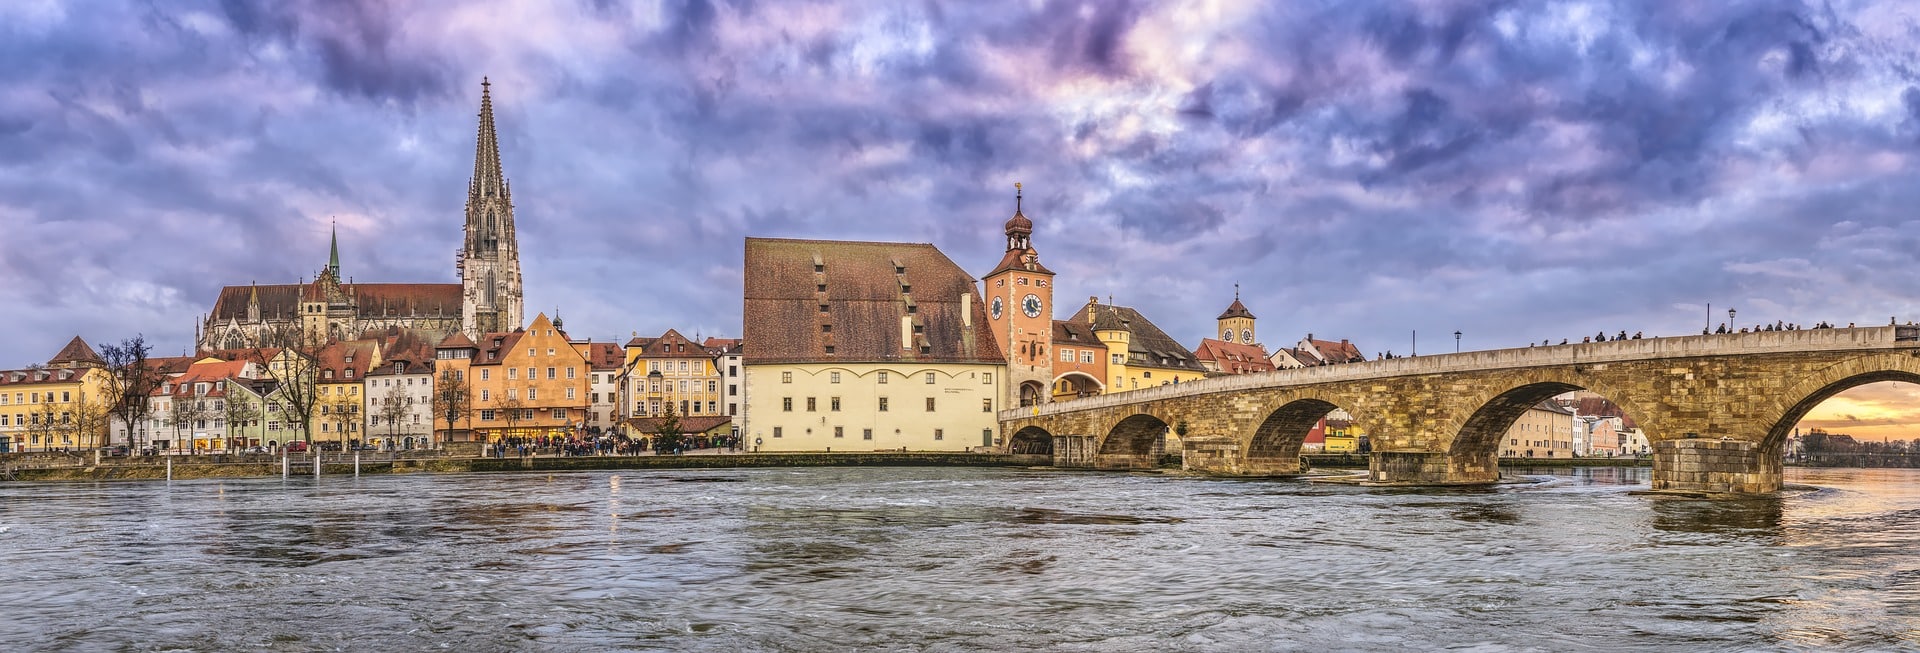
This technique or method is called stitching . It consists of taking a sequence of images and, once taken, joining them using a program (or function within your camera if it allows it) to achieve a great panoramic photograph.
The main difference between these two methods is the final quality. While both achieve the same sense of space and spaciousness, the panorama that results from stitching multiple images together will have much higher resolution and quality than one simply cropped.
Another difference is that sometimes a simple crop doesn't allow you to cover the whole scene you want, either because you can't get far enough away or because you don't have a wide lens that allows it. In that case the only solution is the method of joining several photographs.
In short, depending on what you want your photography for and what you expect from it, you will have to decide which method is most worthwhile for you.
NECESSARY EQUIPMENT TO TAKE PANORAMIC PHOTOS
Next I will tell you about the necessary equipment to make a panorama, although this will depend on the result you want to obtain, of course.
- The camera: to take this type of photography it is not necessary that you have the most advanced camera on the market, far from it. Almost with any camera, be it SLR , EVIL or compact , you will be able to take excellent panoramas. Even with the camera of your mobile phone , as you will see later, you will be able to obtain excellent results. Of course, the better the equipment, the better the final quality of the photo. This is not to say that quality is everything. It is not always necessary so much level of demand. Everything will depend on the final destination, the size at which you are going to print it and how far you want to go.
- The Goal: Avoid distorting targets. A wide-angle produces optical distortions (almost similar to those of a fisheye) that will make it difficult for you to align the shots with each other. On the other hand, you also don't want to use a telephoto lens because you will get extremely tight frames. The ideal, therefore, would be to shoot with a standard focal length, between 35 and 50mm. Have you been lost between angles and focal lengths? In the following article we will tell you everything about the focal length of your lens and how it affects your photographs.


- Tripod: stability when taking the different shots is important, so having a good tripod will be very helpful, although it is not essential. In addition, using a tripod will allow you to correct one of the worst enemies of panoramic photography, which is neither more nor less than "parallax error". Don't you know him yet? Don't worry, I'll tell you about it later and I'll tell you what to do to avoid it. If possible, use a tripod with a rail or nodal point similar to thisor a ball head. On the one hand you will have stability and you will avoid blurred or moved photos. On the other hand, a ball-and-socket tripod will allow you to turn the camera calmly and smoothly in the desired direction. Now, to make pro-level panoramic views, that is, with professional results, the ideal thing is a panoramic head . By the way, if you are thinking of buying a tripod, do not miss this guide with tips and recommendations to find the best tripod for you.
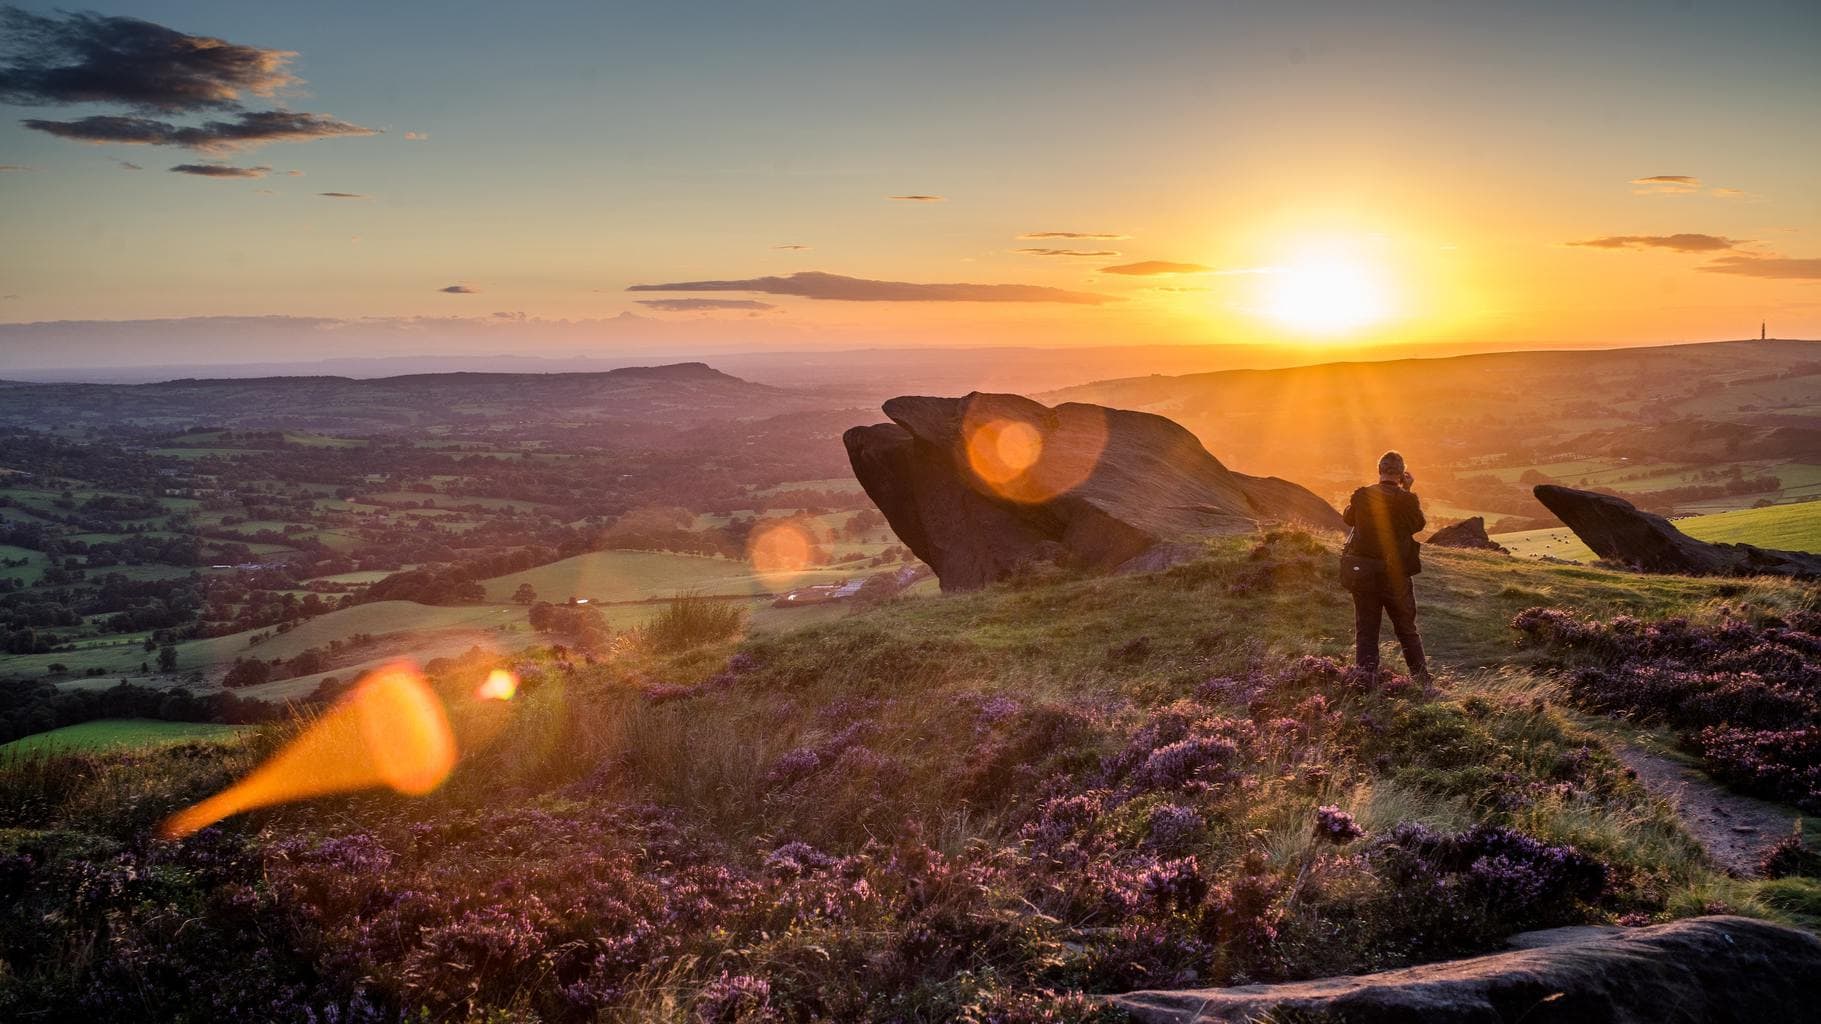
IDEAL SITUATIONS FOR PANORAMAS
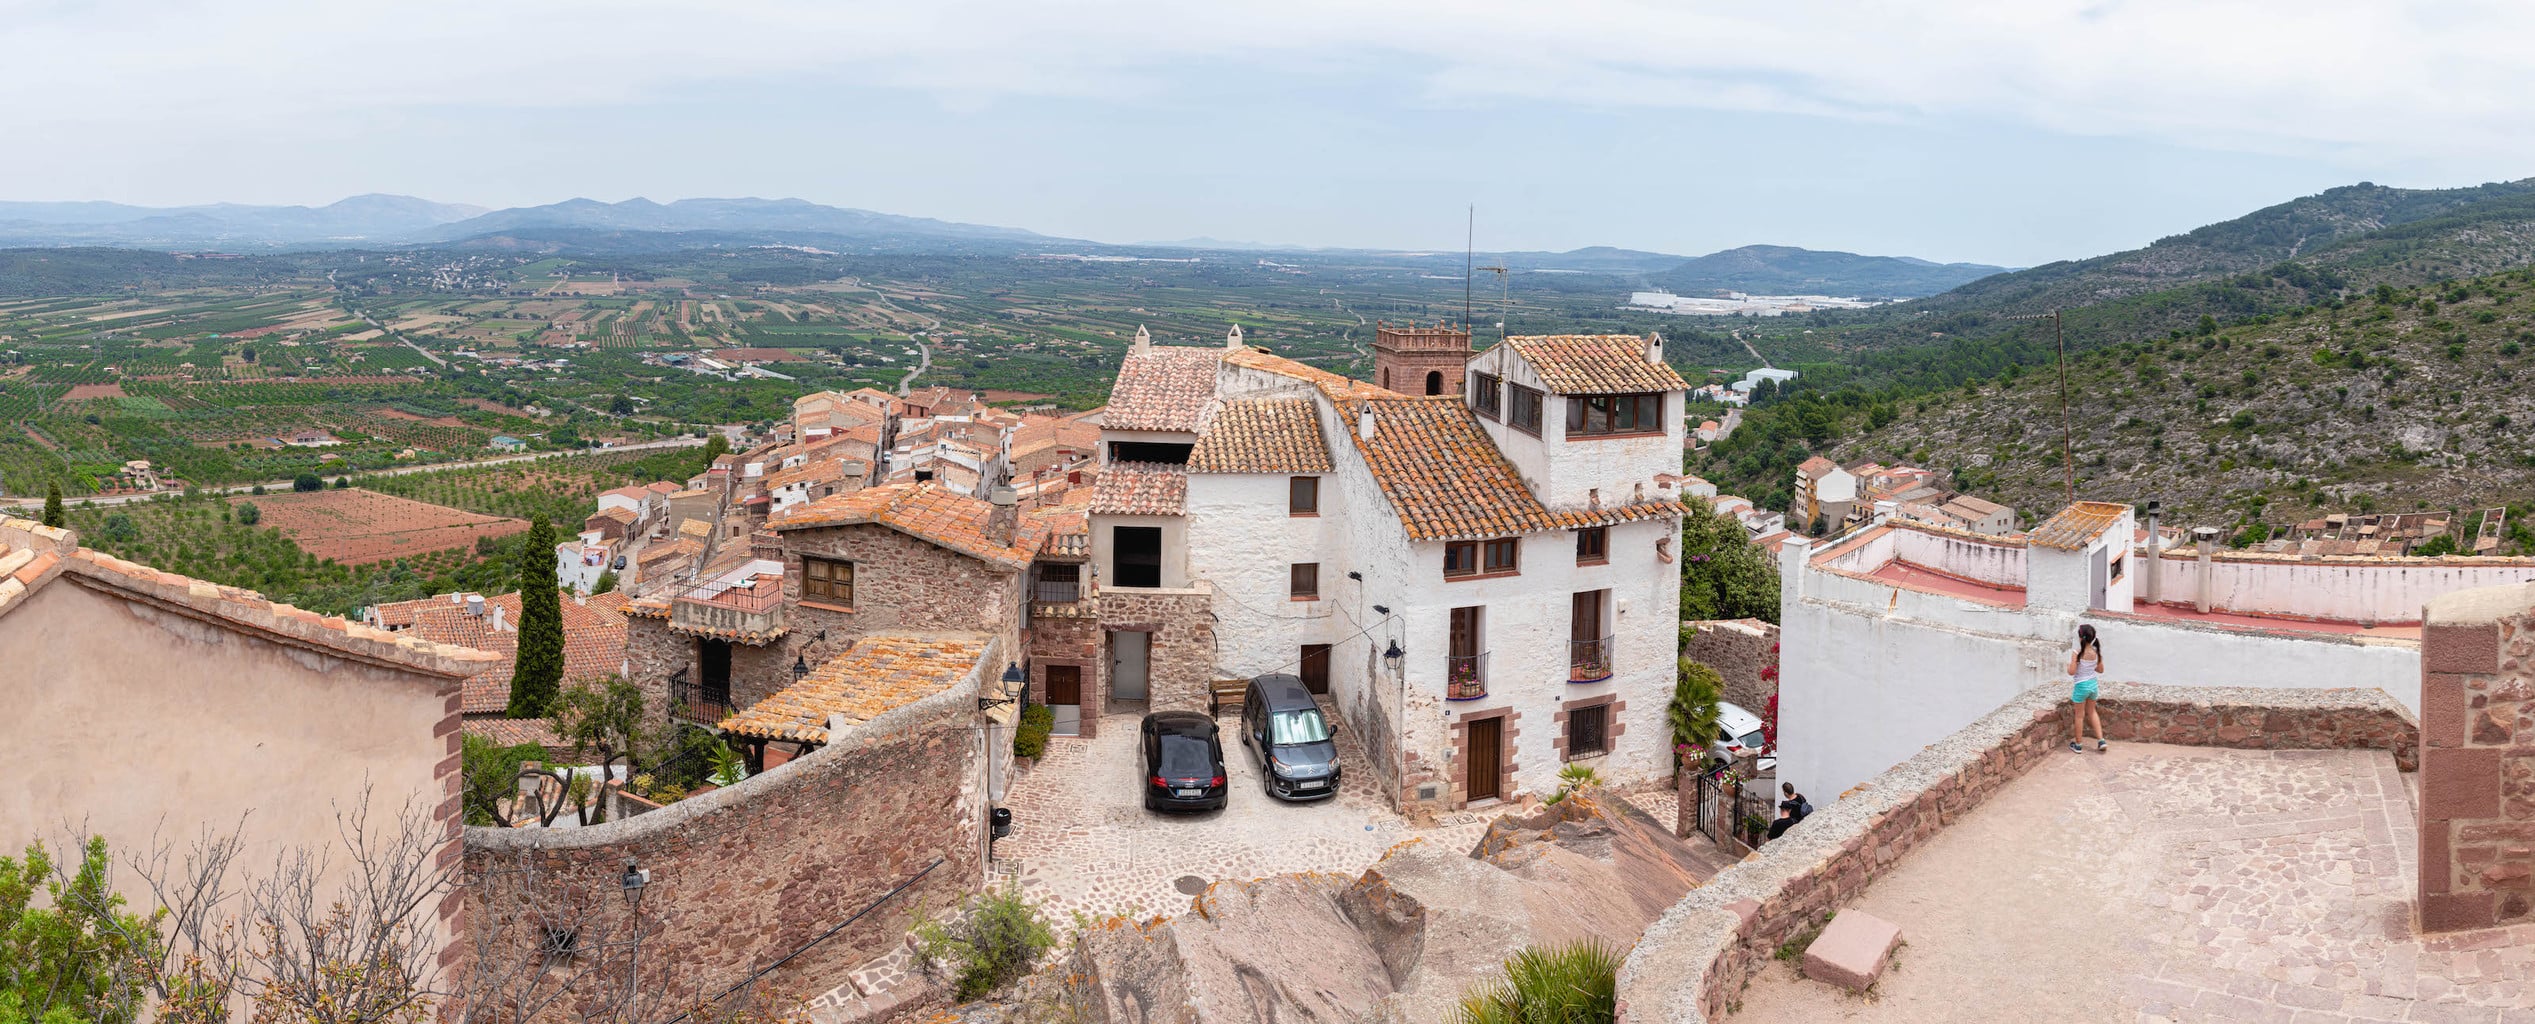
Of course, you can take a panoramic photograph almost anywhere, but be careful, not all places are ideal to obtain a good result. If you browse the Internet a bit, you will see that the vast majority of panoramas are landscape photographs (natural or urban).
And it is that, taking panoramic photographs in situations where there are a large number of subjects or objects moving in front of the objective will not only make the task difficult for you, but the results will be quite imperfect. Below I show you an example of the disaster that can come out.
Also keep in mind that the panoramic format is already a protagonist in itself, but, once you master the technique, you will be able to break the rules and revolutionize your panoramic photographs.
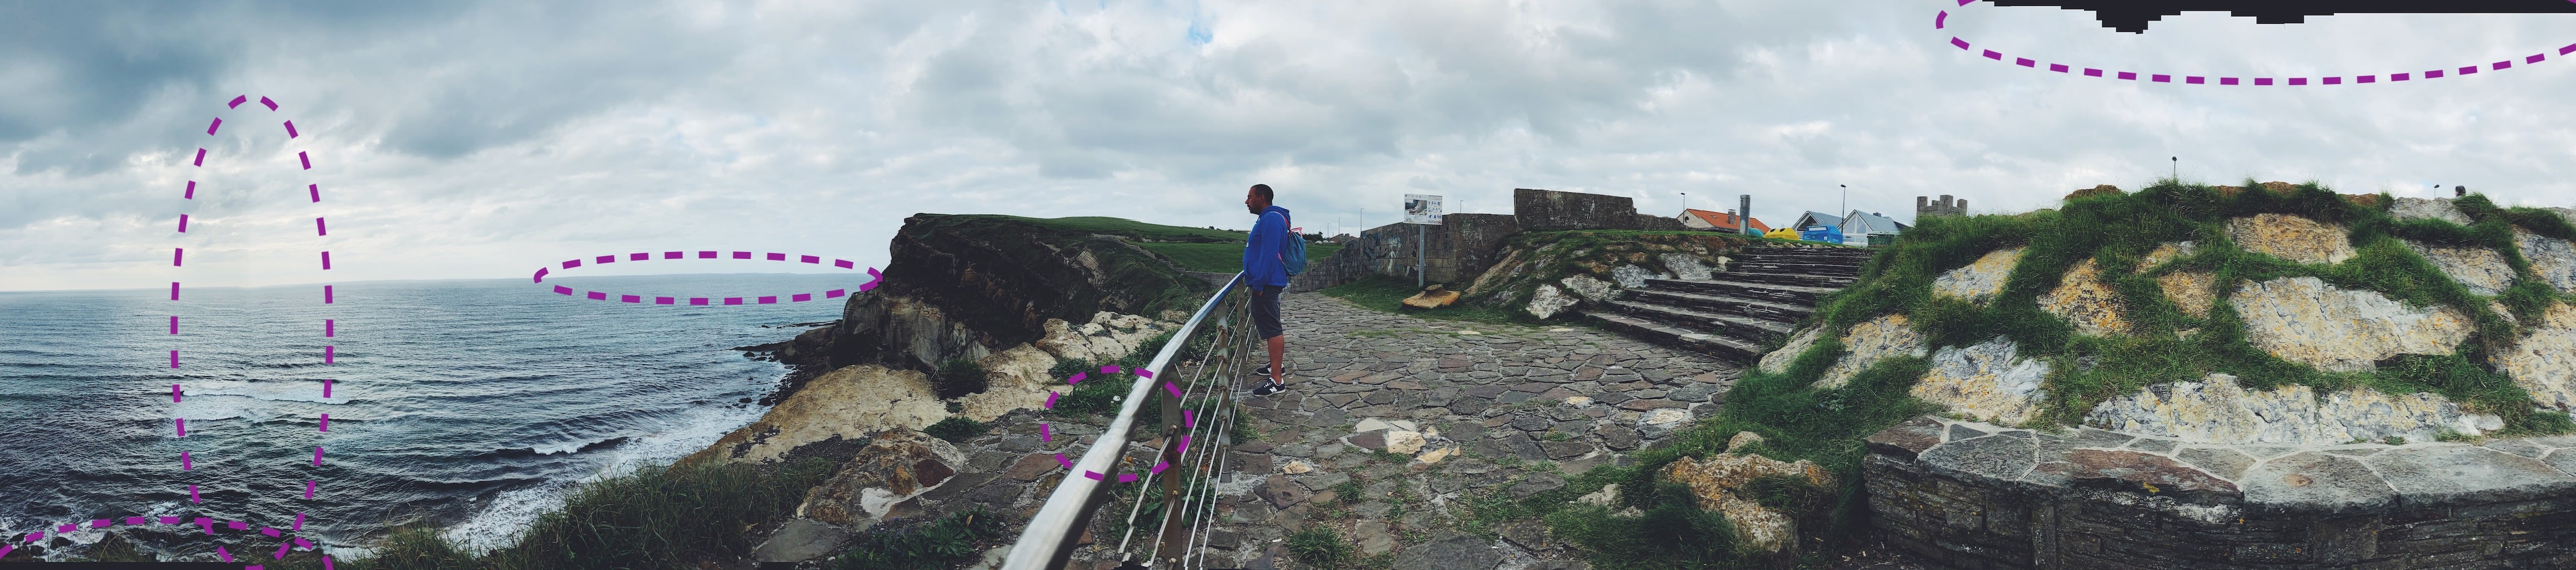
PARALLAX ERROR, THE MOST COMMON IN PANORAMAS
As we have said, taking a panoramic photograph can be easy, but it has its little tricks that you should know. It is not enough that you take several shots with your camera and then join them on the computer. If you do it this way, you will be inviting one of the worst enemies of panoramic photography to the party: “the parallax error”.
And what is the parallax error ? Pay attention to the following pictures:

In the image above, you will notice that as the different photographs are taken, if you do not keep the optical center of your camera fixed, significant distortions can occur that affect the continuity and, therefore, the final attractiveness of your panoramic photograph. The camera varies its position with respect to each shot, changing the perspective and generating distortions that you can easily fix using a tripod (or some little trick that I'll tell you about shortly).

As you can see in this second image, by rotating the image around its optical center, you not only respect perspective but also guarantee the continuity of the shot throughout its entire journey.
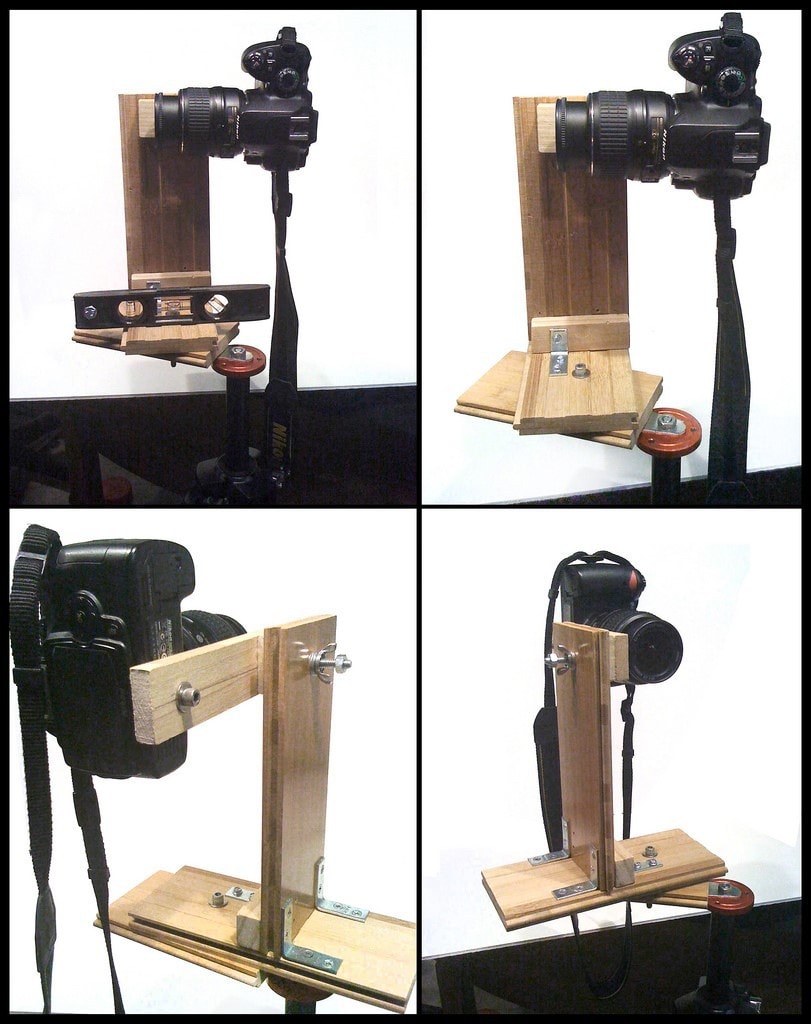
The optical center of your objective , also known as the nodal point , must remain as fixed as possible and for this you can resort to:
- Tripod with panoramic ball head or with a ruler (which you can do at home).
- Resort to the tricks that I leave you almost at the end of the article to shoot without a tripod.
THE 3 KEYS TO EXCELLENT PANORAMIC PHOTOGRAPHY
There are three key aspects when making a panorama:
- Sharpness: as in landscape photography, one of the main factors when taking a panoramic photograph is its sharpness. To do this, it is advisable to use the hyperfocal or small or very closed diaphragm apertures (f/8, f/16, etc.) in order to ensure that the entire photograph is perfectly focused.
- Stability: when working with very closed diaphragm openings, it is likely that, if you do not have enough light, you should reduce the exposure speed. Lowering the shutter speed will increase the risk that your photos will come out blurry, something that you cannot afford in general photography, and even less in panoramas, since they require stitching together several photos and if one comes out blurry, the series will be useless. In addition to this, in order for you to capture the entire scene, the sequence of photos must be as continuous and aligned as possible. If you don't have a tripod… don't worry! With a little imagination and Bricofotografía you can make your own.
- Continuity: once you have achieved very clear and stabilized photographs, all you have to do is join them in the appropriate program (I will leave you a list soon). It is essential that you take as many photos as possible in order to ensure the continuity of the resulting panorama. In the advice section we will talk about the parameters and some other points that you must take into account to guarantee this continuity.
The sharpness, stability and continuity of each of the photos with respect to the following in the series that will form the final photograph will maximize your opportunities to obtain a luxurious panorama. Missing? May the scene you have chosen to photograph and the way you compose the image convey the message you want to communicate.
HOW TO MAKE A PANORAMA STEP BY STEP?
We have already seen how to get a panorama by the easy method from a single photograph. Now it's time to see the other method, the stitching technique . It is somewhat more complex, but not complicated at all. And less as I am going to explain it to you below, step by step.
- Determine which will be the first and last photo of your panorama. This will mark the framing and the composition, it is better that you leave a little extra space on each side in case you have to cut later, do not hurry.
- Put the camera on the tripod if you are going to use one.
- Adjust the parameters in the camera. Below I leave you some tips on the settings, but it is essential that you do not shoot automatically.
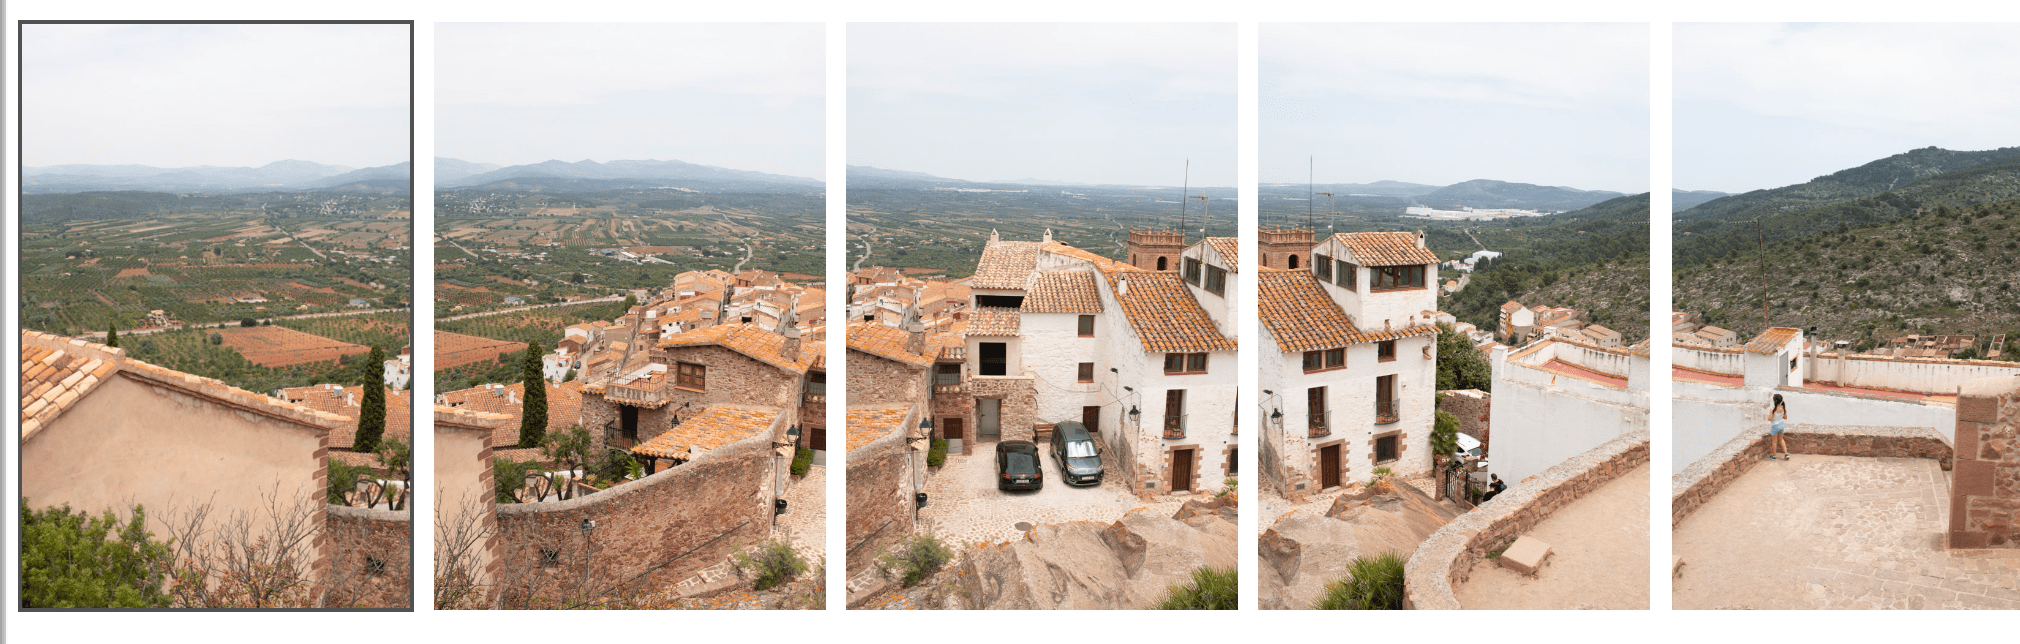
- Start with the first photo and gently pan the camera to the next shot, leaving a 20% overlap (we'll talk about this in the tips section as well). Go capturing the whole scene take by take, being careful not to move the tripod, until you reach the last one.
- Check that the shots have the correct exposure and that you have captured the whole scene in parts. You still have time to repeat the operation. At home it will be too late ? .
- Download the photos to your computer (tablet...) and join them (I'll tell you how in the next section).
HOW TO JOIN THE PHOTOGRAPHS FOR A PANORAMA?
Once you have your series of photos downloaded to your device with the appropriate program, you are just a few steps away from getting your long-awaited panoramic photo. All that remains is to open the images in the chosen program and the magic will be done.
The following images will help you understand how these programs work in general:

Once all the photographs have been taken and loaded into the program, it will align them (hence the importance of their continuity) and then cut them in the most appropriate place. A few more clicks and the final photo is ready.
PROGRAMS TO MOUNT PANORAMAS
Don't you know of any program that makes panoramas? Here is a small list with the best (and easiest) programs to join all the photographs:
- Canon Photostich Tools
- Panorama Maker
- PTgui
- Adobe Photoshop (Photomerge)
- Lightroom
Stitching photos in these programs is really easy. Just download any of them (especially Ptgui) and it will do it for you. You will only have to give the final touches to your panoramic photographs.
And if you have Lightroom or Photoshop, you're in luck because I'm going to leave you the step-by-step process in the following sections.
HOW TO MAKE A PANORAMA IN LIGHTROOM STEP BY STEP
To assemble a panorama in Lightroom, import the files to the catalog and follow the steps below:
- Select the captures with which you are going to assemble your final image.

- Follow the route Photography > Photo Combination > Panorama

- Wait. The following dialog will open, it may take more or less depending on how many captures or if they are JPEG or RAW.

- Select settings. Once the panorama is loaded, the different options to be marked are activated, which will depend on the result you want to obtain and the characteristics of the image. For example, with Limit Warp you warp the image to fill edges, you can try moving the cursor to the right. With Fill Borders , these are filled automatically based on the information around them (check carefully that Lightroom often makes mistakes with certain elements here). With Automatic settings , the program establishes some settings that you can later modify to your liking, in case you don't want to start from scratch. With Auto Crop, the cut is made in the appropriate areas. If you want the images to be stacked in the catalog once the panorama is created, check the Create stack option . You also have three combination options:
- Spherical – Aligns and transforms images as if they are inside a sphere. This is the recommended mode for wide or multi-row panoramas.
- Perspective - Builds the panorama as if it were on a flat surface. It is advisable for architectural photography. It is not suitable for multi-row panoramas.
- Cylindrical : recommended for wide panoramas, it also keeps vertical lines straight.
- To combine. With the settings to your liking, you just have to click on Combine and you will have your panorama assembled. Be patient as the process takes a while.

- Edit. All that remains is to go to the Reveal module and edit to taste (there are no valid or invalid recipes here) and when you have it, export.

HOW TO MAKE A PANORAMA IN PHOTOSHOP STEP BY STEP
Let's now see step by step how to create a panorama in Photoshop. The first thing is to open the photos in Photoshop, you can export them directly from Lightroom or start at step 1.
- Follow the path File > Automate > Photomerge

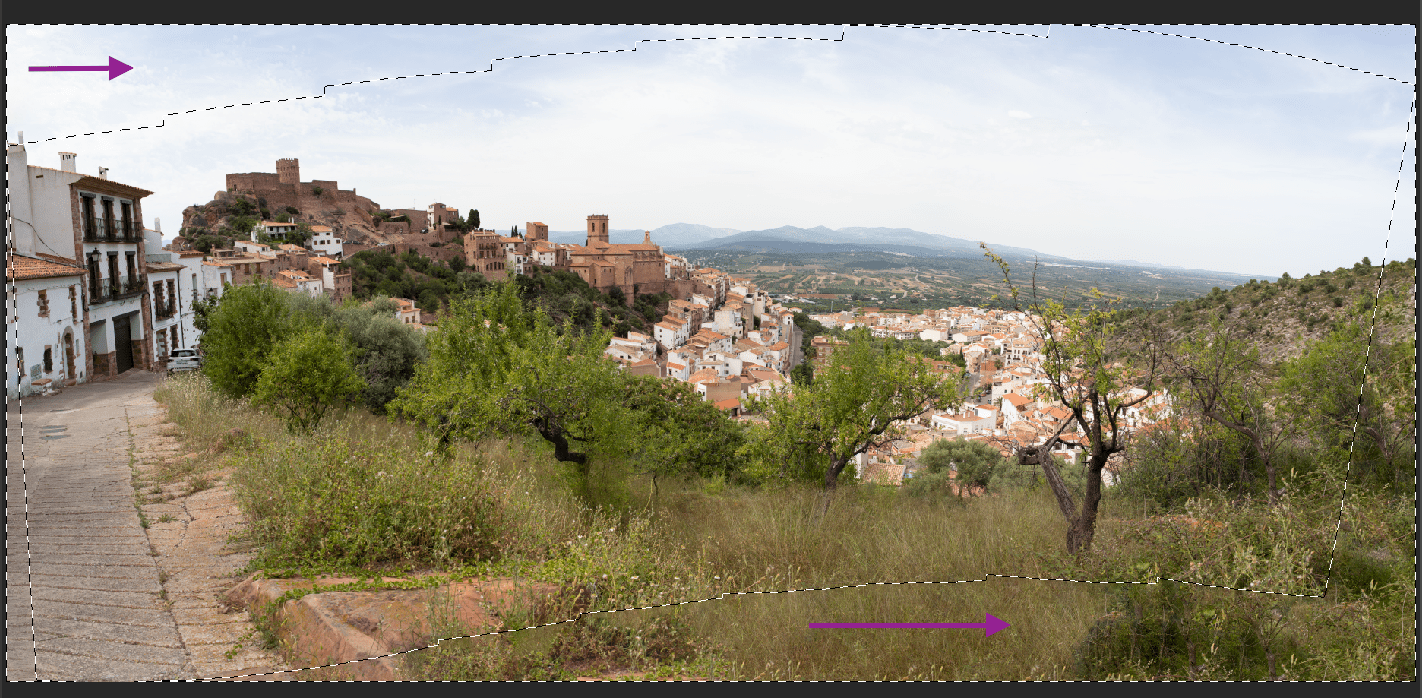
- Browse photos. The following window will open. You can browse in the archive or select "Open Files" if, like me, you've previously opened the photos from Lightroom, for example. Among the different options you have the possibility of correcting geometric distortion or filling in empty areas automatically. You can also remove vignetting, that is, add exposure to the darkened edges. Once you have the Source Files and the options that interest you clicked, press OK, at the top right. Until you have the files, the "OK" option will not be activated.

- Validate (or not). The program creates an image with multiple layers, adding layer masks as needed to create an optimal blend. You can edit layer masks or add adjustment layers to fine tune different areas of the panorama. In short, the mounted panorama will appear, but by layers. When you select the fill option, the program has filled everything outside the dashed line and that I point to you with arrows. If you see something weird in this step, you can always go back and do it without the padding option. If it convinces you... you would already have it!

- Adjust the pan. As I was saying, for a much more precise result you can check by layers. Clicking on the eye of each layer allows you to see where the join is and check if everything is ok or if there is something you need to correct.

This last part of the process is a bit more entertaining, but in the following video it is explained step by step in great detail.
TIPS AND TRICKS FOR STUNNING PANORAMIC PHOTOGRAPHY
We are seeing that taking a panoramic photo is not that difficult, however, there are some tips and tricks that will help you achieve impressive results. Here are my tips and tricks for getting amazing panoramic photos.
1. MEDIUM OPENING
If you are photographing a landscape, yours would be to use the hyperfocal or use a medium aperture, around f / 8-f / 11 to get the different planes in focus. Attention: Due to these very small apertures (f/8) you will most likely get dark photos. Try to get around this by shooting at relatively slow shutter speeds, raising the ISO slightly, and using a tripod.
2. MANUAL FOCUS
To keep the camera from going crazy looking for a focus point and to keep all your photos consistent in focus, focus in manual mode, or focus in auto mode, switch to manual and leave it locked there. In this way you ensure a uniform focus throughout the panorama.

3. MANUAL MODE
In order for all the shots to be similar and also to achieve continuity in the lighting, you will have to photograph in manual mode with the same exposure, that is, the same aperture and same shutter speed for all the shots. ( If you're still afraid of manual mode, with this guide you'll lose it in no time .)

4. WHITE BALANCE
This is one of the few occasions when you should adjust the White Balance of your camera. If you don't you may get each shot with a different color. You can use the "Custom" White Balance mode that allows you to shoot on a white sheet of paper by telling your camera the neutral color tone to use in all the photos so that they remain homogeneous. If you photograph in RAW you can skip this step and correct it in the edition to your liking. As you prefer.
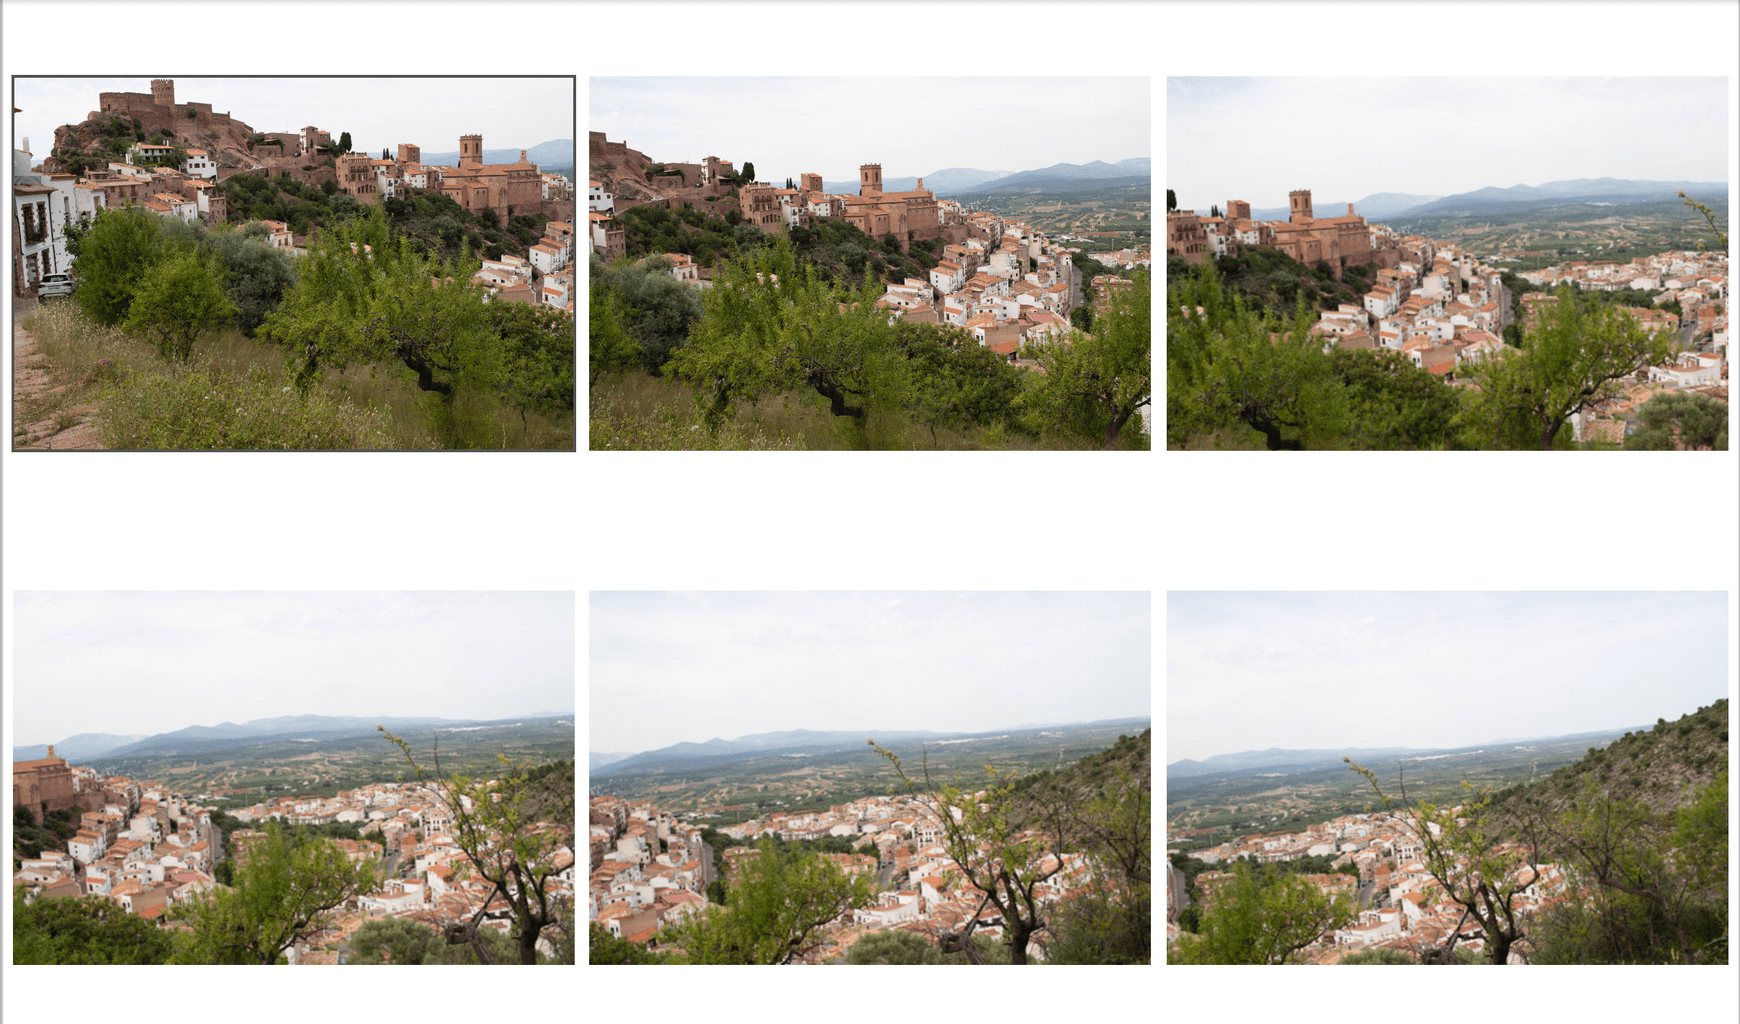
5. VERTICAL SHOTS
By photographing with the camera vertically, even if you want a horizontal panorama, you achieve two things:
- Improve the quality of the final photograph. At the edges of the frame, cameras tend to lose quality. By using a vertical frame, you will minimize this lack of sharpness because you use a greater portion of the center of the shots.
- You will get to increase the portion of the scene. You'll capture more of the frame in each shot, giving you more freedom when it comes to splicing photos and joining them together.
- Increase the resolution. This is good for you if you plan to make large enlargements.
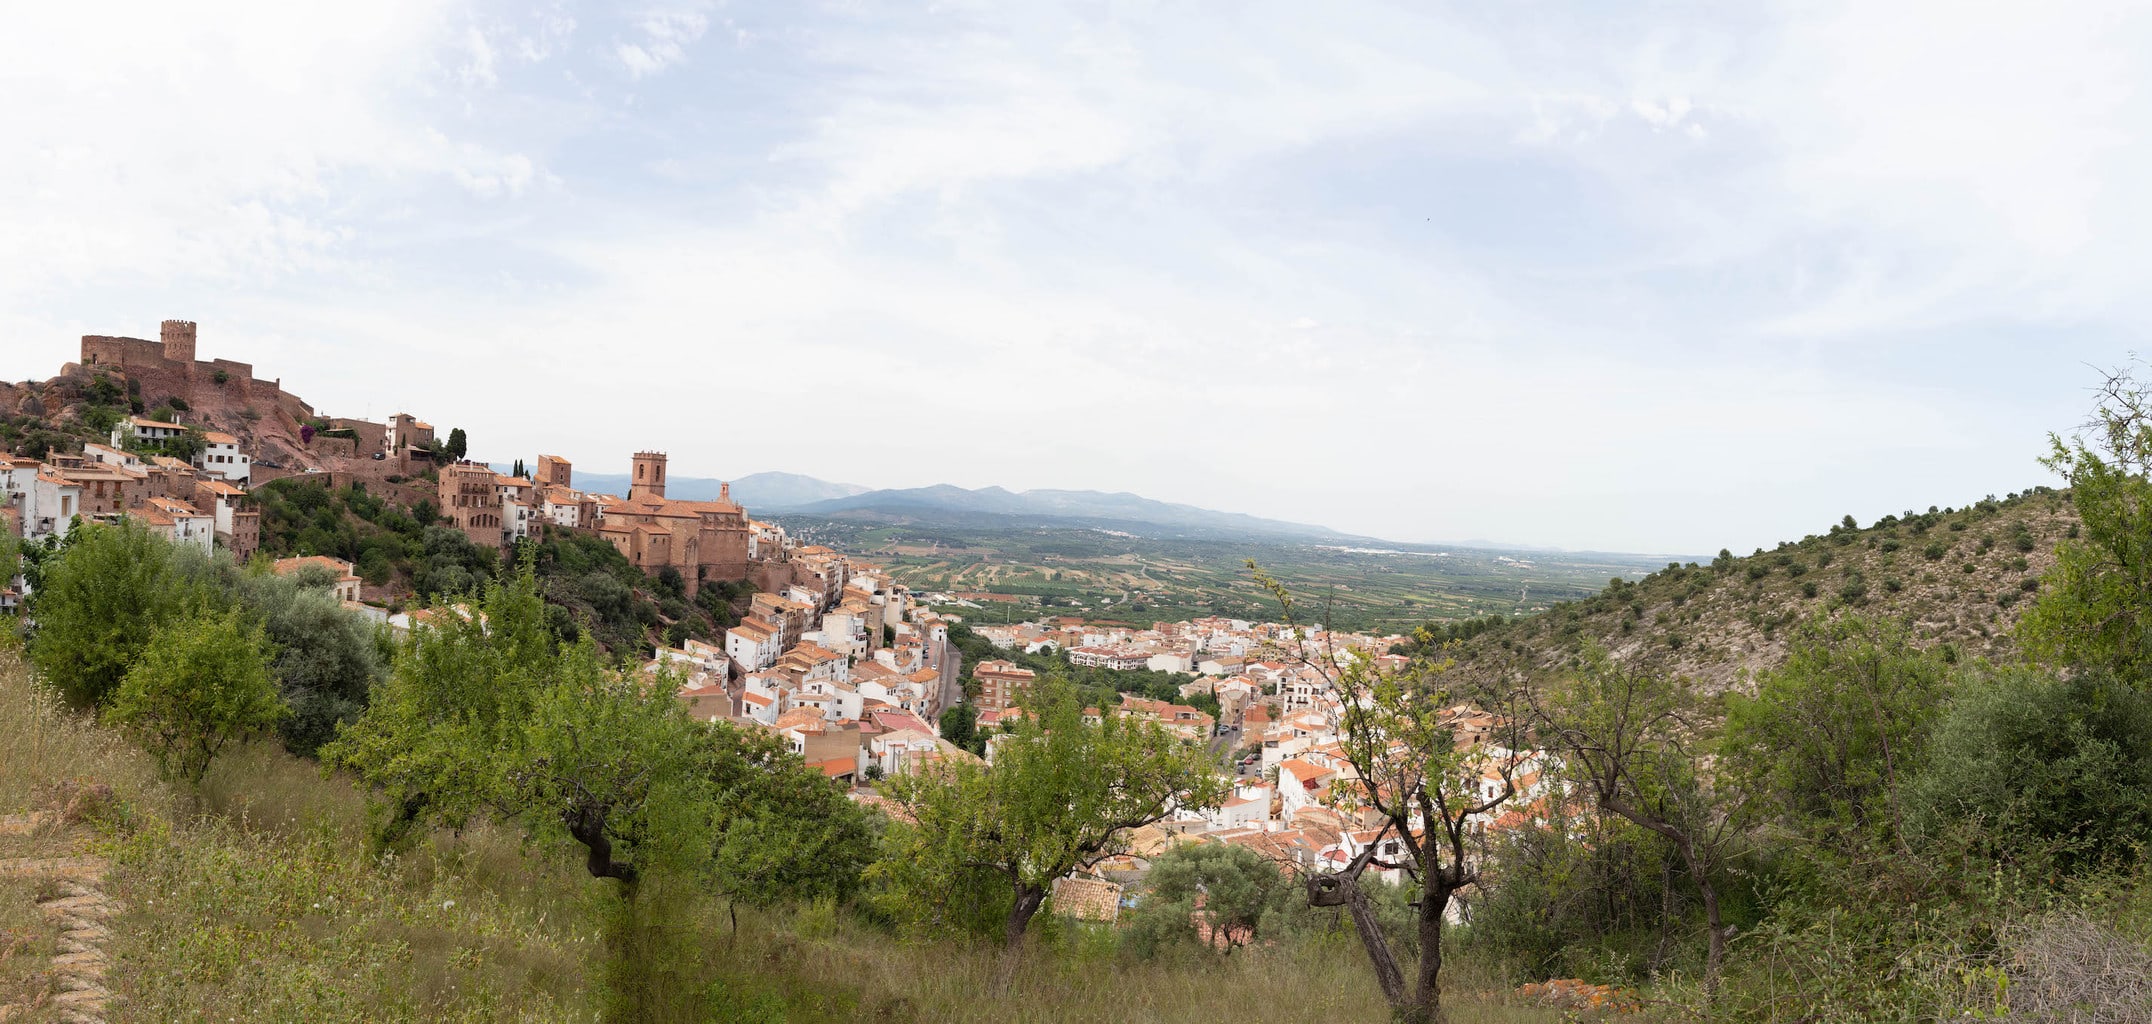
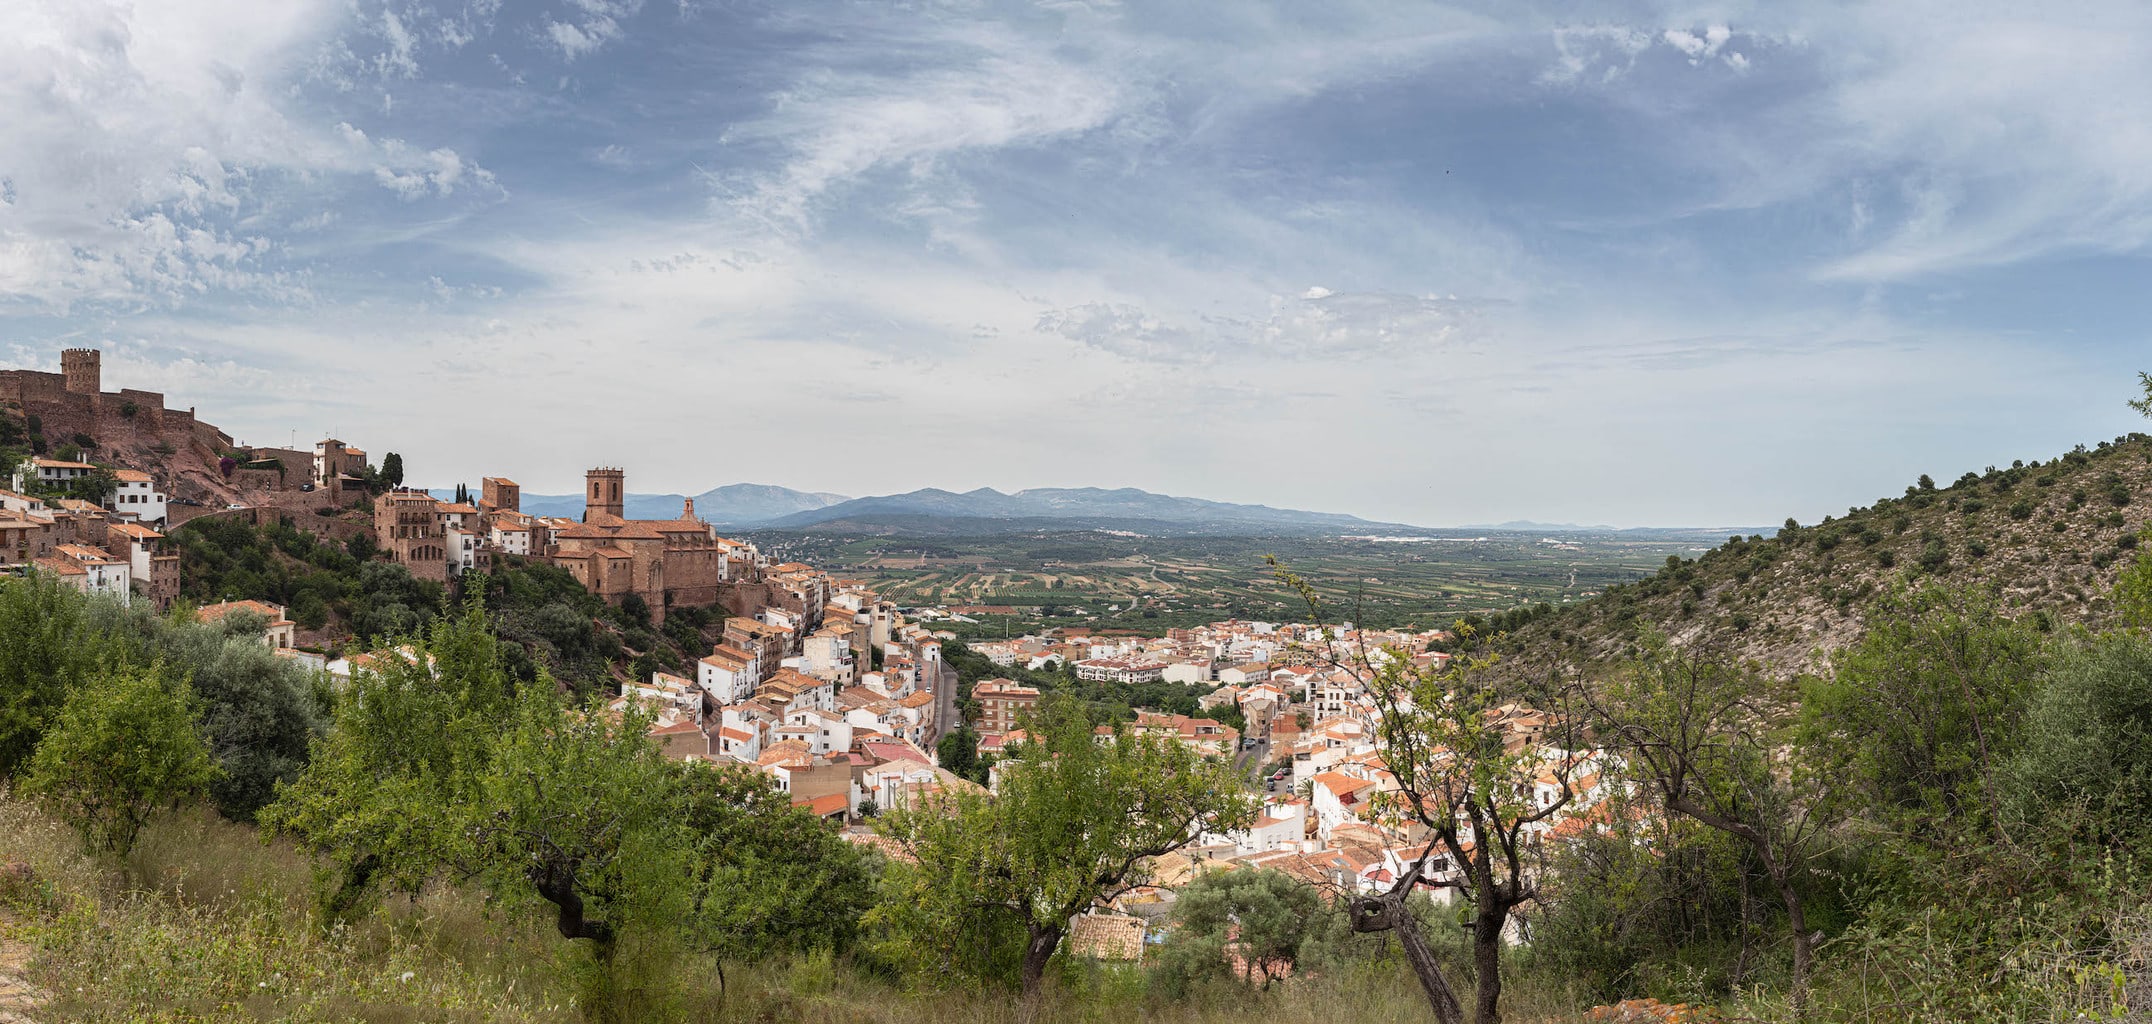
It is true that in this way you will have to take more shots, but the final result is worth it ? . In case you don't believe me, we better see it with an example. So you can check it. I leave you both the series of captures and the result.
