
Novice Photoshop users are eager to create interesting work, but sometimes knowledge is not enough for this. In this case, Photoshop effects will help. Quick ready-made effects of the program are in the "Filter Gallery". Did you see a transformed pencil drawing from a photograph in Photoshop? Such drawings are easy to make by applying effects to photos in Photoshop from the “Filter Gallery”. To understand the principle of this gallery, just consider a couple of effects from it. The rest you learn is also simple. To begin, consider an example of how to make a photo painted with paint. Next - how to make a pencil drawing from a photo.
Ink drawing from photos in Photoshop
Landscapes and views of cities are best suited for drawing with paints. Open the image in Photoshop. In the main menu, select "Filter" / Filter , "Filter Gallery" / Filter Gallery . The preview and effect selection window opens. By clicking on the plus and minus at the bottom left, you can scale the image. In the middle are lists of effects by topic. Lists are opened by clicking on the arrow next to the name. On the right are the effect controls. Basically, these are texture drop-down lists, stroke size sliders, and the like. Convert the photo to an oil paint drawing. We select the group of effects “Imitation” / Artistic , and in it - the effect “Oil painting” / Paint Daubs . It remains to choose the “Brush Size ” , “Sharpness” / Sharpness (the degree of merging of the neighboring strokes depends on it) and “Brush” ( “Simple”, “Simple” , “Wide sharp” / “Wide Sharp , ” to your taste ) Light Rough , Wide Blurry , Dark Rough , Sparkle ). After completing the settings, click Ok , save the photo ( Shift + Ctrl + S ) in any convenient format, for example, in JPG. We’ll select the settings for this picture, as indicated in the photo below. It turned out quite believable. Can be used as a souvenir card. If such a photograph in processing is printed on canvas in a darkroom, it will be very similar to the real picture and may well serve as an interior decoration.
Before processing
After processing
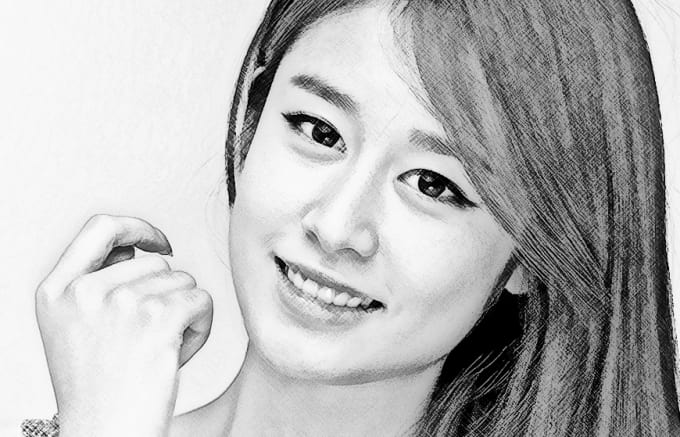
Pencil drawing from a photograph in Photoshop
In the “Filter Gallery” you can choose the effect of a sketch drawing in pencil. Apply it most often to portraits. This is an easy way, but it’s important to consider the following: the higher the resolution of the photo, the better the effect will work. In addition, the photo should be contrasting (the background is uniform, so that the model does not merge with it). We select a large photo (in this case, 5472x2767 pixels). Open it in Photoshop. The color of the sketch strokes will correspond to the main color, which is selected on the toolbar below. You can call up the palette to select a color by clicking once on the image of the overlapping squares. After choosing the primary color, go to the “Filter Gallery” . Main menu, “Filter” / Filter , “Gallery of filters” / Filter Gallery , “Sketch” / Sketch , effect “Photocopy” / Photocopy . Moving the sliders "Detail" / Detail and "Darkness" / Darkness , you need to achieve an image that looks like a pencil drawing. The settings that can be seen in the image below have been applied to this photo. You can add another effect from the "Filter Gallery" , which will enhance the similarity with a pencil drawing. To do this, in the lower right corner, click on the image of a folded sheet of paper. Another line appears in the list of effects used. Now you can go to another list of effects. Go to the Brush Strokes filter group , select Cross Strokes / Crosshatch . In its settings, we select the parameters so that our sketch resembles pencil hatching as much as possible. The parameter “Stroke Length ” , “Sharpness” / Sharpness , “Intensity” / Strength in our case can be seen in the photo below. After selecting the settings, click Ok . As a result, you can refine the picture. If suddenly, against the background of the image, not very attractive gray spots appear, they can be painted over with a white soft brush. The tool is called up by pressing B , on the control panel, select "With Feathered Edge" . The main color is changed to white by pressing the corner arrow above the image of the superimposed squares. Then just paint over the unwanted areas. Now save the picture with the key combination Shift + Ctrl + S , the file format can be selected, as usual, JPG. Here's what happened. If the main color is purple before applying effects from the “Filter Gallery” , the sketch will look like a pen drawing.So simple. Now you’ve learned how to use the Filter Gallery. You can please yourself and friends with interesting avatars for social networks. Use imagination and use other filters. Your work will surprise you.
