

We have all come across a wonderful landscape that we want to portray. You may be more into portraiture, architecture, or gastronomic photography. But if you like photography, surely the camera often accompanies you in your wanderings around the world. And surely from time to time you find yourself before a landscape that you would like to retain in the most precise, correct and memorable way.
In that case, you can not miss this very useful "tool" that we know by the name of hyperfocal distance .
But before delving into the hyperfocal distance, let's refresh some concepts in case we have forgotten them or don't quite understand them, since they will be useful for us to understand what it is, how it works, and what the hyperfocal distance is used for.
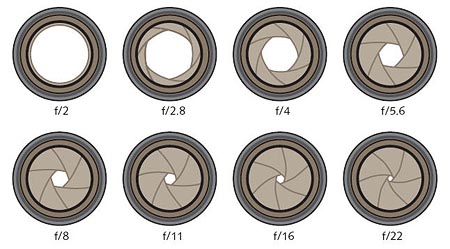
DIAPHRAGM
It is the one that controls the entry of light through the lens. Normally, with more light we can work at more closed diaphragms (F/16, F/22, etc.) and with less light , at more open diaphragms (F/1.4, F/2.8, etc.).
To make it clearer to you, the diaphragm works exactly like the human iris . Surely you have seen how your pupils work many times when you light them up (they "shrink") or when the light is scarce (they "open").
By controlling access to the amount of light that the sensor receives, we control or decide on another variable: speed.
Speed allows us to play with movement or the absence of it , at higher speeds, we freeze any type of movement. At low speeds, the movement is "imprinted" on the sensor.
DEPTH OF FIELD
Linked to the diaphragm , we find the concept of depth of field , since it is not only light that the aperture controls, it is also what controls the amount of focused area we will have in the image.
The larger the aperture of the diaphragm (f/2 for example), more light, but also less focused area in the image, that is, less depth of field. And the smaller the aperture, the greater the depth of field, and therefore, a greater area in focus in the image.
SHARPNESS
When we think of sharpness we think of focus . And we are right, in part, because we are missing another variable, what we call sharpness or contrast. Focus you know what it is; So let's see what acutance is.
ACUTANCE
It is the degree of contrast between details . The more contrasted the limit between these details, the more we perceive the sensation of sharpness, since they are more differentiated by their luminance. In other words, the more contrast there is between the edges of the elements captured in the image, the more difference we will see between them, and therefore the clearer we will see those "lines" that draw any silhouette.
THE TARGET'S SWEET SPOT
All objectives have an ideal aperture in which their degree of sharpness is maximum . This sweet spot is usually located in the middle area of the diaphragm openings; That is, if it has a maximum aperture of F/22, its sweet spot will be approximately at F/11.
Now yes, after this brief review of basic concepts, let's finally see what hyperfocal distance is and how you, as a photographer, can benefit from it.
WHAT IS THE HYPERFOCAL DISTANCE?
The Hyperfocal Distance is the distance at which we get the largest focused area in the image; that is, greater depth of field in the scene. This is one of its classic definitions:
“It is the distance between the objective and the nearest point of focus acceptably sharp, when the objective is focusing towards infinity. When it is for the hyperfocal distance, the depth of field extends from half this distance to infinity.
Michael J. Langford “Basic Photography
HOW IS IT CALCULATED?
This is the formula to calculate it, since it depends on multiple factors:
H=(F*F)/(f*d)
Where H is the hyperfocal distance , F is the focal length of your lens, f is the aperture of the diaphragm , and d is the diameter of the circle of confusion .
Have you been speechless? Don't be scared, did you think we were going to leave you with this confusing explanation after getting here? ?
BEING REALISTIC… SIMPLY AND STEP BY STEP
It may not be the most orthodox way to calculate the hyperfocal distance, but I assure you that it is the most comfortable, since there is a great application called Dofmaster that you can consult here and that, free of charge, calculates the hyperfocal distance with the same parameters as the previous formula.
BEFORE ENTERING THE VALUES YOU HAVE DECIDED, DO NOT FORGET THAT…
You are not only looking for the largest area of the field in focus , but the highest possible sharpness in the image. Using the hyperfocal distance will greatly increase that focused area of your image, but don't forget that lenses retain the highest degree of sharpness at intermediate apertures, which in the introduction I called the " sweet spot of the lens ."
Therefore, the best way to obtain not only the largest area of the field, but also the sharpest, is to combine both factors .
Here is an example of calculating the focal length through Dofmaster . In which I have added the parameters of my scene and equipment: The model and brand of my camera, the focal length of my lens, the diaphragm opening chosen, and the approximate meters at which what I want to focus is located. As a result I will obtain an automatic value of the hyperfocal distance, in this case 0.69m.

After getting the magic number that will tell you how far to focus, here's what you'll get:
- Depth of field or area in focus from where you place the focus to infinity . In this case, the formula tells me that I should place it at approximately 0.69m. That is to say, 0.69m. to infinity everything will be in focus.
- But not only that, the use of the hyperfocal distance also increases the depth of field in front of the focused area . Exactly at half the hyperfocal distance. That is, in my case, the hyperfocal distance is 0.69m, this means that its half is 0.34m. And that therefore, I will add depth of field at that distance in front of the area that I have previously focused on; From 0.34m to infinity, all my image will be in focus. A wonder for lovers of infinite depths of field, right? ?
To make it even clearer, I show you by comparison what would happen in this same example, if you did not use the hyperfocal distance , and simply focused at 15m. that we have used to elaborate this “exercise”:
From the previous image we can easily and graphically deduce that without using the hyperfocal distance we lose a large and valuable area in focus both behind the focused area and in front of it.
