

Today I will not promise you the most fascinating article in the world, because I am going to talk about something that its name already prepares us for the worst: the circle of confusion. Unbeatable name for something that is so hard to understand.
If, in addition, we associate this concept with other words or concepts such as hyperfocal distance , focal plane, focus, diaphragm aperture, we add distances, millimeters and endless more, the subject becomes complicated.
That said, I do not promise you the most fascinating article in the world. What I do promise you is that, when you finish it, you will know and understand perfectly what the circle of confusion is and how to calculate it.
Surely as a good photographer (or photographer) you are curious, I know that you are going to stay here and give me the opportunity to explain it to you. So, right from the start, I thank you for your patience ;-).
FOCUS
To understand the circle of confusion, one must first understand how the focus of our cameras works.
Look at the following image:
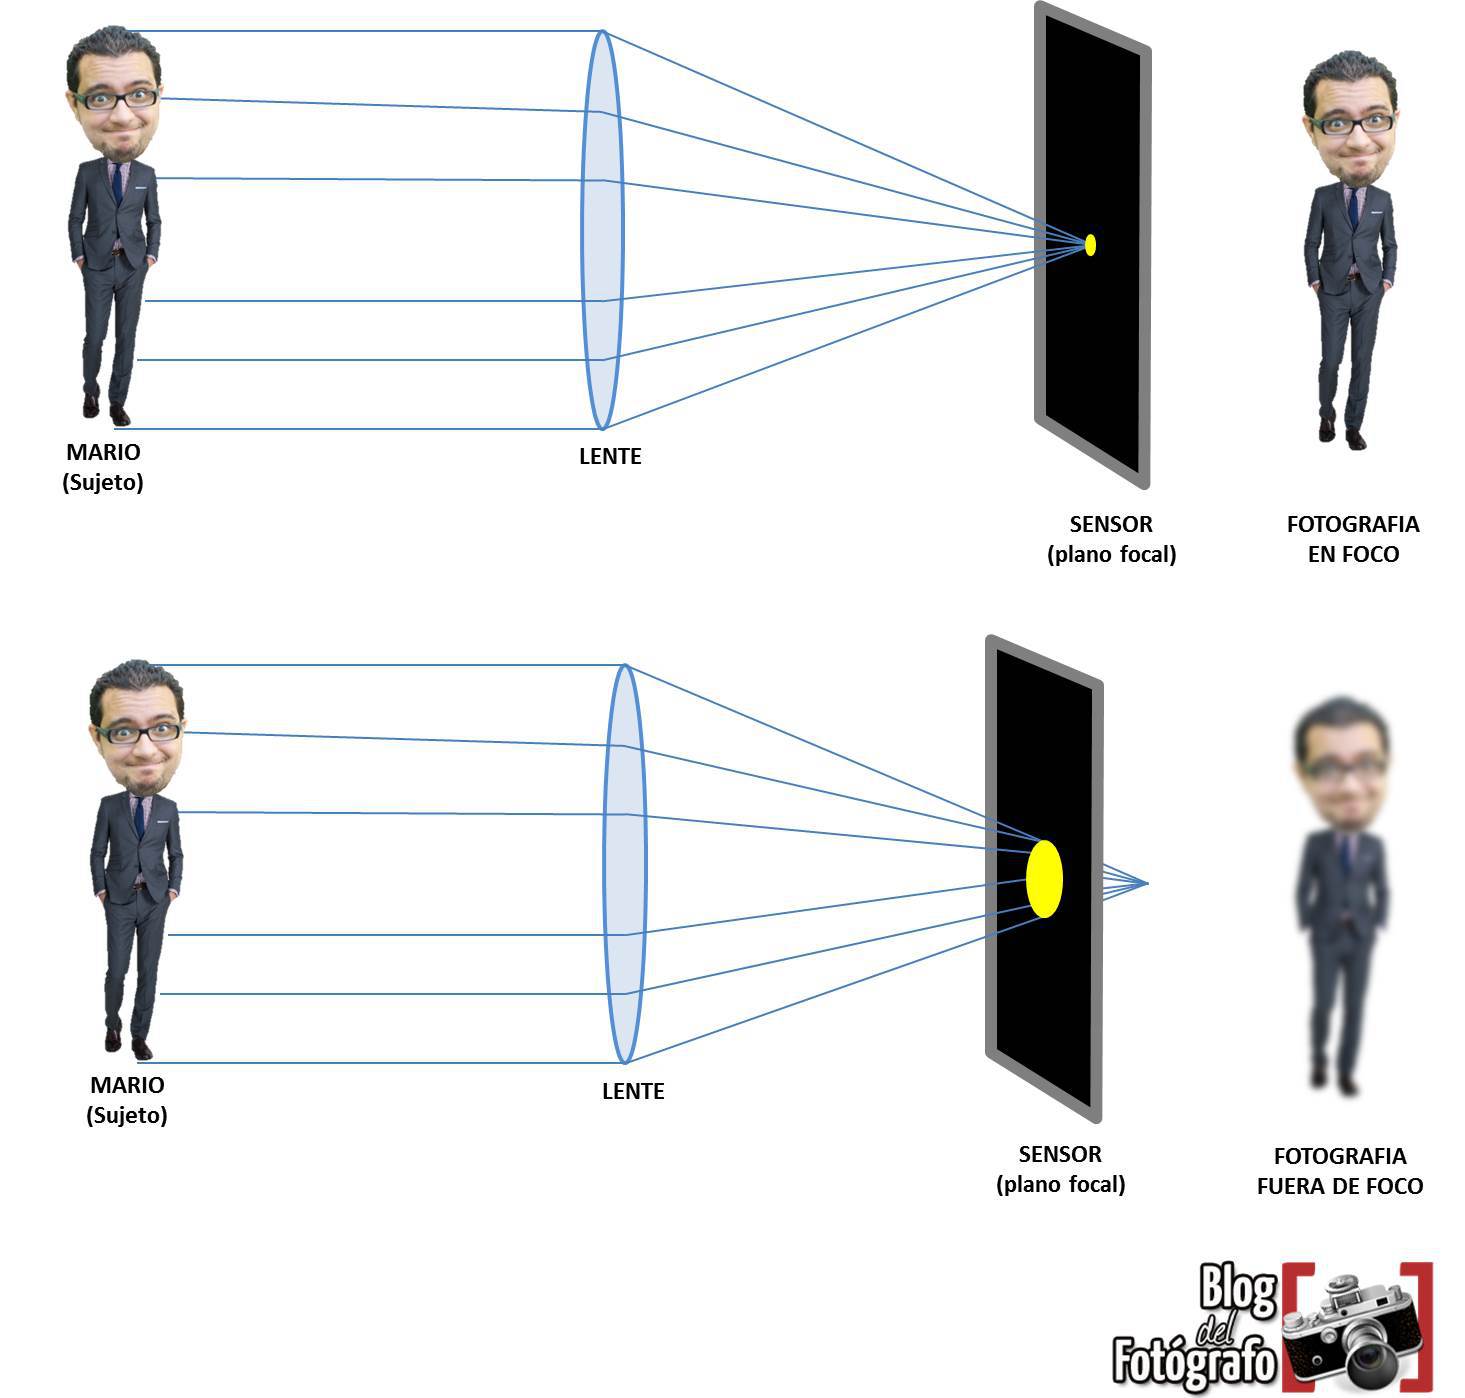
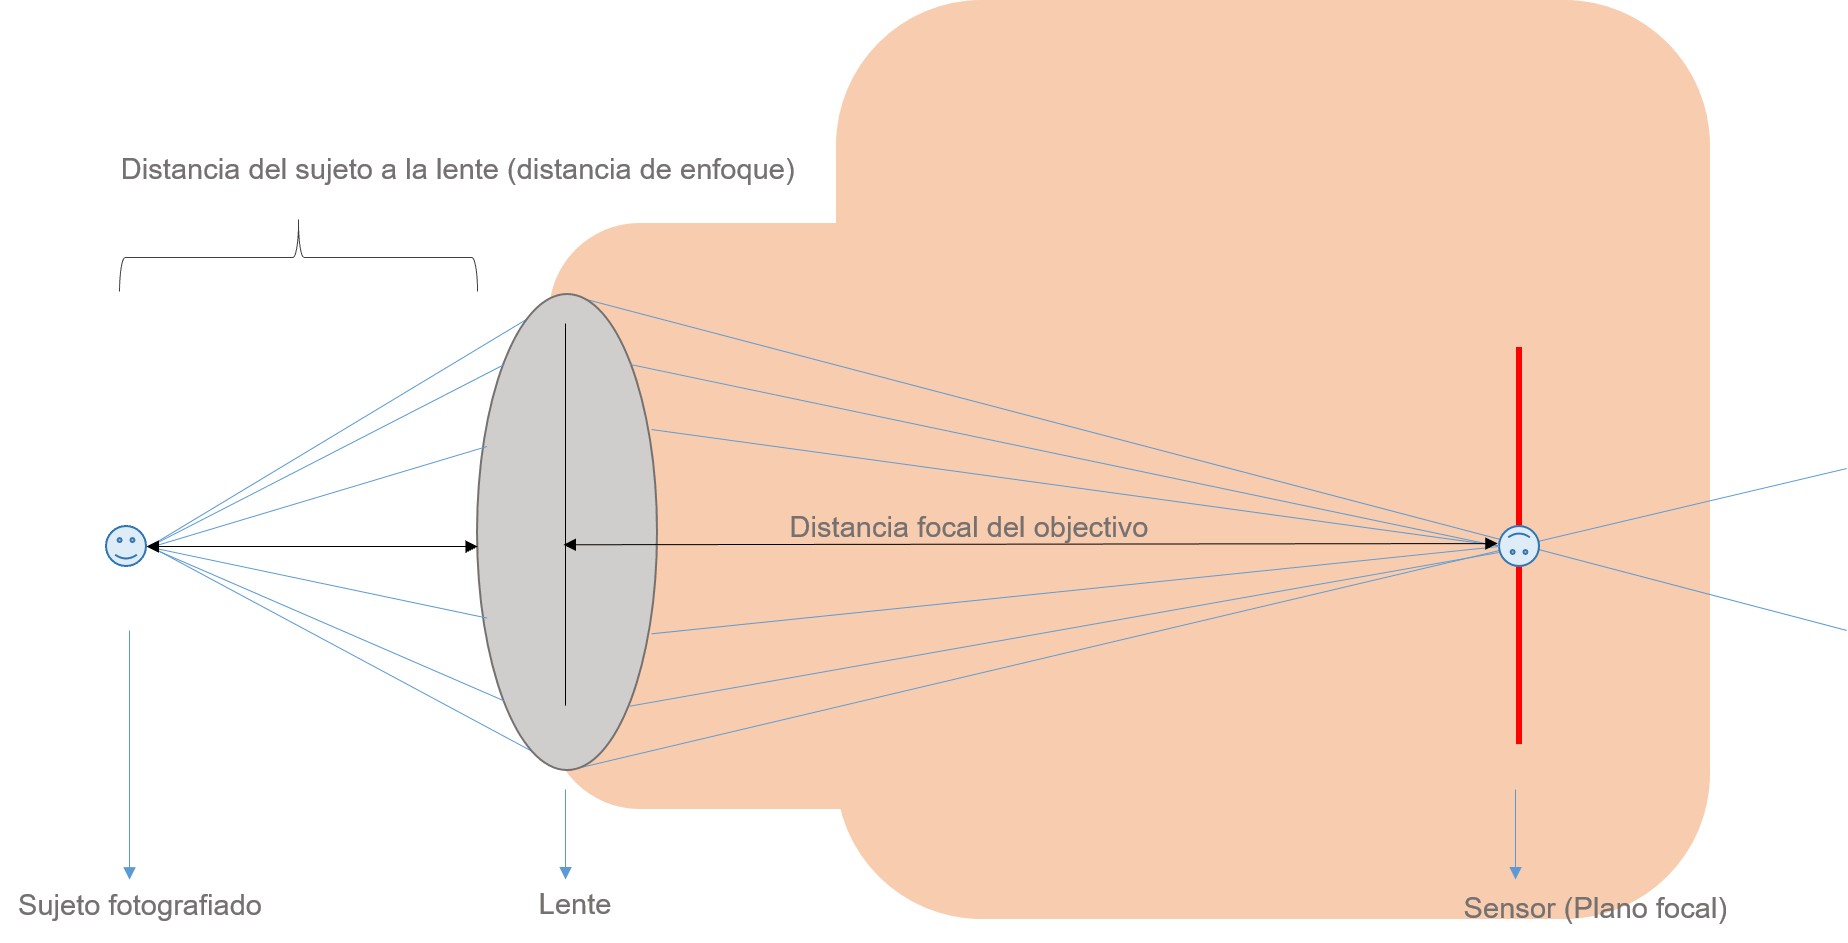
As you can see, we have a subject (Mario) that we want to photograph. This is at a certain distance from our lens (the one we decide) and which is known as the focus distance.
Mario's image, in the form of light, passes through the lens and is projected onto our sensor or focal plane (where the light beams converge is known as the nodal point ). If the projection of the image (of Mario or the subject we are photographing) perfectly matches the sensor, Bingo! Let 's have focus! And this translates into a perfect point on the sensor.
If, on the other hand, the image is projected in front of or behind the sensor (light beams converge outside the sensor's focal plane), this image arrives at the sensor not as a perfect point but as a circle, the size of which is increased or reduced. decreases depending on how close or far the sensor image has been projected.
That is, the further the image converges from the sensor, the larger the circle will be that is reflected on the sensor (think of an increasingly blurred point) and, on the other hand, the closer this convergence (nodal point) is to our sensor, the more it will resemble a point or, what is the same, the smaller the circle it projects on the sensor.
THE CIRCLE OF CONFUSION
If you have read carefully (and especially if I have been able to explain myself well), you may have already guessed what the circle of confusion is ;-).
I have told you before that the perfectly focused area translates as a perfect point on the sensor, but you may wonder what happens with everything that does not exactly coincide with the focal plane. Because our camera is incapable of focusing on more than one shot at a time. So what?
You may have thought that there are many images in which not only what we are focusing on appears clearly, but also an area immediately before or after that can be larger or smaller depending on the image.
Is that area in focus or not? Well, the answer is yes and no ? . That is to say, in the sensor, everything that does not converge perfectly on the focal plane will not be a point, it will be a circle or what is the same, it will be theoretically out of focus.
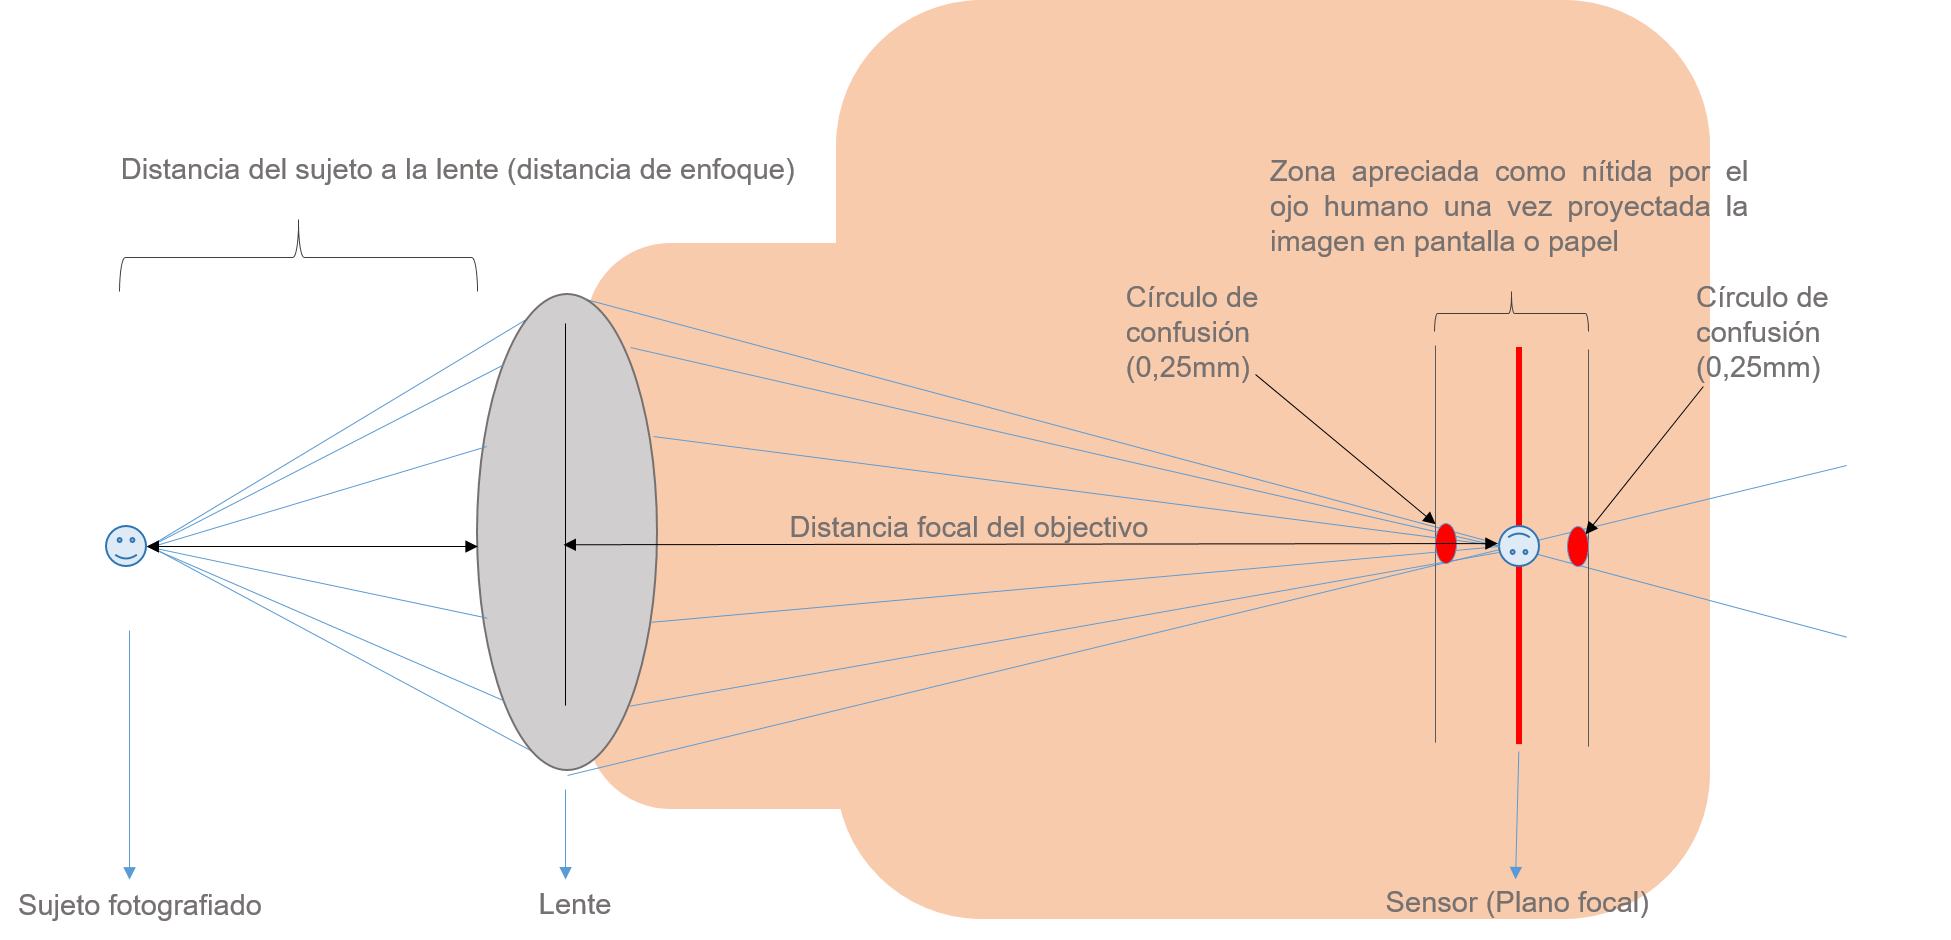
Now, our perfectly imperfect eye, these blur circles are not capable of distinguishing them from a point as long as they are less than a certain value that has been established at 0.25mm.
In other words, it may be that in theory and on paper, the image is not focused on our sensor, but it is for our vision, because everything that we look at at a certain distance (it is established at about 25cm.) and that has a size less than 0.25mm, we will perceive it as a sharp point.
In short, we can say that the circle of confusion is:
The maximum size that a blurred dot on the sensor when projected onto a surface and viewed by a viewer at a specified distance, is still perceived as a dot rather than a circle.
That is to say, everything that, although it is not perfectly focused on our sensor, but that we perceive (in prints, screens, etc.) as a sharp point will be, for us, a perfectly sharp image.
If, on the contrary, the circle of confusion is not perceived by our vision as a point but as a circle, we say that this area of the image is out of focus, or that it does not have an acceptable sharpness.
THE CIRCLE OF CONFUSION AND THE APERTURE OF THE DIAPHRAGM
If you have already understood a little what the circle of confusion is, let's see how it is related to the aperture of the diaphragm and, consequently, with the depth of field.
For this we turn to the images:
As you can see, in the first image, we have an open diaphragm aperture that gives us a relatively shallow depth of field, since we consider that the place that coincides with the circle of confusion is the maximum point of acceptable sharpness.
On the other hand, if we do the test with a more closed diaphragm opening, as is the case in the second image, we see that the depth of field increases, since the circle of confusion is located further from the focal plane (sensor) and, therefore, the entire area between the sensor and the circle of confusion will have acceptable sharpness.
THE CIRCLE OF CONFUSION AND THE HYPERFOCAL DISTANCE
In its day, I already explained to you what hyperfocal distance is and what it is for, but if it is still a term that scares you, I recommend this article that will make you lose your fear ?
In short, the hyperfocal distance is the distance at which you have to focus in order to have the greatest possible depth of field in a scene. In other words, using the hyperfocal will be equivalent to having the maximum sharp area in focus (for the eye, because remember that the sensor can only focus on a single plane that will appear as a sharp point) or what is the same, the circle of Confusion will be located at the point furthest away from the sensor.
HOW THE CIRCLE OF CONFUSION FOR EACH CAMERA IS CALCULATED
It is calculated by dividing the diagonal size of the sensor by 1,500 (according to Kodak ) or 1,750 according to Zeiss (stricter ? ), or… simply adding here in Photopillsthe necessary parameters to calculate it: camera model, the size at which you are going to print or enlarge, or the distance at which you are going to observe the image.
AND WHAT IS ALL THIS GOOD FOR ME?
It is very likely that you have asked yourself this question, or that you have already intuited something. Well, be that as it may, here are some of its utilities:
- Calculate hyperfocal distance
- To take photographs in large formats (the larger the print, the smaller the circle of confusion should be)
How about? I hope the confusion has turned into clarity after reading this article, and if not, at least you've done a master's degree in optics, just like me ? hehe. I hope you have found it useful and that you reward our common effort (mine for writing it and yours for reading it) by sharing it on networks so that someone else can benefit from it. Thank you very much for reading this far and until next time ? .
