
![15 WAYS TO MASTER YOUR RAW MATERIAL, LIGHT [UPDATED]](https://photographychef.com/wp-content/uploads/2023/01/15-WAYS-TO-MASTER-YOUR-RAW-MATERIAL-LIGHT-UPDATED.jpg)
Light in photography is the fundamental element, without light there is no photo. That is why, in order to obtain surprising results, you must learn its technical characteristics and also how to model it to your liking. Before continuing with today's advice, to go deeper into the subject of lighting in photography I recommend this very complete guide in which Mario tells you everything you need to know.
In today's article I bring you 15 tips so that you can master your raw material: light, but before delving into each of them, it is necessary that we review some concepts that I have previously touched on in the article “ 23 Ways to Use Light As a Creative Element (For When You're Not Inspired) ”.
WHAT DIRECTION IS THE LIGHT?
Light, despite propagating in all directions, has a direction and this depends on where the light source is located, that is, from where the subject or object incident by it is illuminated. In general it could be said that the direction of light in photography can be:
- Frontal
- Overhead (the light source illuminates the scene, subject or object from above)
- rear
- Side
- Against Aerial (the light source illuminates the scene, subject or object from below)
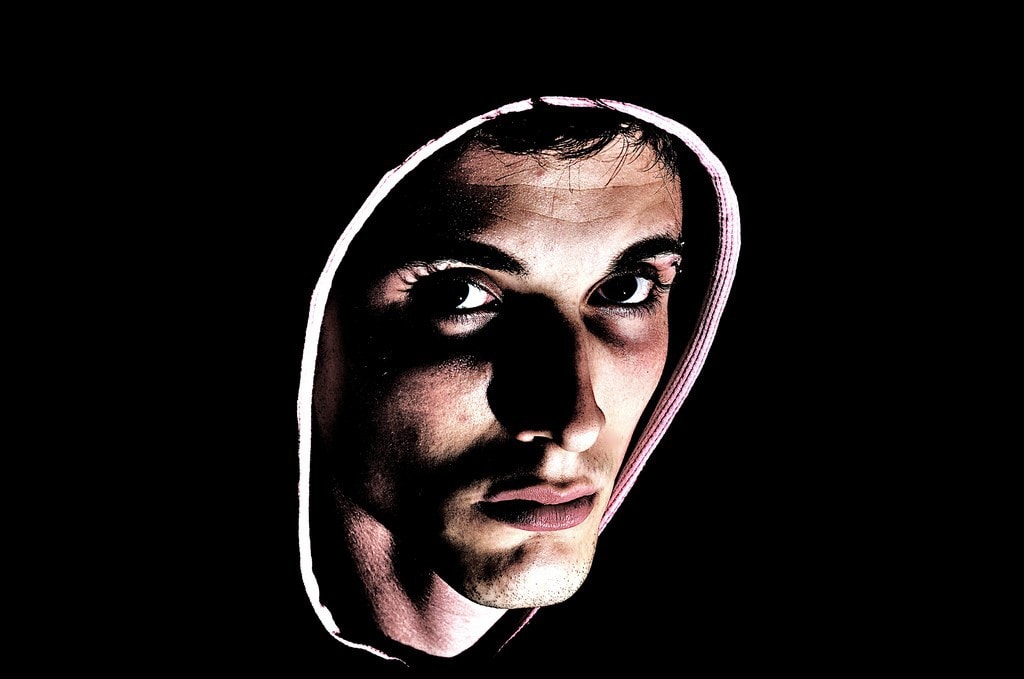
- Spot (illuminates only part of the subject to make it stand out from the rest of the image)
The way in which you illuminate your objects or subjects within the setting of your photography will radically change the sensations that it will transmit, creating one sensation or another. Look at the following example, the same portrait lit from different directions:
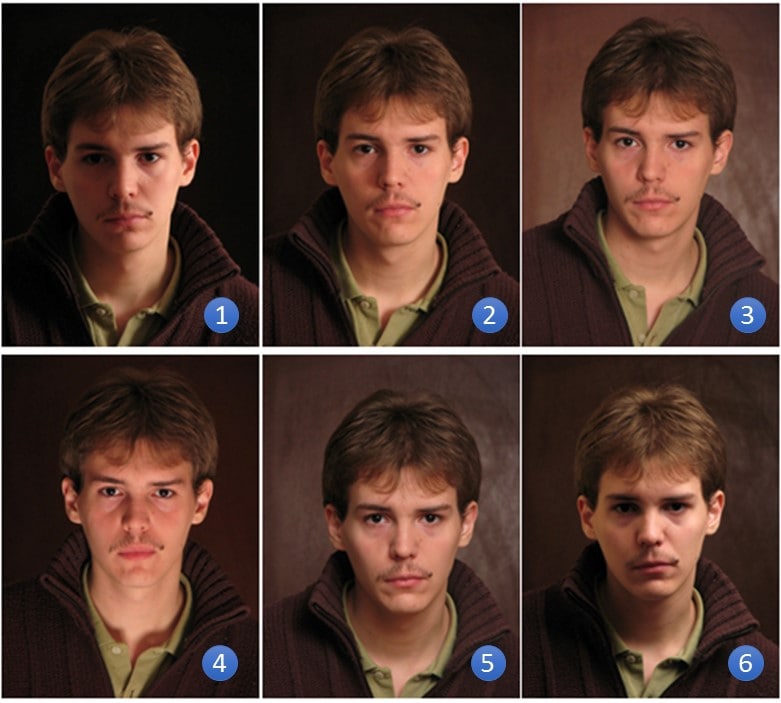
1. WHAT IS SIDE LIGHT?
This type of lighting enhances the textures and gives the scene, in this case a subject, greater volume thanks to the contrasts between light and shadow.
2. SEMI-SIDE LIGHT
In this case, the light source has been placed at 45 degrees and despite continuing to work with side light, the sensations change a lot. The contrast is much less, it still continues to outline the face, although to a lesser extent because the contrast of this is less.
3. WHAT IS FRONT LIGHT?
In this case, the light source is located in front of the subject, which means that the reliefs and textures cannot be appreciated in such detail since the contrast is minimal. This type of lighting is easy to achieve if you fire your camera's built-in flash.
4. LIGHT AGAINST OVERHEAD
This time, the light source has been placed below the subject, which is why it feels unnatural when viewing it. Our eyes are not used to perceiving light with this type of direction since it does not appear in this way in nature.
5. FRONT OVERHEAD LIGHT
Contrary to the previous photograph, the light source was placed above and in front of the subject, that is, so that it hits the subject from the front but overhead: the lighting comes from above.
6. WHAT IS OVERHEAD LIGHT?
In this case, the light source has been placed just above the subject, making it perpendicular to the floor, just as it would be if you went out to take pictures at noon. In this way, the light causes contrasts that, in this case, are not at all pleasant in our subject, but notice how his eyes have been darkened.
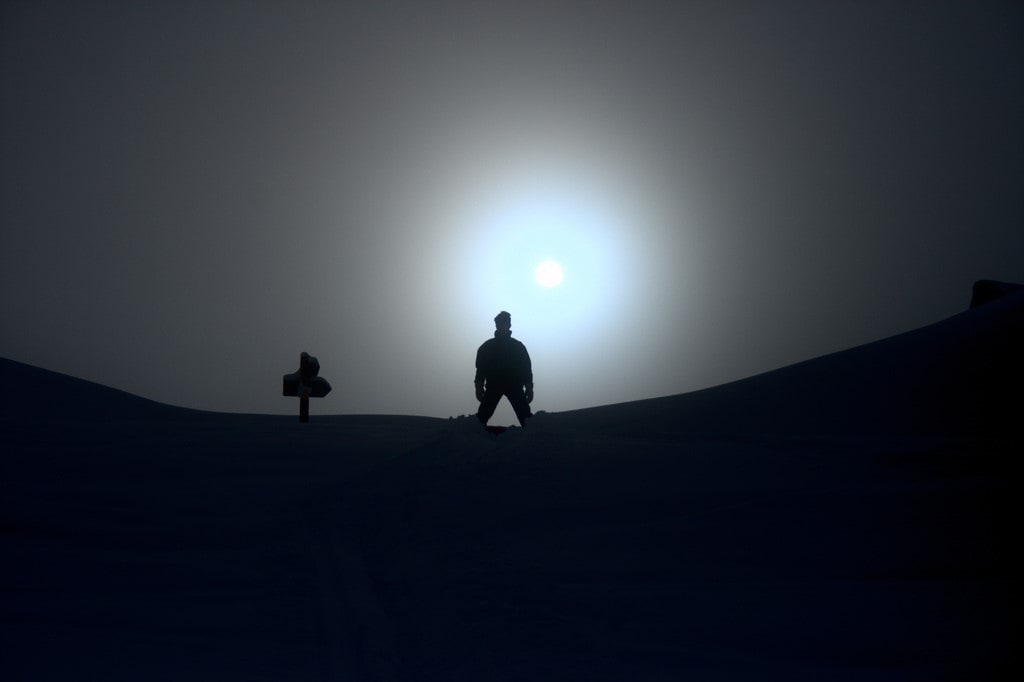
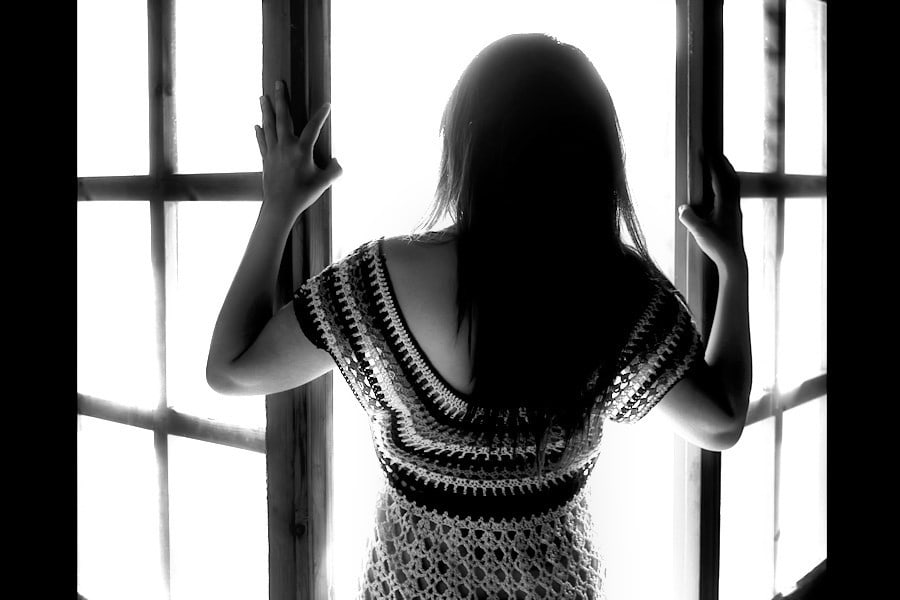
It will depend on where the light comes from or, from where you illuminate it to create one effect or another. Keep in mind that if the light is from the front, the object will lack shadows, so it will lose volume and detail. If the light is from behind, the silhouette of the subject of your photograph will stand out as in the photograph that you have just seen. If the direction of the light is overhead, lateral or against the overhead, shadows will be drawn on the scene that will highlight the textures and reliefs, giving the photograph greater volume and if the light is punctual, only what you have decided to illuminate will stand out.
Remember that the eyes seek the light, so the way to illuminate or not a scene will be of great help when it comes to giving prominence to your subjects and directing the viewer's gaze .
LIGHT INTENSITY
Depending on the intensity of the light with which you are working, the results will also vary: it is not the same to work with a powerful light like midday, which produces very marked shadows, than if, for example, you take your photographs in a completely cloudy day. Where is the difference? On the "intensity of light": can it be hard or soft?
WHAT IS HARD LIGHT?
If the light with which you work is very intense, very marked shadows will be drawn in the scene that will create strong contrasts between light and dark tones, having to choose to obtain detail in the lights or in the shadows, but it is very difficult to obtain detail in both of them. Why? Take a look at the following article and you will understand: " Detailed Guide: How to Perform Correct Metering and Exposure in Your Photographs ".
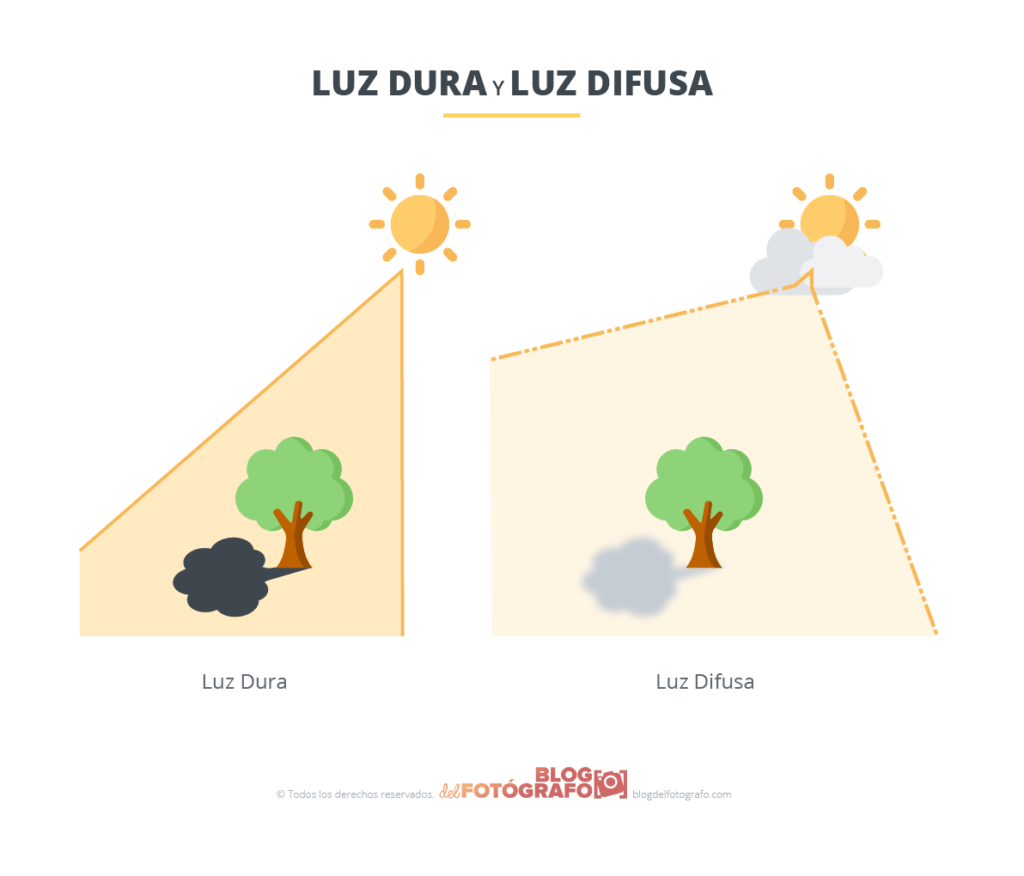
WHAT IS SOFT LIGHT?
On the contrary, if the light with which you work is more diffuse, the shadows will be almost imperceptible and diffuse. The contrast in this type of situation is much lower, which is why this type of light is very popular among photographers thanks to the even light throughout the scene.
Each lighting situation has its advantages and disadvantages and although hard light will be very useful when it comes to emphasizing textures and soft light to achieve more uniform lighting, in both situations and using the elements that I will detail later in this article. item, you can manipulate the light to your liking. Be patient!
LIGHT SOURCES
The intensity of the light is not only given by the power of the light source but also by its size: the larger the surface of the light source, the softer it will be, and the smaller it is, the harsher the lights that it will be. draw. Think of it this way: the sun, despite being a huge star, in our sky is just a small circle, that is why the light it produces is hard, on the other hand, when the light bounces off some clouds, when these have a much larger surface (because of its proximity to the earth) the light on cloudy days is soft.
If you want to obtain a soft light using a flash (intense and small light source) try to diffuse it using a diffuser, light window, etc. Do not worry if you do not have one, with the following guide you can make it in minutes and with materials that you would commonly throw away: " DIY: How to Assemble Homemade Photographic Accessories ".
LIGHT METERING
As I told you in the article "Detailed Guide: How to Correctly Meter and Exposure Your Photographs":
“The mastery of light is what will define you as a photographer and the way to measure it is what will make you a master.
If the light in the scene is not correctly measured, the exposure will not be correct and therefore, the quality of the photograph will suffer, making all the techniques and tricks that you have applied have been in vain.”
That is why before learning to shape light, it is essential that you understand how to make it perfectly reflected in your photographs in order to not only achieve the image you were wanting, but also to maximize the quality of all the resulting photographs and this is achieved by making a correct measurement and exposure.
How to do it? The process is somewhat extensive despite being something relatively simple and that all it requires is practice, but since the reason for today's article is something else, I will refer you to the article with which I opened the section in which you will be able to understand how to expose correctly all your photographs: " Detailed Guide: How to Perform a Correct Measurement and Exposure in Your Photographs ".
MEANS TO CONTROL LIGHT
Now that you know more about the qualities of light and as I promised you before, the time has come for you to know how and with what elements it will be possible for you to model light whatever its source and intensity.
Here is a series of elements with which you can, with a little practice, generate, direct, diffuse and model light in your photographs:
- Flash: The flash is the photographer's number one ally when it comes to adding artificial light to a scene. Whether you use your camera's built-in flash or have an external one handy, this is the ultimate means of adding extra lighting as it takes up little space and can be really powerful. By using one or more flashes, you will be able to achieve excellent results when shaping the light since it is you who defines its intensity and direction for each of your photographs. Be sure to read the following articles if you want to get the most out of your flash: “ Everything You Need to Know About Flash ”, “ Tricks for Better Flash Use ” and “ Did You Know These Creative Ways To Use Flash? ”.
- Spotlights: Just like if you use a flash, by using spotlights or extra lights, you can control the direction and intensity, but unlike flash, when you use continuous light (flash is just a flash) you can shape it "in alive”, that is, you will be able to see the results of applying one or another lighting in the scene. The main differences with a flash are the color temperature they emit and of course their size and portability.
- Reflective screens : these screens are surfaces that will allow you to reflect the light that falls on them. You can use a wall, a sheet of paper, a cloth or, if you have a few extra euros, get one specially designed for photography, they are not expensive at all. Depending on the color and texture of said surface, the light will be reflected in one way or another: it will change its color, intensity and direction. You can find a wide variety of photographic reflectors: golden ones that reflect warm light or silver ones that reflect colder light, white ones that diffuse it, etc. You can even make them yourself. I eat? Reading the following article: “ DIY photography: How to Assemble Homemade Photographic Accessories ”.
- Diffusers: Diffusers are, like reflective screens, accessories that you can use to make the hard light of a flash or spotlight softer or more punctual. As with reflective screens, the limit on its use is set by your imagination. There are countless types of diffusers on the market, but with a little creativity you can create your own: a curtain, a handkerchief, a sheet of paper, clouds, a plastic bottle, and any other element that allows you to reduce the intensity of the diffuser. light and increase the surface from where it is emitted.
- Filters: filters are lenses or crystals that, once placed in front of the lens, will allow you to achieve endless effects such as: eliminating reflections, filtering certain colors, reducing the amount of light that reaches the sensor, etc. I recommend that you read the following article if you want to know the different types and uses that you can give to the different filters available: “ Types and Uses of Photography Filters ”

THE CONSTANT SEARCH FOR LIGHT
The obsession of every photographer is to find good lighting that justifies taking the camera and starting to create spectacular photographs. The constant search for light, whether you have your camera in hand or not, is something that, with the passing of the photos, will obsess you. But can good lighting be found or manufactured?
You cannot settle for just not having found lighting that meets your expectations, the search for the perfect photograph cannot be limited only to “being lucky” or “being at the right time”. Luck is made by you and the more you work to capture that photograph that you want so much, the closer you will be to obtaining it.
A well-lit photograph makes a difference, so if you are able to put into practice all the techniques and tips that you have been learning in your time at the Photographer's Blog , your path to success is almost assured.
Although there are many other factors that make a photograph something spectacular, the domain of light is one of the most complicated to manage, after all, photography is light made into a photo.
As I told you in the article “ 23 Ways to Use Light as a Creative Element (For When You're Not Inspired) ”, you can work both with natural light, which is that which is present in the environment, whatever its source (Sun, moon, etc.) or, introducing an external focus, firing a flash, the light of a sign, etc. The challenge is to make the light available in the scene, whatever its source, become your ally to enhance the messages that your photographs convey.
Below I leave you a series of tips, tricks and techniques so that, the next time you go out to do what you like the most, take pictures, put into practice:
INDOOR LIGHTING
1. The more light, the better: if you are taking pictures indoors, try to clear the path of light so that it can enter it: raise the blinds, draw the curtains, etc. The more natural light you have when taking your pictures, the better results you will get.
2. Avoid firing your flash: although I just told you that the flash is your best ally when it comes to increasing the light in a scene, if it is done indoors, the artificial light from the flash will take away the rich tones and everything the charm that natural light produces in these. Flash light, being harsh, is usually not appropriate. Anyway, remember that these are tips so that in "average situations" you get good results, which does not mean that you can get stunning photos by ignoring them.
3. Set the white balance: although in the era of digital photography and even more so if you shoot in RAW format , white balance settings can be done in post production, that is, on the computer, keep in mind that depending on the color temperature of the light in a certain scene, the colors will be affected. If you fire your flash, remember to compensate for the cold tone of its light, with a white balance that neutralizes this effect so as not to distort the colors.
OUTDOOR LIGHTING
4. At noon is not always the best: as I mentioned before, the intensity and direction of midday sunlight is so harsh and perpendicular that it generates excessive contrasts, which is why most of the photographs taken at this time tend to be very flat and unattractive.
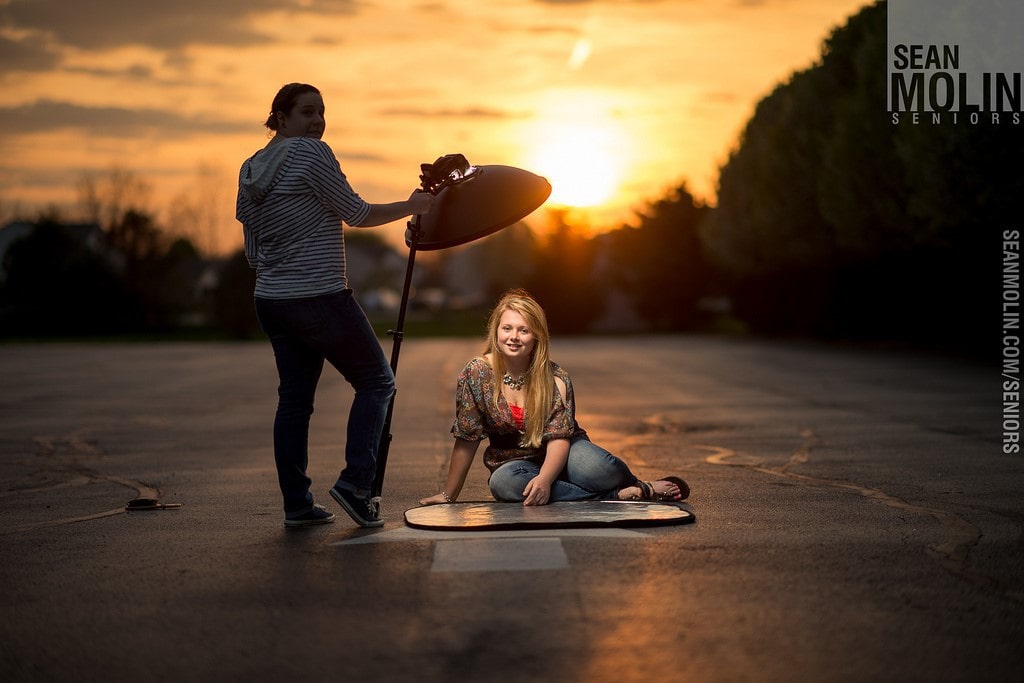
5. The blue hour: The best moments to take pictures outdoors are in the so-called “blue hour” or “golden hour”. What do I mean? The twilight hour, which is approximately one hour before the sun sets to one hour after the sun has set below the horizon, and also the first hours of the day as the sun rises, are the ideal time to take advantage of the great variety of tones and colors that heaven has for you.

6. Stability, always: the fact that you take shots outdoors where, a priori, you may have better lighting conditions does not mean that you should forget to use a tripod to prevent your photos from coming out shaky. Depending on the time of day, you may need to take longer exposures that are impossible to do if you don't have a tripod with you. In the best hours of the day to take photos, such as “the blue hour”, the light intensity is usually low.
7. Keep the ISO to a minimum: although in the absence of light, the quickest solution that may cross your mind is to raise the ISO sensitivity, keep in mind that doing so will introduce noise into your photos that may end up ruin them. Try to keep the ISO as low as possible, how? Take a look at the following article and you will become an expert in it: “ How to Use the ISO Correctly in your Photographs? ”.
THE DIRECTION OF LIGHT
When you work with natural light, it is not always possible for the scene to be illuminated as you need it to be. In these situations you can do two things: either you settle for what you have or you put all these tips into practice in order to transform a given situation into your ideal situation.
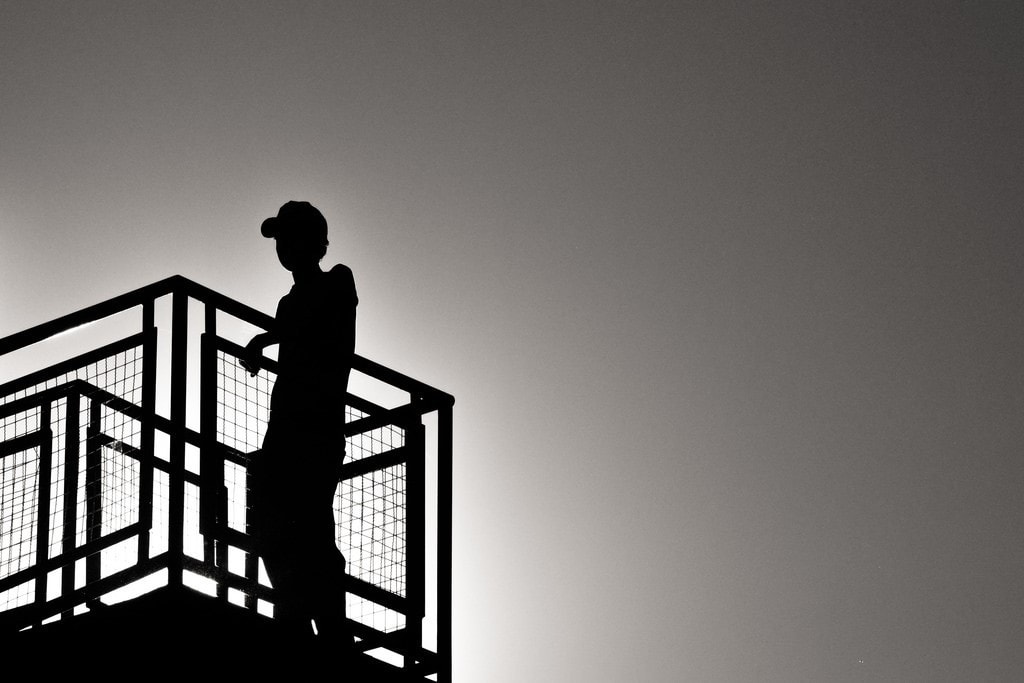
8. Don't be afraid of backlighting: although it is usually quite difficult to obtain highly detailed photographs in this type of situation due to the impossibility of obtaining detail in both lights and shadows, this should not prevent you from getting the most out of your imagination and get amazing shots with back light.
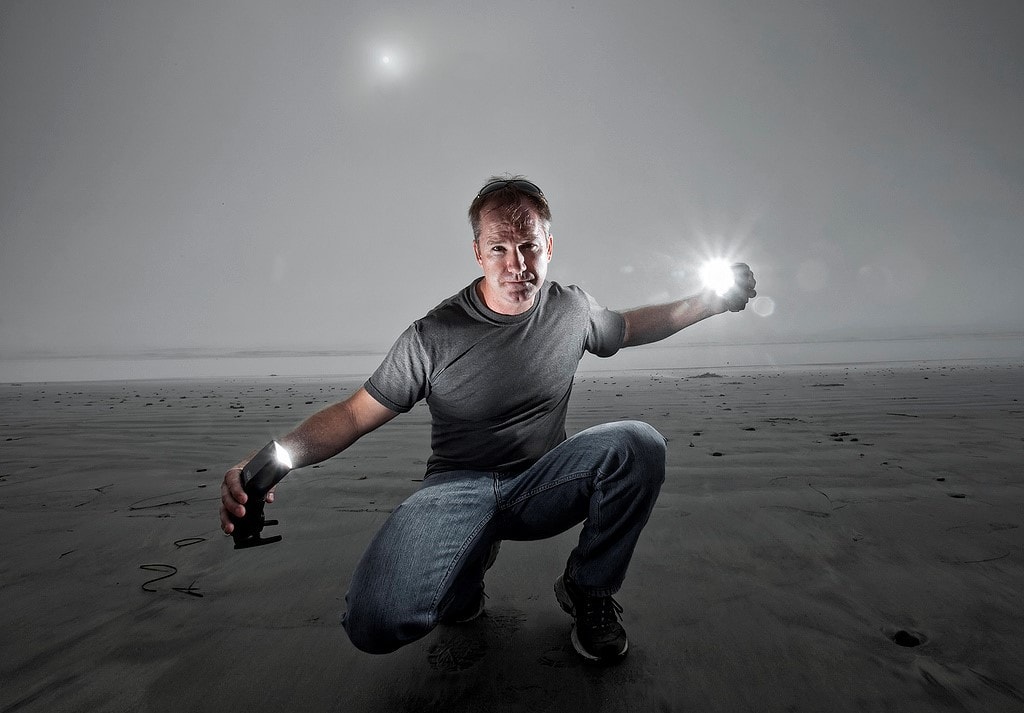
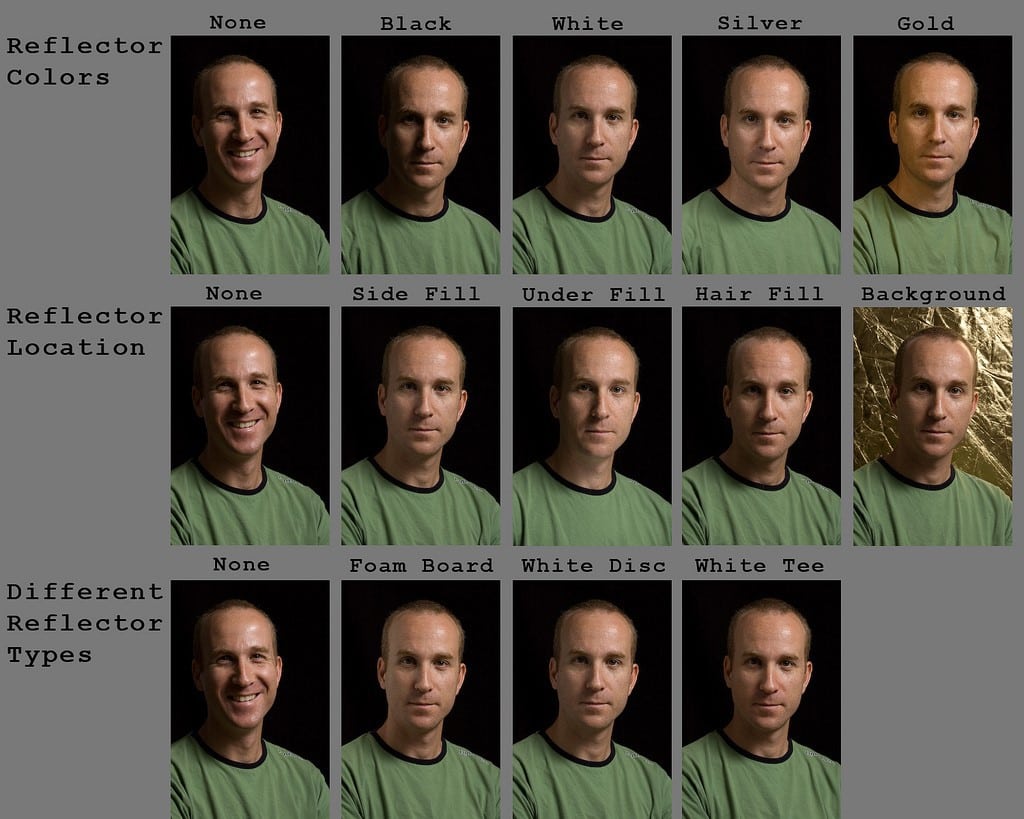
9. Be encouraged to use reflectors: in certain situations, such as strong backlighting, the flash will become your best friend, as long as you know how to get the most out of it. If you can't avoid backlight, you can compensate for the difference in tones by firing your flash. Try to bounce it against a surface that works as a reflector or, get your own. The results that you will be able to obtain while experimenting with its use will surprise you, if not, take a look at the following example:
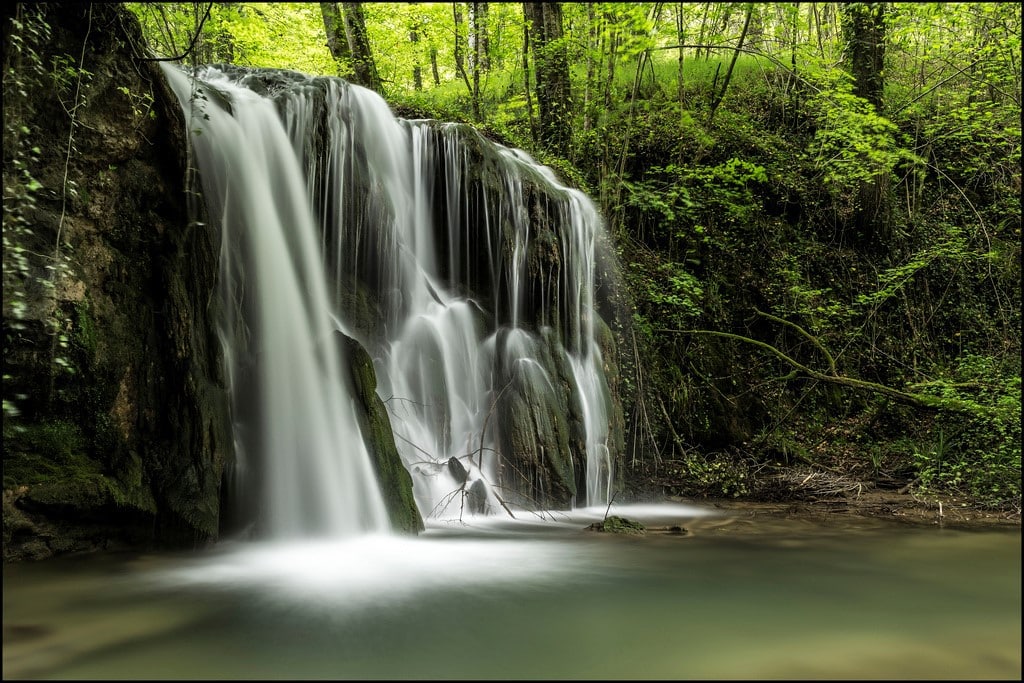
10. Experiment with the use of filters: although today it is possible to emulate the effects of a filter by editing photos on the computer, there are certain effects that are impossible to achieve without retouching the photo (introducing elements that did not exist at the time of takes it). An example of this are neutral density filters that dim the light present in the scene. For the water of a waterfall to look like a mist, it is necessary to make a long exposure (more than 30 seconds) but, if you are in broad daylight, this is something impossible to do, but not if you place one of these in front of your lens. these filters in order to reduce the “amount of light” reaching the sensor.
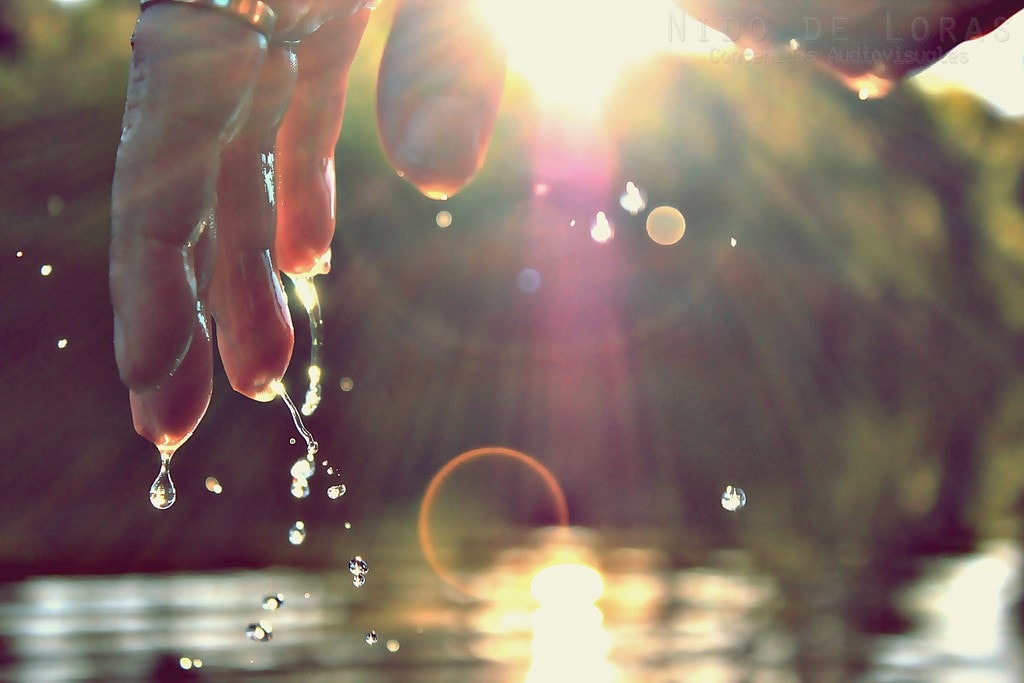
11. Avoid the "flare": unless you want to experiment using the "flare" or "reflection" as one more element in your photographs, do not forget to place the lens hood on your lens. In this way, you will eliminate all the strange shines and unwanted reflections. If you don't have a parasol, don't worry, they are very easy to make with paper.
SPECIAL TECHNIQUES
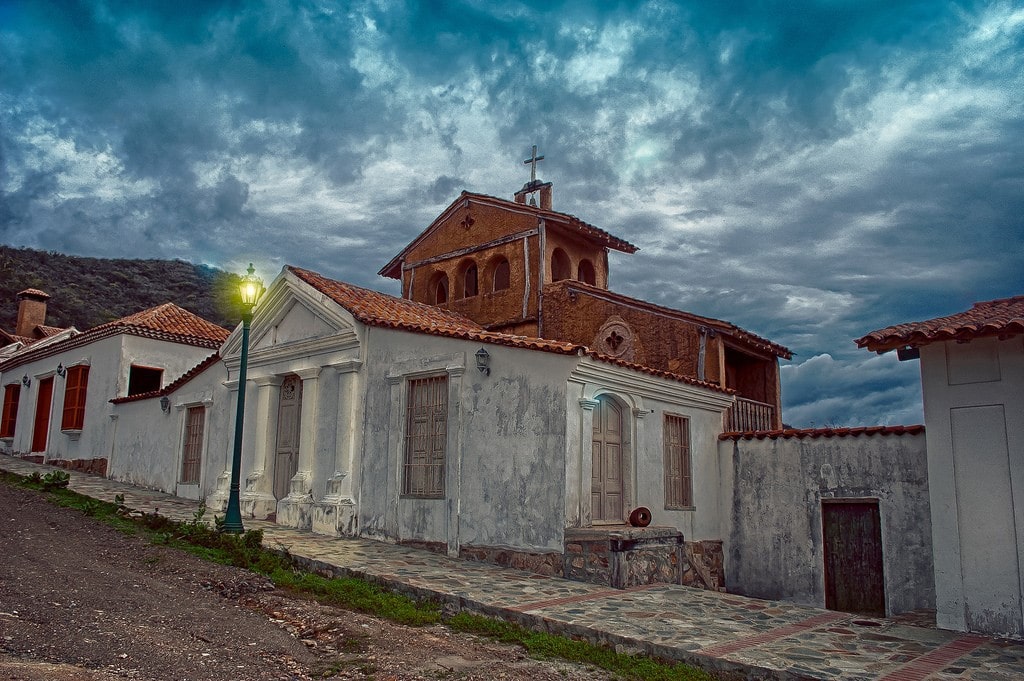
12. High Contrast Photographs: I just told you that getting detail in light and shadow at the same time is almost impossible for a camera these days. Like every rule, it has its exception: HDR mode. What is it about? They are high dynamic range photographs (high dynamic range) through which, thanks to a series of several photographs with different exposures, it is possible to obtain detail in light and dark tones by joining them all in a single final photograph. How is it done? If you want to become an expert in this type of technique, take 5 minutes and read the following article “ Steps to follow to get HDR photos ”.
13. Long Exposures: This type of photography consists of taking photographs using very slow shutter speeds, lasting several seconds or minutes. By leaving the shutter open, that is, letting light enter the sensor for a long time, the effect on the final photograph will surprise you. Go ahead and experiment with this technique! You do not know how? By reading the following article, of course: “ How To Get Long Exposure Photos ”.

14. Painting with light: Light painting photography or painting with light, is the name given to the technique in which, through long exposures and some lights or flashlights, you draw with light directly on the photograph whatever shape you can come up with. The air is your frame, the sensor is your frame and your imagination is the limit. The traces of light are captured by the camera sensor and are "drawn" directly in the final photograph. If you want to learn how to do it step by step, read the following article: “ Start Guide: How to Take Your First Photograph “Lightpainting ”.
15. Stay Creative: The best way to develop creativity is by looking at photos and then trying to replicate the techniques when you're out with your camera looking for your next great shot. Light is an excellent creative element if you know how to get the most out of it. For this, here I leave you “23 Ways to Use Light as a Creative Element (For When You Are Not Inspired) ”.
TO END
You may not have realized it yet, but light is to photography what oxygen is to humans. Without light there is no photo.
When you walk the streets, whether or not you have your camera close at hand, try to take pictures with your eyes constantly searching for the light. The best photos are taken with your eyes, take advantage of them constantly so that later, when you have your camera in hand, you can shape the light to your liking and pleasure.
