Mario's note: In his debut as a collaborator of the Vicente Nadal Photographer's BlogHe shares 5 very useful tips that will make you rethink the way you have been doing portrait photography up to now. I am very excited about the incorporation of Vicente to the team. He will bring a new voice to the blog and I am sure we will all enjoy his articles and advice.
Have you ever cut off heads ? Well, it's time for you to cut heads when you do your portraits.
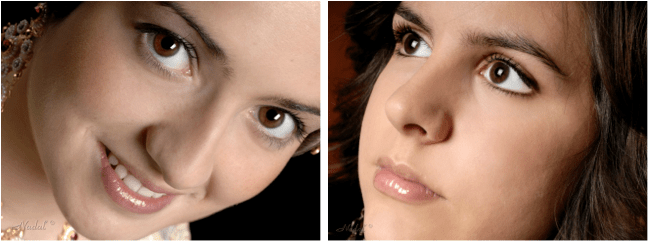
This type of framing is called "extreme close-up." It is a variant of the close-up taken much closer. It is also known in the cinema as the Italian plane because it was Sergio Leone, Italian director of western films (Spaghetti Western) who made it fashionable in his famous dollar trilogy.: "Death had a price", "The good, the bad and the ugly" and "For a fistful of dollars".
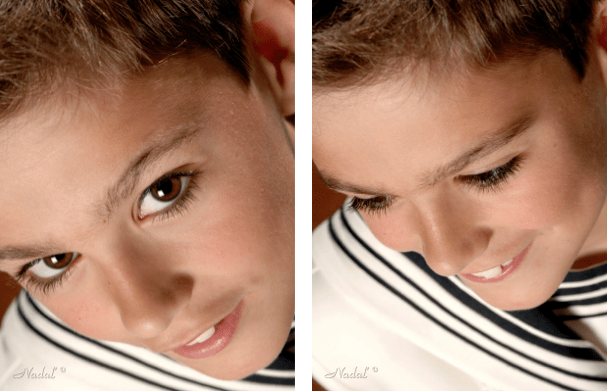
I had my moments of doubt, I thought that my clients would not understand some photos with the head cut off, in which you can only see the eyes, the nose and the mouth. No forehead, no hair, sometimes not even a chin... at most one ear and thank you. The need to experiment got the better of me.
My surprise was that most of my clients loved those cropped photos, with strange, crooked framing, with hidden glances that outlined a timid response.
In fact, it is my star photo, no matter what they ask me, I always take several photos of those… it is my personal stamp among my clients so to speak.
Despite the fact that I have said that there are no rules, I will tell you how I take these "cut" photos in case it helps you.
1 – I never take these photos completely from the front, always in semi profile.
I am looking for a horizontal frame that cuts the forehead in half and adjusts for the chin, which sometimes cuts.

2 – Make variations: a photo hides thousands. Come closer and find your frame. Once you have it, you can shoot with the model looking at the camera or looking straight ahead.

3 – Vary the height of the camera and make a small dive. This way you can better see the length of the eyelashes if the model is looking straight ahead and not at the camera. This photo usually has better results the longer the eyelashes. Of course the focus should be on the eyelashes of the eye closest to the camera. Remember that the model is not facing you so one side of the face will be closer than the other.
4 – Take advantage of this dive to make the model look up, at the camera or more to the right or to the left. It's up to you!
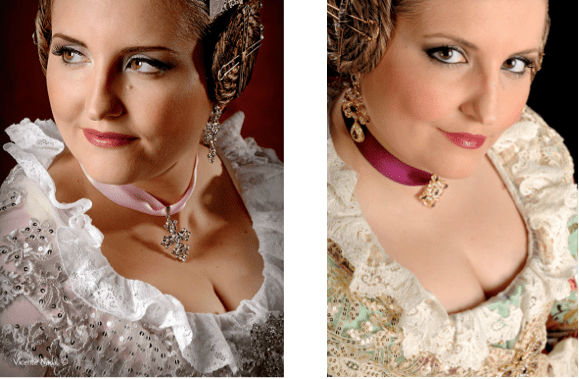
5 – In the vertical framing I continue to cut the forehead and bring the framing to the middle of the chest. You should also vary between photos with a direct look at the model and with a look at another point outside the frame.

This type of photo is indicated above all for portraits of brides or any woman who has a dress that highlights her neckline and favors her in good taste. I apply it to both brides and Falleras.
It is possible that when you master this type of framing and your friends are impressed with those photos, you feel like you have not taken them before.
Do you dare to cut heads?


