
How to make a vector image in Photoshop is often asked. As you know, Photoshop is a program for processing raster graphics and is not intended for working with a vector. Specialized graphic editors work with vector graphics. But if you really need to, and there is no time to learn a new program, then with the help of some manipulations you can translate the picture into a vector.
What is a raster and vector image and how do they differ
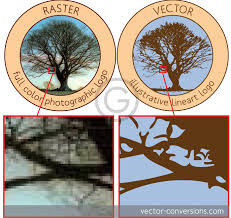
A raster image is also a grid of pixels (points). All of us familiar digital photo is just a bitmap. The vector image does not consist of pixels, but of geometric primitives: straight lines, rectangles, and other shapes. If you reduce and then significantly increase the bitmap image, its quality will be irrevocably corrupted. Since each pixel is a point of a certain color, and all together these points form a picture. When the image is reduced, excess pixels are ejected, so you cannot return it to its original form. Scaling a vector image allows you to resize without loss of quality. This is possible thanks to the mathematical recalculation of the sizes of the geometric figures that make up the image. A raster image allows you to reliably convey visual information, vector has no such advantage. Images of vector graphics can be useful for visualizing logos and contour drawings. You won’t get photographic beauty from them. Or it will be very complex images, consisting of a huge number of primitives that actually replace pixels. More about Photoshop in Fotoshkola.net courses .A simple example of how to convert a raster to vector
So, the vector consists of geometric shapes. Photoshop has tools for creating contours. The contour is a geometric figure. To make a vector image in Photoshop, you need to create an image outline. Help us in this group of tools "Selection» / the Select : "Rectangle Selection» / the Rectangular Marquee Tool will , "Ellipse Selection» / the Select the Elliptical Tool will , ** "Magic Wand» / Magic Wand Tool will , ** "Quick Selection» / Quick Selection Tool and Pen tool . To make the vector accurate, you should choose a bitmap image of the highest quality possible, otherwise you will need to draw the contours manually. Open the bitmap in Photoshop (the most common bitmap format is JPG). Logos, contour drawings, sketches are very easy to process. To get a vector sketch of a portrait, you can first convert the portrait to a sketch using the "Filter Gallery" , or use ready-made pop art. We talked about how to work with the “Filter Gallery” and quickly create pop art from photos in previous articles. For this example, we will take a ready-made pop art portrait. We intentionally prepared it from a photo of not the best resolution. Therefore, the vector version will show us a noticeable difference. To work with paths, you need to call the tab “Paths” / Path to the palette of layers. To do this, go to the "Window" / Window menu and check the "Paths" / Path item . A bookmark appears in the layer palette. The image has 4 colors (we don’t count the background). Take the Magic Wand Tool and select the first color. To select all the areas scattered by the islands in the image, hold Shift . When the first color is selected, select the Lasso / Lasso tool or the Rectangular Marquee Tool and, without removing the selection, right-click. In the context menu, select "Create Work Path" / Make Work Path . In the dialog box, specify the maximum smoothing “Tolerance” / Tolerance (from 1 to 10; the lower the number, the better the contours will be repeated). Click Ok . On the “Contour” tab, the first contour appears. In the image, it will be visible in the form of curves with dots. They can be aligned and adjusted using the “Site Selection” tool / Direct Selection Tool . With this tool, select a point and either correct the curve by moving the tendril of the point, or move the arc itself. On the “Contour” tab , change the name of the contour. To do this, double-click on it and change the name in the dialog box. We follow all the steps described with the rest of the colors. As a result, we get four contours for each color. Having received the contours, it remains to create a vector. We proceed to the tab "Layers» / Layer Palette layers, create a new layer Shift + Ctrl + N . The main color is set to the one in which we color the first contour. We return to the “Contour” tab , stand on the first contour. In the main menu, under “Layers” / Layers, select “New Fill Layer” / New Fill Layer - “Color” / Solid Color . In the window that opens, click Ok . Now, going to the “Layers” tab , you will see the first vector layer on a new layer. We will follow these steps for each circuit. So we got four figures that made up the portrait. Now you can save it to a file with the vector extension SVG (delete the layer with the original image). Press Alt + Shift + Ctrl + W (export as). In the dialog box, select the SVG file extension, click "Export All" / Export All . In the next dialog box, as usual, specify the file name and path. That's all. The method is quite simple. If you often have to work with vector images, perhaps this article will inspire you to explore new graphic editors. In any case, you have learned another useful method. We wish you excellent work. More about Photoshop in Fotoshkola.net courses .