
Even if you don't know exactly what HDR is, or even if you have never heard of it, I assure you that you know it directly or indirectly, because you will have seen it in the many images that you have surely devoured.
The name may sound a bit like a foreign language to you. Normal, because the initials are for High Dynamic Range or, what is the same, high dynamic range. Don't you know what I'm talking about? Don't worry, it's very simple, I'll explain it to you below.

LET'S START AT THE BEGINNING… WHAT IS DYNAMIC RANGE?
Dynamic range is the ability to capture detail in the highlights and shadows of a scene. Our eye, for example, has a great dynamic range, infinitely better than any camera that exists today. That is, we are able to see detail in both lights and shadows in the same scene without any difficulty.
On the other hand, cameras have infinitely more difficulties in capturing details in scenes where there are different lights, surely you have noticed it, surely you have thought more than once, how can it be that this image that I have in my head is incapable of reproduce it in image?
Simply, today and with the dynamic range that cameras have, no matter how good they are, it is impossible to reproduce reality.
Now, we have photographic techniques that help us get very close. One of them is HDR.

WHAT IS HDR?
HDR or high dynamic range is the ability to have detail in both highlights and shadows. That is, a low dynamic range means giving up detail in highlights or shadows. On the other hand, a high dynamic range, it will try to preserve it in both.
The HDR photographic technique allows, therefore, to get closer to human vision and, in this way, to obtain images, in principle, closer to reality. And I say, in principle , because the HDR must be used in the right measure.
Too much abuse of it can lead us to the opposite pole, to images that are far from reality, too retouched and exaggerated. For example this:
Of course, it's a matter of taste, this exaggerated type of HDR was in fashion some time ago , although it has been lost until a more realistic effect is sought, which takes advantage of the detail in lights and shadows but without being so exaggerated. But what has been said, about tastes, colors;).
HOW TO GET A GOOD HDR IMAGE STEP BY STEP?
Nowadays, most smartphones have this option automatically, so it is not a mystery nor do you have to go beyond having it activated or not and, if applicable, compare the HDR image and the normal one, and choose the one that suits you best. we like the most
Now, in SLR/mirrorless photography, etc., which is the one that requires work and gives us the best results, the one that we love and makes us lose our minds in equal parts... ahem, I'm going astray.

As I said, in this type of photography, in which we want the best results and the best quality in our image, the way to achieve HDR step by step is simply as follows:
- Look for a preferably static scene, because we are going to take several photos with the same frame.
- Therefore, a tripod will be essential (as you are going to use it, remember to deactivate the image stabilizer because you no longer need it).
- If you have a remote release, use it.
- Set the camera to manual mode .
- Set a diaphragm opening according to the image you want to take (much depth of field, closed aperture and vice versa).
- Set the white balance manually and don't change it.
- Use as low an ISO as possible.
- Try to work in RAW .
- Fix the focus point and don't move it.
- Make a total of 3 images that are identical in composition, because you'll be stacking them later.
- Each of these photos will have a different exposure, to do this, adjust the speed of each of them so that:
- The first image is correctly exposed for the highlight areas.
- The second image for the darker areas of the image.
- The third image for the intermediate areas of the image.
- If you want more precision, you can combine more exposures, but 3 usually gives good results, at least to start practicing.
- With this, what we get for the moment is detail in each of the types of light separately.
- Once we have our images, what we do is overlap them with an editing program like Photomatix, photoshopor Lightroom. In the next section I show you the step by step with the latter.
And that's it, it's very simple, right? By adding all the information from the different lights, the result is an image where all areas of the photograph have detail.
HOW TO DO AN HDR IN LIGHTROOM STEP BY STEP
Once you have the three images taken with a tripod with different exposures, we follow the following steps in Lightroom to achieve HDR :
- Select the three photographs. In our example, we have these three (burn, dodge, and correct exposure ).
- In the menu, follow the path: Photography > Photo Combination > HDR
- A dialog box like the following will open. I recommend clicking on Align automatically in case there has been any involuntary movement in the shot. You also have to select the Amount of deghosting . This refers to the elements that can be moved in the shots and create a difference between one and the other. Here the water is moving so we would select Medium or High . If there is no moving element in the scene put None . To preview them, you can check on the Show Deghosting Overlay tab.
- Click on the Combine button.
- Wait a bit for the HDR to be created and you're done.
This is the result of mounting an HDR with the three initial images:
From here you can continue editing the image however you want (starting by tilting the horizon ? ), because you still have a RAW file. Keep in mind that in photos with moving elements like this (ghosts) the result may not be perfect. Look in the lower left corner. The program refines a lot but it is not miraculous.
HDR APPLICATIONS
As you may have already deduced, the main application of HDR is for scenes with a lot of contrast between lights and shadows, in which it is impossible for us to preserve the detail of the different areas through our camera.
This situation occurs and obtains the best results mainly in:
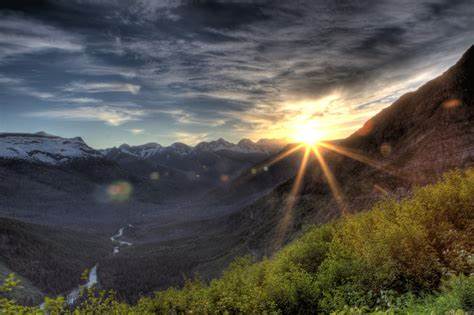
- Landscapes: one of the most classic applications. It allows to preserve information of the sky and the ground without having to give up the detail of either of the two parties. If the sky has clouds, all the better.
- Interiors with an entrance of natural light (interiors illuminated by light from a window, tunnels with access to the outside, etc.). In these cases, the difference in light is also noticeable and an HDR will help you.

- Macro: will allow you to reveal and preserve image details that would otherwise be lost.
- Metallic elements: cars, cutlery and, in general, any metallic surface gives very good results in HDR.
- Urban night photography.

TIPS FOR MAKING A REALISTIC HDR
To obtain realistic results, the ideal is not to abuse the editing settings once you have done the HDR. You already know that the more an image is retouched, the more artificial it usually seems to us.
For it:
- Do not abuse the saturation of colors. If you work in Lightroom it is preferable to play a bit with the Intensity that saturates the less saturated tones in a slightly more subtle way.
- Be careful when adding texture or clarity to the image. Too much will result in a very artificial image.
- Do not abuse the contrast, it is preferable to slightly adjust the whites and blacks separately that already generate contrast and offer you greater control of the result.
- Make sure that the colors are true to reality, however tempting it may be to exaggerate them, it does not usually give good results. It's best to work with the luminance and saturation for each color separately if you're working with an editor that has this option.
In general, as you can see, it's just trying not to overdo the editing and stay true to our vision of the image. It's always good to play around with the different settings to find the moment in which the image we have in our heads and the one on our screen coincide.
Now, it is clear that you can use HDR as one more creative function, so investigate, tinker, try, and keep the result that you like the most, because perhaps you are precisely trying to obtain an image that is far from reality ?
I hope this article has been useful to you, that it encourages you to practice this simple and effective technique.
