
This is an article by guest author Julien Leveau who opens this section by talking about a topic that is passionate and at the same time imposes respect: lightning photography. With your advice today, photographing them will seem much more affordable. Getting lightning photographs during a thunderstorm can be most satisfying for a photographer to obtain the most powerful images he has ever created. However, this practice is a dangerous exercise, both for you and your material, if it runs poorly. In this guide I give you the keys to reduce risks and take the most extraordinary photos.
THE CONTEXT
Obviously, the first condition that must be met to take lightning photos is to attend a thunderstorm. In my case, living in Puerto Vallarta, Mexico, it happens a lot during the summer and its tremendous rainy season. The feeling of adrenaline that fills my body when I attend the display of power of nature is inexplicable. Feeling how the wind begins to blow, to cool the atmosphere while charging the necessary humidity for the torrent of rain and electricity is a unique experience. Then the show begins: with rain or without it, the sudden light display followed by a rumbling thunder can fascinate or terrify. It excites me. Admiring the quick lightning is part of the privileged life of the storm photographer and the child we all carry inside. Storms usually have patterns, study if in your area they tend to form at the same time and if they move in the same direction. This will help you plan and increase security.NECESSARY MATERIAL
To take the lightning photo you've always dreamed of, you need several elements:- The motivation to wake up at any time (night storms -> WOW!)
- You want to rain (or failing that, a good umbrella, the better the bigger)
- Mosquito repellent, if like me, you are in tropical areas
- A waterproof camera can be helpful (also cover it with a waterproof case), but it is necessary that you have manual controls. If you have a mirror, you are in luck because they are faster in the click , that is, the response time once you press the shutter button is shorter.
- Your favorite targets (those of greater focus allow you to get away from the storm and reduce the risks of being shot by lightning, the angles allow you to capture most of the scene).
- A parasol will help protect your target from raindrops.
- A tripod (the photo of rays is made with long exposures).
- If you want to photograph day rays, I recommend the use of ND filters to use long exposures.
- Batteries Extra
- A towel or cloth to dry.
- Your lucky charm
SECURITY
While the safest thing in a thunderstorm is to be in a closed place and away from open windows, without pipes, cables or electronic devices nearby, you could hardly get lightning photographs like that. Better to find a middle ground, you will not have zero risk, but with these tricks you will greatly reduce the chances of being struck by lightning.- If no more than thirty seconds pass between lightning and thunder, you are too close to the storm. Salt by legs and look for another place.
- If you hear the sound it is because you are not outside the possible radius of the lightning strike.
- Get away from the water
- Do not stay on high ground or in exposed areas
- Outside metallic and electronic objects. No, in the middle of the storm it is not time to take pictures or use your mobile
- Stay away from tall trees
- Avoid having the tripod nearby
- Do not approach within 5 meters of other people
- Never lie down
- Keep your feet together and bend down covering your ears. This you have to do yes or yes at lightning speed if you notice that your hair stands on end as when there is static electricity.
DIAPHRAGM AND EXPOSURE SETTINGS
Depending on the place and the light conditions of the instant, the settings may change. In my case, I always shoot at night and these are the settings that work for me. You will have to assess whether they are also valid for you;).- Exposure time: from 2 to 4 seconds for photos from the street (they are the most delicate light conditions), from 4 seconds to 10 seconds from a balcony or a rooftop and more than 10 seconds in full nature.
- Opening: between f / 2.8-4.5 for distant lightning, between f / 4.5-8 for small lightning, f / 8-13 for strong and up to f / 14 for huge storms.
- Turn off auto focus to gain speed. You can use it but once you have the focus turn it off.
- It also disables any pre-trip detection function, such as facial recognition.
- ISO: I always recommend leaving it close to 100 ISO to achieve great sharpness in your shots.
WHEN TO SHOOT
There are several techniques to shoot at the exact moment, all with their advantages and disadvantages:- The first technique is what we will call the manual firing , which consists of waiting for the lightning and firing as soon as it happens. We can do it with both our finger (although it generates vibrations) and with a remote trigger (more recommended).
- The second option is through the time-lapse technique , the camera shoots a certain amount of time a photo with the settings we want, praying that during this period of time a ray will happen.
- The third and last option (and also my favorite) requires a lightning sensor (Lightning Trigger). It is not a very economical device, but it detects the ultra red light that happens just before the lightning and shoots. If you are not fast finger this option is excellent, as if you intend to photograph the rays of day.
HOW TO COMPOSE THE RAYS
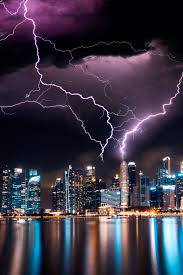
When composing your ray photography, there are elements that, well controlled, allow you to create a composition that you like and then there are the rays ... These, unfortunately, you cannot control. It will always depend in part on luck to fall in the place we want. For this reason, I recommend you to be patient and shoot as many times as necessary until you achieve the desired shot. Also keep in mind which area is most active in lightning to focus on it and frame the scene better. A larger framing area will increase the chances of capturing lightning. Do not limit yourself to photographing the rays, it includes part of the soil to contextualize (land, sea, city ...) and also some element in the foreground to give depth. Also try vertical framing.EDITION
Since lightning photography is quite shocking in itself, it hardly needs further editing. The only thing I add personally is a bit of contrast and saturation to further strengthen the dramatic aspect without falling into excess. You can also adjust the white balance if you shot in RAW or turn to black and white. If you are thinking of getting serious about the issue of editing and do not know where to start, here is the Mario Lightzoom course , which explains the Lightroom tool from scratch and without technicalities, with a clear and simple language.LIGHTNING GALLERY
If you have been wanting more images, I leave you with a small gallery: This is an article by Julien Leveau, professional wedding and architecture photographer. You can continue his work at Julien Leveau and at Arcenciel Studio . If you also want to participate as a guest author, click here. Did you like the article? Thank Julien for his advice by sharing the article on your favorite social network so that others can enjoy his fantastic work and the advice he offers. Thank you and see you soon.