The moon is a beautiful and mysterious satellite of our planet. You can just admire her, or you can try to make interesting shots with her participation.
In this article, we will analyze the creative aspects of shooting a night star, learn how to take the most clear pictures, how to beautifully and expressively show the Queen of the Night in the frame.
What does the photographer need to know about the moon?
Schedule of movement . The moon is a natural satellite of the earth. As in the case of the Sun, the inhabitants of our planet can observe its sunrises and sunsets. It moves across the sky according to its own schedule and can ascend both late at night and during the day. To take beautiful photos, you need to know this schedule.
Moonrise late at night. On the right is the planet Jupiter.
Why is the moon shining? The phases of the moon . The moon or part of it begins to shine when the light of the Sun is reflected from them. When the relative positions of the Earth, the Sun, and the Moon change, the boundary between the illuminated and unlit parts of the moon’s disk shifts. Therefore, the illuminated part may increase or decrease.
Everyone knows that the Moon can be full, or it can appear before us in the form of a crescent. There are eight key phases of the moon.
|
|
New Moon: The moon is not visible. |
|
|
Young Moon (Waxing crescent). |
|
|
First quarter: Half of the moon is lit. |
|
|
Waxing gibbous: more than half of the lunar disk is lit. |
|
|
Full Moon: The moon is fully lit. |
|
|
Waning Gibbous: More than half of the moon is lit. the illuminated area of ??the lunar disk is gradually decreasing. |
|
|
Last quarter: The half moon is lit. |
|
|
Old Moon (Waning crescent) |
The phases of the moon give only a generalized idea of ??what part of it will be illuminated by the sun on certain days. For example, the first and last quarter will include 70% of the illuminated area and 95%. Therefore, the area of ??the illuminated part of the moon is often measured as a percentage of its total area. At the full moon it is about 100%, and with a thin month in the sky - a few percent.
Size and color of the moon. The illusion of the big moon . The surface of the moon itself is gray. Reflecting sunlight, it becomes yellowish. Also, the lunar disk can change its color due to the atmosphere of the Earth (passing through the thickness of the air). Sometimes the moon rising over the horizon turns bright red, while it seems much larger. Note that for the photographer this is the best time to create beautiful shots with the moon.
NIKON D810 / 70.0-200.0 mm f / 4.0 Installations: ISO 800, F8, 1/8 s, 400.0 mm equiv.
We plan to shoot: we choose the time, place and conditions
To begin with, it is worth deciding which phase of the moon you want to photograph. Any lunar calendar will help you get acquainted with the schedule of the movement of the moon in the sky. The ideal option would be special programs for photographers that track the movement of celestial bodies. It’s convenient to use the TPE web application on your computer .
Please note: when it’s deep night in the courtyard, and the Moon is high above the horizon, you can get boring shots of the lunar disk without any interesting plot or background. In my opinion, such photographs will be of interest only to astronomers. And they have seen the lunar surface thousands of times already.
A picture of the moon taken in the dead of night. The night is dark, and the crescent of the moon is very bright. Therefore, neither the sky, nor any background in the photograph will be visible.
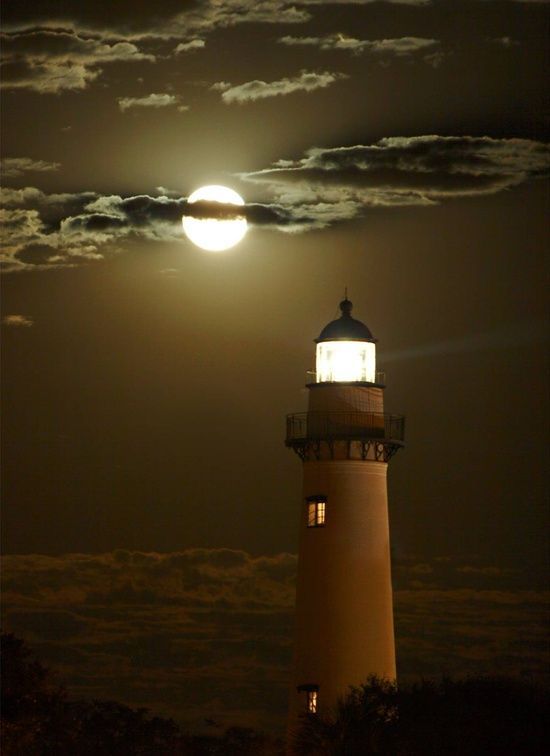
To be able to fit the moon into some kind of landscape, take a picture of it against the background of a city, nature or clouds, it is better to photograph at dusk. Wait for the moment when the Moon rises or sets (immediately after sunset or immediately before it rises).
On the other hand, if you just want to shoot the moon against a black background, it is best to photograph late at night in clear weather, when the moon is high above the horizon.
Shooting the moon at dusk allows you to photograph it not by itself against the background of blackness, but fit into the surrounding reality.
NIKON D810 Installations: ISO 100, F8, 1/3 s, 400.0 mm equiv.
From personal experience: either the full moon or a thin month with an illuminated part of less than 15% looks most expressively in the frame.
A good time to shoot the moon would be white nights. When the contrast between the bright moon and the environment will not be so great. At this time, you can do landscapes like this. This shot was shot on the north coast of Lake Ladoga.
It is important to choose the right shooting point. To take an interesting shot, find a place where a good view opens. The programs mentioned above will help determine where the moon will rise. In the city you can choose some high point with a view of its attractions. In my case, they were the Ostankino Tower and the Picturesque Bridge. It is advisable to arrive at the place of shooting in advance, because the rising moon “jumps out” from the horizon very quickly, so you will have very little time for shooting - several tens of minutes.
Necessary photo equipment
Let's make a list of photographic equipment, which is definitely useful for shooting the moon.
Shooting the moon is a rather difficult task, so it’s better to configure at least some parameters yourself. It’s good if the camera has a wide dynamic range. This will help when shooting the Moon against the background of other objects - it will not overexposure, and the background will not be too dark. For such shooting SLR cameras are perfect: both the simplest (for example, Nikon D3300, Nikon D5500), and advanced models (Nikon D750 or Nikon D810).
Also a compact budget choice for the amateur photographer will be compact hyperzums (for example, Nikon COOLPIX P900). They have manual settings and such a zoom that DSLRs have never dreamed of. The same P900 can give an increase equivalent to a lens for a full-frame SLR with a focal length of 2000 mm.
If you want to show the moon in the frame large enough, then you need to use a
telephoto lens . The larger the focal length of the lens, the larger the moon will be displayed in the frame. The shots for the article were shot with a Nikon 70-200mm f / 4G ED AF-S VR Nikkor lens with a two-time NIKON AF-S TC-20E III teleconverter. The focal length in photographs is 400 mm. A good compact and budget telephoto lens is the Nikon 70-300mm f / 4.5-5.6G ED-IF AF-S VR Zoom-Nikkor.
NIKON D810 / 70.0-200.0 mm f / 4.0 Installations: ISO 640, F8, 1/2 s, 350.0 mm equiv.
Do not forget: the larger the focal length, the more difficult it will be to obtain high-quality frames. But more about that below.
A shot made on a lens of a moderate television range of 110 mm. In my case, it was the same Nikon 70-200mm f / 4G ED AF-S VR Nikkor, but without a teleconverter.
NIKON D810 / 70.0-200.0 mm f / 4.0 Installations: ISO 400, F7.1, 1 s, 110.0 mm equiv.
The moon can be photographed with wide-angle optics. At the same time, it will not be so large in the frame, but in this case you can show some landscape along with it in the photo. It is appropriate to use lenses with a focal length of about 35 mm for a full frame or 28 mm for a crop. That is, almost any universal or whale zoom lens is suitable for such shootings.
Morning landscape with a picturesque bridge and a setting moon. The frame was shot with a lens with a focal length of 30 mm.
If you want to get high-quality sharp pictures of a night star, then you definitely need a tripod . An exception would be the shooting of the moon during the day on full-time or wide-angle optics . In regime time (early in the morning or late in the evening) and at night, the moon is shot at shutter speeds long enough for handheld photography (a “shag” may appear )from camera shake in the hands). If you are working with telephoto lenses with a focal length of more than 300 mm, it is advisable to use a tripod even during the day. Otherwise, do not pass the grease. After all, the narrower the viewing angle of the lens (the closer it zooms in), the stronger the picture will shake in the viewfinder. When shooting with a telephoto lens, a tripod is needed to stabilize the image. It must be very powerful, able to reliably, without hesitation, hold the equipment.
It will be a useful accessory when shooting with a tripod. The remote control is needed in order to avoid camera vibrations when you press the shutter button. So we insure ourselves against getting blurry shots. If you don’t have a remote control, you can set the camera to self-timer, so that at least a few seconds elapse between pressing the shutter button and shooting itself. If your camera, like the Nikon D5200, Nikon D5300 or Nikon D7200, supports Wi-Fi remote control, then your smartphone can serve as a remote control.
Shooting options. Technical difficulties and solutions
The problem of beginners number 1. "Shevylenka" when shooting with hands . Novice photographers hold the camera in their hands or on a flimsy, shaking tripod. And if they take pictures with a telephoto lens (with a large zoom), then they almost always get a blurry image. To shoot with great approximation, you need to greatly shorten the shutter speed. That is, when shooting with a telephoto lens, the maximum shutter speed should be shorter than 1/250 s. Sharp frames help get optical image stabilization. If you have a VR, IS, or Optical steady shot switch on your lens, set it to ON.
About how to calculate the maximum allowable shutter speed when shooting handheld, described in one of our lessons .
If you are a beginner and did not understand anything from the previous paragraph, because for now you use only the automatic mode and scene programs, for photographing the Moon with a strong “approximation”, select the “Sport” scene program - it guarantees shooting at a fast shutter speed. If you shoot the Moon with a general plan, without a strong "approximation", you can use the story program "Night landscape".
Problem number 2. The moon moves in the sky . How is shooting the moon different from other landscape shots? By shooting a very fast moving object. If you take a picture of her at a slow shutter speed, she will be smeared.
The moon smeared from its own motion at a shutter speed of 30 seconds. It is easy to see how much she has traveled through the sky during this time.
How to determine the maximum shutter speed for shooting the moon, so that it turns out clearly? Typically, exposure is determined experimentally by making test shots. The general pattern is simple: the longer your telephoto lens, the shorter the shutter speed. Therefore, photographing with super telephoto lenses is very difficult - the moon literally flies through the frame - have time to catch. Excerpts will be required rather short.
Those who are familiar with astrophotography know about the “rule 600” for determining the maximum shutter speed when shooting stars (if the number 600 is divided by the equivalent focal length , we will get the optimal shutter speed in seconds). But when shooting the moon, this rule will not work, because it moves through the sky faster than stars.
To take a high-quality picture of the moon with a telephoto lens, it is recommended to use shutter speeds shorter than 1 s. If we photograph with normal lenses, then the maximum shutter speed can be 2-3 seconds without loss of sharpness. Since we take photographs at relatively short exposures in the conditions of night or twilight, ISO will have to be raised. From my own experience I will say that the shooting of the moon usually occurs at ISO 400-800.
Problem number 3. Exposure adjustment and lack of dynamic range . We already mentioned this problem: at night the moon is brighter than everything that surrounds it in the frame. Therefore, the photographer will have to choose - to show in the photo either the moon or the surrounding landscape, greatly overexposing the night light. When shooting at night, you have to choose only from these two evils. The article has already seen illustrations of both situations. Let's look at them again:
The picture shows a night landscape with a rising moon. Although it was possible to show the landscape, the moon was completely overexposed. So I decided to bashfully hide it behind a tree.
The exposure is set on the moon. Its surface is not overexposed. However, I had to say goodbye to heaven: in their place is black.
And this is just an overexposed disk of the moon, shot on a telephoto lens. All the details on it were lost. This is an exposure error. Avoid such frames. If the moon is overexposed, make the frame darker in order to preserve all the details on it.
If you shoot at night with a telephoto lens, focus on the moon, show it all the details. If you are shooting on a wide-angle lens, it is better to focus on the landscape.
To avoid such a choice, it is necessary to choose lighting conditions under which the contrast between the Moon and the environment is not so high. This is, first of all, twilight - the time when the Moon is already beginning to shine, but not yet as brightly as at night.
The dynamic range of the camera can be expanded slightly. This will save more details of different brightness in the frame. If you shoot in JPEG, Nikon provides Active D-Lighting technology to expand the dynamic range.
Also, some cameras allow you to create HDR images (for gluing several frames with different exposures). Remember that the moon moves relatively quickly across the sky. And so that the final HDR image is not blurred, each individual frame will have to be done at significantly shorter shutter speeds.
How to determine the exposure when shooting the moon? I think the first time no one managed to get a perfectly exposed frame. Under such difficult conditions, any metering method may fail. Always take test frames and adjust the exposure, focusing on them, making the following frames either darker or lighter. Use the Live View screen, so you can see the future brightness of the frame directly on the camera display. In order not to depend on the whims of automation, it is best to shoot in manual mode, independently controlling all the shooting parameters.
It is convenient to use exposure bracketing. This function will allow you to take several (from 2 to 9) frames with different exposure (brightness). From this series of frames you can choose the most accurately exposed and work with it. You can also combine captured frames using HDR or exposure blending on a computer.
In conclusion, I would like to wish readers interesting shootings and bold photo experiments! Remember, the ability to take pictures does not end with the ability to press buttons on the camera. You need to find interesting scenes for shooting and choose good conditions for photographing. Pay attention to preparing for the shooting, planning. This is the key to successful personnel.