IF YOU ARE SCARED OF THE TERM "WHITE BALANCE" YOU NEED TO READ THIS ARTICLE
IF YOU ARE SCARED OF THE TERM "WHITE BALANCE" YOU NEED TO READ THIS ARTICLE
This article is an outraged reaction and a shocked response to the way that many media (blogs, books, magazines, ...) explain certain photographic terms to the amateur photographer. A very clear example is «White Balance» . I just launched a little google search on the definition of White Balance and am coming across terms like:
Spectral distribution of energy
Light energy
RGB level scaling
Gamma compensated
Kelvins
Is it me or does it give me the feeling that you have to study Semantic-photonic-graphic Engineering to understand these concepts? What is worse is that explaining things in such a complex and hermetic way the only thing it achieves is to scare away the amateur photographer giving him the false feeling that photography is something very complex. Nothing further from reality, luckily
If you're scared of the term "White Balance" you need to read this article. In it I will try to explain to you in an easy and simplified way the meaning of this setting, its function and how to use it. When you finish reading it you will not know the meaning of the Kelvins or the spectral distribution of energy, but you will know how to use White Balance as the best of photographers
WHITE BALANCE
Have you ever taken a photo at night but in a bright environment getting a yellowish photo shooting a slightly orange tone? Have you ever shot a portrait photo in a shady area, or on a cloudy day, and the result was a muted blue-toned photo?
In a correct photo there should not be any predominant tone , there should be balance, a certain balance, let's say, but it happens that sometimes the circumstances in which we shoot a photo (place, time of day, light source, etc.) make a color becomes dominant. As I said before, the light from bulbs (those that illuminate the interior of a house for example) at night usually produces photos of an excessively orange tone, which makes the photo ugly and distort its colors.
The solution is found in the famous "White Balance". Basically the idea is to "counter" the prevailing tone using its "opposite" in search of that balance. This is how White Balance works, there is no more mystery. If we are in a situation where we see that the photos come out yellow or orange, we put a White Balance of colder tones, turning to blue. If it were the other way around and the photos were bluish by default, we would put in a "Warm" White Balance, turning red, to find that balance of tones.
You will ask me "And how do I know which tone is going to be predominant so that I can correct it?"The answer is easy: You can let the camera itself take care of detecting that a certain color is dominating the photo excessively and that it is in charge of counterattacking it. If you want the camera to handle this task for you, go into the White Balance setting and choose the "Automatic White Balance" option (also known as "AWB").
As the machines are not perfect, sometimes the camera is not able to detect a certain excess of tones and therefore cannot correct it. There you go (you are the photographer, did you forget?) Basically you are going to do the following: you are going to shoot a test photo and look at it carefully, if you find it correct and neutral, great, but if you see a certain excess to one side in blue tones or towards the other in red tones, you will have to manually select one of the different White Balances that your camera makes available to you. Below I attach a small graphic in which I explain which White Balance to choose based on the excessive tone you want to remedy:
Warning: This graphic was prepared by myself and for guidance. It is not precise, but only a rough orientation.
As you can see it is not more complex. If you perceive that the photo is too "cold" use a white adjustment of those you see on the right of the graph, if instead the photo appears more "warm" and orange, use a White adjustment of those that appear on the left of the graph.
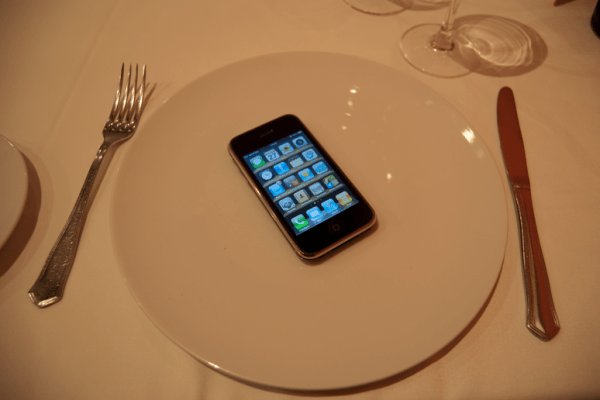
To make it even clearer, let's look at a practical example. The following photo was taken inside a restaurant illuminated with artificial light. The photo I got initially was this one, too reddish as you can see
Photo with incorrect White Balance
Applying the graphic above, to counteract this red tone I had to choose the White Balance with a light bulb symbol (this is how it appears in most cameras, please check if yours also appears like this). Once I had it selected I shot again. The result this time was more "correct"
Correct White Balance
BY LAST
I recommend that you always have the camera set to Automatic White Balance «AWB». Most of the time the camera will apply it correctly. You will have to touch it very few times but you should know what it is for, how to adjust it, and so the day you see something strange you can correct it without fear.
I hope I have achieved my goal with this article and that next time you will enjoy modifying the White Balance of your camera at your whim.
Happy photography
The free CSS minimizer will compress the style files for your websites in seconds and it does not require download and installation.