

Mastery of light is what will define you as a photographer and correct measurement and photographic exposure will make you a master. Therefore, today we update this article with this topic that seems so important to us and that we are going to improve for you according to the questions that you ask us the most in the forum and by email. But before continuing, I would like to recommend our guide on lighting in photography with all the information and advice you may need, so that you can go deeper into the subject whenever you want.
If the light in the scene is not correctly measured, the photographic exposure will not be correct and, therefore, the quality of the photograph will suffer, making all the techniques and tricks that you have applied have been in vain.
Before learning how to correctly measure light, you will see why it is so important to do so: make a correct exposure.
In today's article I will try to shed light on some issues that tend to scare most photographers who are just starting out in the wonderful world of photography, but that they cannot miss if they want to achieve excellent photographs.
Settle in, zoom in on your camera, and read on.
WHAT IS DYNAMIC RANGE?
Before seeing how light is measured in a scene to achieve a correct exposure, you need to understand what dynamic range is and why it is so important when it comes to achieving a correct exposure:
The dynamic range measures the amount of light and dark tones that your camera is capable of capturing in the same photograph, that is, it is the capacity of the camera to obtain details in both areas of a photograph, the lights and the shadows. Dynamic range sets the amount of tonal nuances your camera is capable of capturing.
Pay attention to the following photo. Two opposite situations coexist in it, one very light area and the other very dark. These types of situations are impossible to solve by digital cameras, so they will not be able to offer you detail in both areas at the same time because their dynamic range is not wide enough. You will have no choice but to lean towards detail in one area or the other: detail in the shadows and blown highlights or detail in the highlights and very dark shadows.

The greater the dynamic range of your camera, the more details it will be able to capture and therefore the better the quality of the final photographs. Of course, as long as you make a correct measurement and exposure of the scene to take advantage of its full potential. Don't worry, keep reading and you will learn how to do it!
And if you are curious about the dynamic range of your camera, you can see it on this website.
WHAT IS EXPOSURE IN PHOTOGRAPHY?
Exposure in photography is the process by which light reaches the photosensitive material, that is, the film or reel in analog photography, and the digital sensor when we talk about digital cameras.
Contrary to what it may seem to you, exposure is not the time that the photograph is exposed to light: time is just one of the three variables that control the entry of light to the focal plane (sensor) to achieve a correct exposure.
WHAT IS THE EXPOSURE TRIANGLE? 3 VARIABLES THAT INFLUENCE EXPOSURE IN PHOTOGRAPHY
These three variables that I just mentioned are those that make up the triangle of light. Let's see them in detail.
1. ISO SENSITIVITY
The ISO sensitivity determines the amount of light that the sensor must collect. The lower this value is, the less light it will capture. The higher, the more light.
In analog photography , to change the ISO sensitivity you have to change the film, but in digital cameras, we are lucky to be able to adjust it with a button.
What is noise in photography?
As I mentioned in the article “24 ways to get super sharp photos” , if you raise the ISO sensitivity too much, your photos will have more noise, less sharpness and therefore lower quality. Use high ISO values only when you have no other alternative, that is, when you cannot achieve a correct exposure by compensating for the "lack of light" caused by using a low ISO through the other two variables that we are going to see now: decreasing the speed of clogging or opening the diaphragm.
2 . DIAPHRAGM OPENING
The diaphragm is a device that is inside the objective of your camera and that allows you to control the amount of light that reaches the focal plane (sensor), together with the shutter speed, and at the same time, regulate the depth of field of the camera. photography , that is, which will come into focus and which will not.
The more you close the diaphragm (higher f/ values, for example, f/16), the greater depth of field you will obtain in your photographs (more focused image planes), but less light reaches the sensor, having to compensate for the lack of It is either increasing the ISO sensitivity or decreasing the shutter speed.
The wider you open it (with lower f/ numbers like f/1.8), the shallower the depth of field (greater blur or bokeh ) and the more light that hits the sensor, allowing you to use lower ISO values and faster shutter speeds. .
3. SHUTTER SPEED
Shutter speed is the time the shutter stays open allowing light to reach the sensor. The faster the shutter speed (1/1000s), the less light will reach the sensor and the slower the speed (1”), the more light will get through the shutter. In this video Mario explains it very well:
By adjusting the shutter speed you will not only achieve lighter or darker photos, but you will also be able to convey the sensation of movement using very slow speeds or using very fast speeds, you will be able to completely freeze a scene .

As a summary, in this graph you can see what each of these parameters affects with their main and secondary effects:
HOW DO YOU ACHIEVE PROPER PHOTOGRAPHIC EXPOSURE?
An excellent tool that will help you to make a correct exposure of your photography is the so-called " Reciprocity Law " which is neither more nor less than a rule with which you will obtain the same exposure (photography) with different combinations of speed, aperture and sensitivity ISO. No, don't panic yet! Here I explain it to you:
Law of Reciprocity : The 3 variables to achieve a correct exposure do not have a unique combination, but you can adjust each of these differently and achieve exactly the same exposure.
Observe the following image: in it you will be able to see different combinations of aperture and shutter speed that will result in the same exposure, that is, the same photograph, neither more nor less exposed, the same.
A very easy way to get the same exposure with different combinations of ISO, speed and aperture is by doing “double and halves”. What does this mean? It is very simple pay attention:
If you leave the aperture fixed, you can get the same exposure by changing both the ISO sensitivity and the shutter speed as follows:
| ISO | Speed |
| 100 | 1/50s |
| 200 | 1/100s |
| 400 | 1/200s |
| 800 | 1/400s |
| 1600 | 1/800s |
| 3200 | 1/1600s |
| 6400 | 1/3200s |
The exposure in all cases will be the same: if you double the ISO sensitivity, to achieve the same exposure you can double the speed and still keep the same exposure on your photo.
The same happens if you set the ISO sensitivity and change the speed and aperture of the diaphragm:
| F/ | Speed |
| 1.8 | 1/3200s |
| 2.8 | 1/1600s |
| 4 | 1/800s |
| 5.6 | 1/400s |
| 8 | 1/200s |
| eleven | 1/100s |
| 16 | 1/50s |
In all combinations you will get, again, the same exposure. Note that this time the relationship between the two is inverse: when closing the diaphragm you must slow down in order to compensate for the light entering the sensor.
The last relationship that remains to be seen is by fixing the shutter speed, obtaining the same exposure by changing the ISO sensitivity and the aperture of the diaphragm, to obtain the same final photograph.
| F/ | Speed |
| 1.8 | 100 |
| 2.8 | 200 |
| 4 | 400 |
| 5.6 | 800 |
| 8 | 1600 |
| eleven | 3200 |
| 16 | 6400 |
The law of reciprocity is extremely useful, with it you can adjust the parameters of the shot to be taken in a more conscious and controlled way, making the most of the power of your camera.
Now let's look at the same scene taken with different parameters but with the same exposure (regardless of whether it is correct or not).
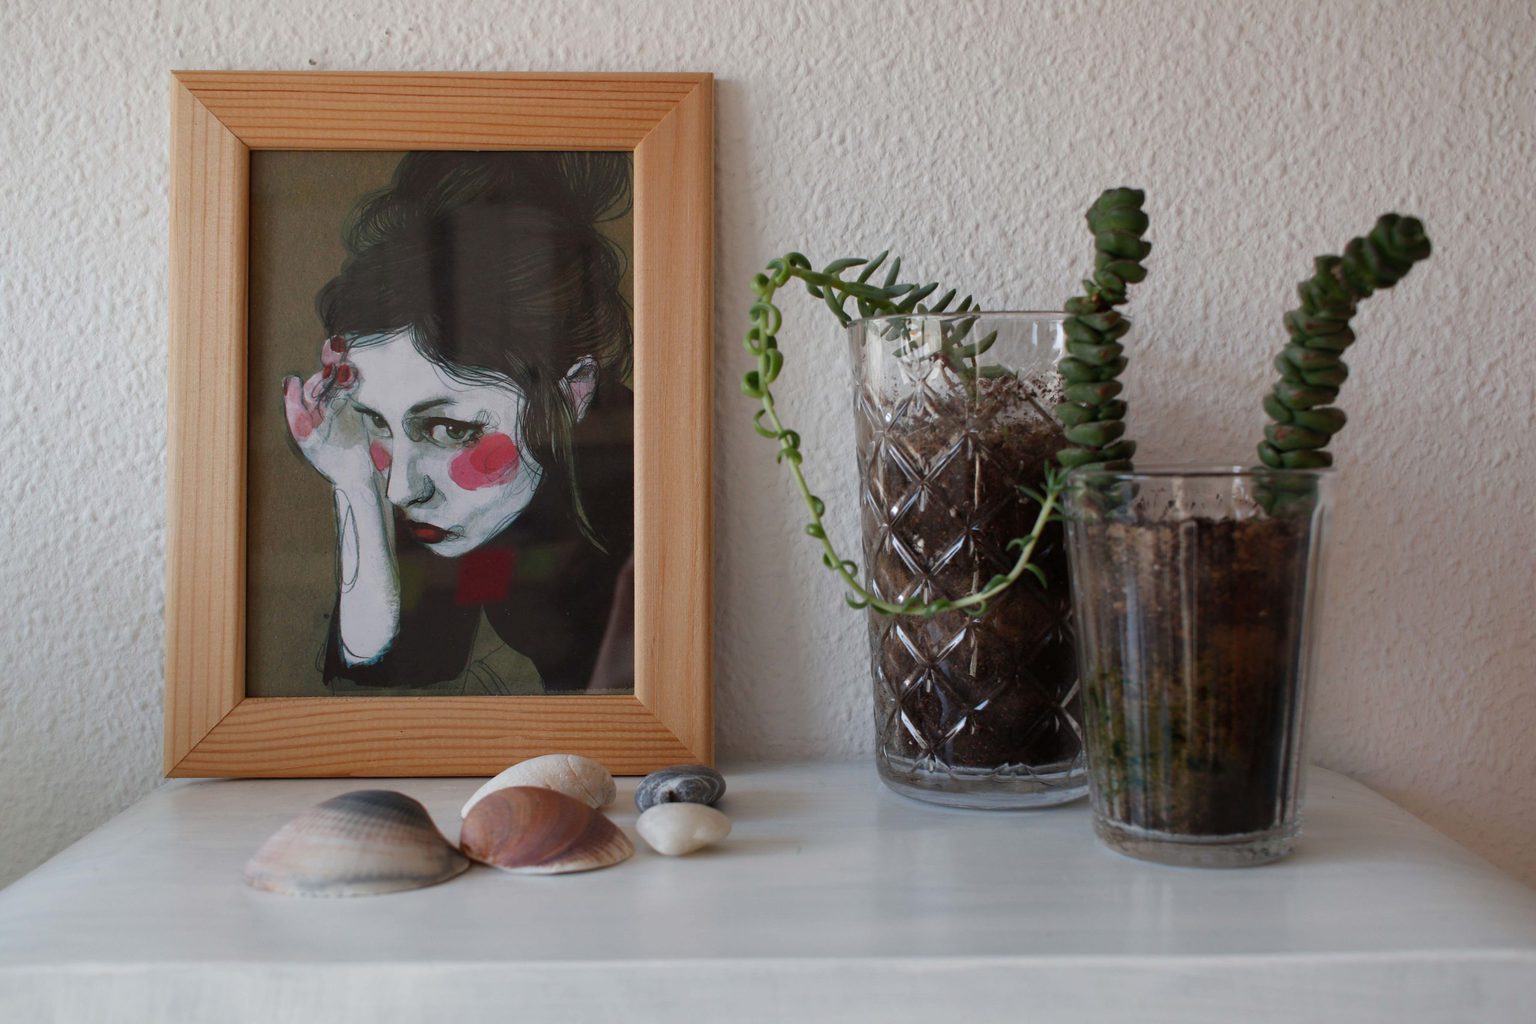

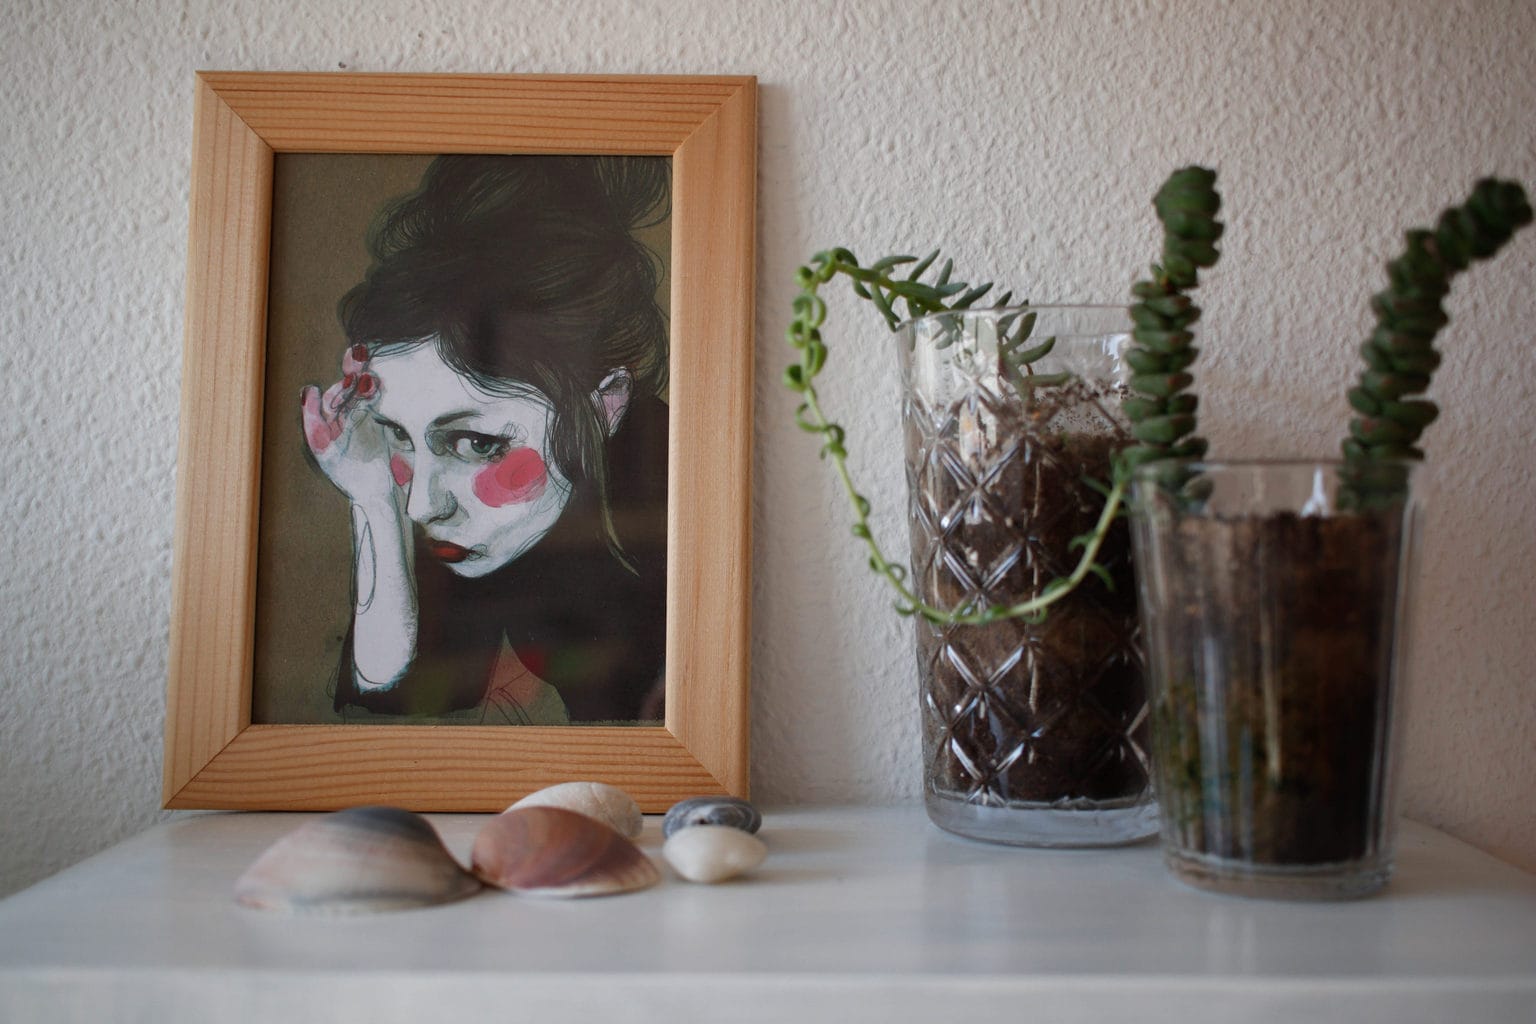
The key for you to fully understand how it works is to take your camera and do the tests yourself with any object you have at hand. Take any of the examples that I mentioned earlier and start taking photos.
WHEN IS A PHOTOGRAPH CORRECTLY EXPOSED?
A photograph is correctly exposed when the sensor is capable of capturing the greatest amount of information (light) and tones (dynamic range) that its capacity allows. Imagine that you have a camera capable of taking photos in a resolution of 18 megapixels, but you only shoot in 8: you would be wasting the potential of your camera to work with better resolutions.
The same happens with light, if your camera is capable of capturing much more light than you, by adjusting the 3 exposure variables you allow it, you will be wasting a lot of information that the sensor is capable of capturing, but that you are leaving out. .

The photograph in the middle is correctly exposed, it may not be the final result you want for it, but it was possible to take advantage of almost the entire capacity of the sensor to record light, that is, its dynamic range was used to the maximum. Once you have achieved a correct exposure, you can edit it* on your computer without losing quality.
If you over or underexpose your photographs, you will be sacrificing a lot of valuable information, which you will not be able to recover later through editing, so if once on the computer you want to "lighten" or "darken" the photographs, you will reduce their quality a lot since the computer you will have to “invent” information where there is none.
*by editing I mean only adjusting certain parameters such as exposure, luminance and shadows on the computer, unlike retouching where the scene is directly modified by altering it.

Achieving a correct exposure will be easier if you take advantage of the following tools that you have at your fingertips (on your camera):
EXPOSURE METER
It is in charge of measuring the "amount of light" necessary for a photograph to be exposed correctly. Once it receives the light reflected by all the elements in the scene, it calculates an average value of all the tones, light and dark, and adjusts the values of speed, aperture and ISO sensitivity in order to obtain a correctly exposed photograph (this is not so like that but you'll understand later).
In automatic or semi-automatic modes it is essential since it is the camera that decides which are the correct exposure parameters for each shot, on the other hand if you shoot in manual mode, you can use it to measure the light of the scene and adjust these parameters yourself .
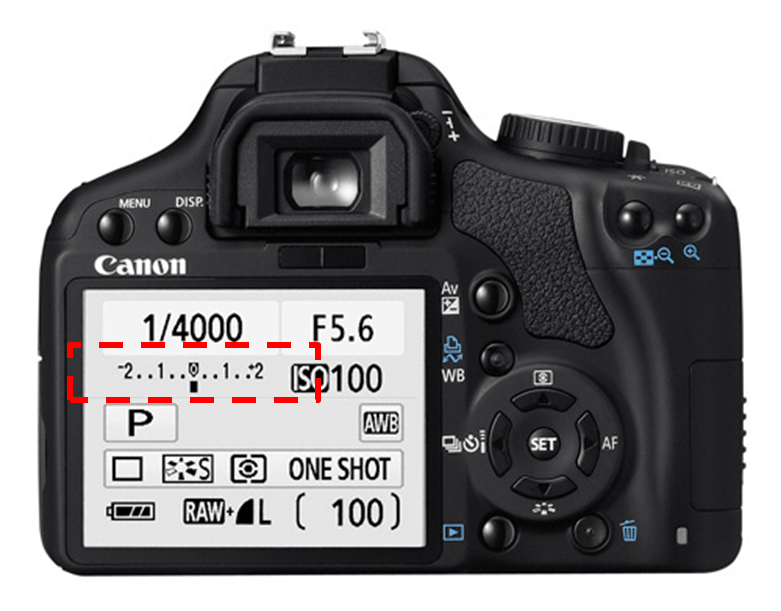
Its use is very simple: by means of the "+" or "-" sign it will indicate if the scene is over or underexposed respectively. In other words, if the signal in the exposure meter that you see boxed in the dashed red line is below 0, it is normal for your photo to be correctly exposed, although this is not exactly the case, further down in the section on how to measure light in photograph, we will look at this in more detail. Leaning towards positive values (left or right depending on the camera) will usually indicate that the photo is overexposed. While if it deviates towards negative values, it is most likely indicating an underexposure.
If you do not want to modify the parameters you have adjusted, and you are not using manual mode, you can resort to exposure compensation.
WHAT IS EXPOSURE COMPENSATION?
In automatic and semi-automatic camera modes, you can tell your camera to dodge or burn steps as you see fit ( if you don't know what I mean by steps , you need to pause to read this so you can understand what we're talking about). ). Sometimes, in certain situations, the light meter of your camera or exposure meter does not measure correctly, or you do not achieve the effect you want. In these cases, if the manual mode is not the solution for whatever reason, you can resort to compensating the exposure (usually it is accessed in the cameras through the "+/-" option, when in doubt, resort to the manual of your camera.
Now we continue with another tool that will help you expose correctly.
HISTOGRAM
The histogram is a graph that shows how all the tones in a photograph are distributed, whether they are gray or not (RGB colors: blue, red and green) according to the dynamic range that your camera is capable of capturing.
In this you can see how many light, medium and dark pixels are in your photographs, that is, how it is exposed. A photograph is correctly exposed when the capacity of its sensor to capture tones is used to the maximum. This is when not only are there no parts outside the range that your camera is capable of capturing, but also when the histogram is as "right" as possible, that is, as close to the right edge as possible (without losing information, that is, to leave the graph to the right).
In the digital age of photography, the more light tones you manage to capture (most right-oriented histogram possible) the less quality loss your photos will suffer, even after editing.
Check your camera manual to find out how to view the histogram once your photos have been taken, or, if your camera allows it, view it live through the screen or Live view when taking your shots.
STEPS FOR A CORRECT PHOTOGRAPHIC EXPOSURE
Although everyone has their method to achieve a correct photographic exposure, it is likely that at first you feel a little lost and do not know where to start. It's normal to feel a little overwhelmed, no one was born knowing. Next, I leave you a step by step so that you can use it as a guide until you become a master at it:
- Set your camera mode to Manual.
- In the menu of your camera, select the area of light measurement in point.
- Adjust the ISO value according to how your camera processes noise and your tolerance for it.
- Adjust the aperture or shutter speed according to the type of photography you want to achieve: dynamic or still. If you're shooting a landscape, adjust the aperture to get a greater depth of field so that the photo comes out as sharp and in focus as possible.
- To adjust for the missing exposure value, you need to measure the lightest tone in the scene.
- Once your photo is taken, take a look at how it looks on your camera screen, but in “histogram” mode. In this you will be able to see how the light and dark all have been distributed in your photograph.
WHY NOT USE THE MODES PREDEFINED BY YOUR CAMERA?
All cameras come equipped with what is known as a "photometer", which is in charge of "measuring the amount of light" in the scenes you are going to photograph. This light meter captures the light that is reflected by objects towards the camera and measures its intensity in order to automatically adjust the exposure for the shot, if you use the preset modes.
The problem starts here, this photometer is calibrated to capture the light of a scene as if all the objects in it were "MEDIUM GRAY". Medium gray in photography is something like an average between the light and dark tones that can be present in a scene.
Beyond the fact that your camera's exposure meter tells you that the photographic exposure is correct, it may, in very light or very dark situations, tell you that the photograph is over or underexposed when in reality it is not. This is what I was referring to when I was talking about exposure compensation above.
Another even bigger problem than the previous one is that, by taking all the colors as neutral gray, the photometer of your camera tends to center the position of the histogram, thus wasting a lot of information and not using the maximum potential of your camera.
Try to photograph a white sheet in an automatic or semi-automatic mode and you will see that it comes out more gray than white. You can only correct this, either with processing, but you will lower the quality of the image, or by performing a correct exposure in manual mode.
The dotted lines in the previous image mark in the histogram the capacity of the sensor (dynamic range) that has been wasted due to not making an exposure that optimizes all of its capacity to capture tones in a scene.
In any case, if you have a compact digital camera where you can see on the screen exactly how the photograph will look before taking the shot, the difference between the measurements of the automatic modes and the one you can take in manual mode will be very similar. Only in certain cases, you will be able to improve the measurement that the camera performs yourself. In fact, in many cameras of this type, it is not possible to adjust the exposure parameters manually.
FIRST MEASURE, THEN EXPOSE
The key to achieving a correct photographic exposure is to make a good measurement of the amount of light in the scene. And, once this is done, expose for the lighter tones. What does this mean? Keep reading and you will understand.
LIGHT MEASUREMENT IN PHOTOGRAPHY
Let us now see what is measurement in photography . As its name indicates, the process to measure the "amount of light" that a certain scene has in order to achieve a correct exposure, that is, it is not overexposed (burnt) or underexposed (dark).
This means that, whenever you are going to take a photograph, you must measure the amount of light that is reflected by the objects in order to adjust the parameters in favor of a correct exposure: aperture of the diaphragm, shutter speed and ISO sensitivity and thus achieve , make the most of your camera's dynamic range and maximize its potential to capture information.
Not adjusting the parameters correctly will mean having to force processing later with a consequent loss of quality or even an irreparable loss of data:
- If your photo has been underexposed, when you try to "lighten" it on the computer, you will generate noise, lowering the quality of the image. In the histogram you will see that there is a large proportion of information that has been left out of what your camera is capable of capturing (its dynamic range). There is a large portion of data that has been left out of exposure, losing detail in the dark tones.
- If your photo has been overexposed, that is, you have lost detail in the lighter tones, and you try to correct it in post-processing, the computer will have to invent information where there is none, since the pixels remain completely white, losing again quality. The histogram is oriented more to the right, and a large proportion of the data that your camera could have used is left out of exposure. This is known as “burn area”, that is, without detail in the targets.
HOW TO MEASURE LIGHT IN PHOTOGRAPHY?
Here are two ways to measure light in photography:
- With the exposure meter of the camera: it is the most common method and used by most photographers whether they are aware of it or not. Even if you don't notice it, your camera's photometer is constantly calculating the amount of light from the scene that is reflected towards the sensor in order to provide you with information so that you can adjust the exposure of the shot or to adjust it automatically if you shoot in automatic or semi automatic modes. Remember that your camera's exposure meter is calibrated for a "neutral gray" so it will not give you the best possible exposure in a shot. And depending on the object it is (lighter or darker, smoother or brighter) it will reflect the same light in a different way. That is why we cannot say that setting the exposure meter to 0 always guarantees acorrect exposure.
- With a handheld photometer (incident or reflected): handheld photometers are used by professional photographers, for the most part, to measure both the light that falls on a certain object (that reaches it) as well as that which is reflected towards it. the camera. Working with them means more time available to plan the scene, measure the highlights of the entire scene, and average the lightest and darkest measurements to get a correct exposure in both tones.

LIGHT METERING MODES
As you may have already realized, the best way to take advantage of all the potential that you have in your hands (your camera) and in your eyes (yourself) is to measure the light in your photographs yourself. Well, regardless of the quality of your camera, they all have the same problem when using automatic modes.
Luckily, your camera comes with different modes to measure light in a scene. Mario published the article "Examples of light metering modes in photography" where he explains how and when to use each of these modes, I recommend that you take a look before going out to practice. In any case, as a summary, I will briefly explain each of the light measurement modes in photography.
MATRIX OR EVALUATIVE METERING
It measures the light of the whole scene and tries to get an average exposure of it, ignoring the highlights and shadows. It is the best way to start, as it greatly simplifies the task and is valid for most situations, at least to achieve a correct photographic exposure (although not always optimal). If you're just starting out, don't get complicated, use this mode, little by little, with practice, you'll get better.
PARTIAL OR WEIGHTED METERING
It works in the same way as the matrix, but in this case it prioritizes the measurement of light in the central area of the photograph.
SPOT METERING
This is the mode I highly recommend using once you get the hang of it. With it, you choose, with the focus point, exactly where you want it to measure. At the exact point, and it will take that point as the measurement, even if there is a lot of difference with another part of the scene.
HOW TO CORRECTLY MEASURE LIGHT IN PHOTOGRAPHY?
As I told you before, there are many situations in which your camera's light meter will tell you that the photo is correctly exposed when it really is not (for example, in the snow).
The key to good metering is to “expose for the lightest tones”. That is, measure the amount of light in the lightest area in the scene to be photographed and adjust the exposure values so that that area comes out as light as possible (further to the right of the histogram without going out). If the lightest tone in the scene is not overexposed, that is, it is not burned, you make sure that all the darker tones remain in detail, taking full advantage of the dynamic range.
You may be wondering: How do I do it if I can't trust the camera's exposure meter? It is true that you cannot always trust the exposure indicator on your camera since, as we saw before, it does not take full advantage of the capacity of your sensor and it may indicate that there is over or under exposure when in fact there is not.
OVEREXPOSURE LIMIT OF YOUR CAMERA
What you should know is the overexposure limit of your camera . To do this, perform several tests photographing very clear objects. The objective is to know how far your camera is capable of capturing detail in the lightest tones. It does not matter that your camera tells you that the photo will be overexposed, when you look at the histogram you will see that no area has been left out of the graph. Once you know how far you can dodge without losing detail, you'll be ready to measure your photos.
You can use both the histogram, as well as the "highlighted areas" mode when reviewing the photograph. This mode will show you your photo on the screen of your camera and will indicate which areas have been "burned" by blinking. Try to minimize these areas.
STEPS TO CORRECTLY MEASURE LIGHT IN A PHOTOGRAPH
- Set your camera to manual shooting mode.
- Set the light metering mode to “spot” mode.
- Look for the lightest tone in the whole scene that you are about to photograph.
- Measure your photograph at that point.
- Configure the exposure parameters according to the aesthetic you want to give to your photography. Do it by trying to keep the ISO sensitivity as low as possible so as not to lose quality due to noise.
- Take the shot and capture the photo.
The measurement was carried out in a specific way on the white stripes of the little boy's shirt (1).
In this way you will have managed to maintain the maximum level of information in each of your photographs. If you are still not satisfied with the result, you can compensate the exposure in situ . You can also do it a posteriori , in the processing, darken it until you get the desired photograph, but in this case with the consequent loss of quality.
Another example in which you will have to compensate the exposure is when photographing a snowy landscape. If you photograph it with the exposure meter at 0, since the snow reflects a lot of light, your camera will tend to underexpose and you will get a dark photo, with gray snow. That is why it is usually recommended to dodge two stops.
PRACTICE
Today's article may seem more complicated than it really is. The key to being able to understand it well is to have your camera at hand and carry out the tests yourself. Patience, together with practice, will be your best allies when it comes to achieving a correct photographic exposure of your photography.
