
In the view of most photographers, a panoramic shot is a horizontally elongated “long” shot taken with a very wide (maybe even 360 °) viewing angle ...
Panorama in the view of an ordinary person
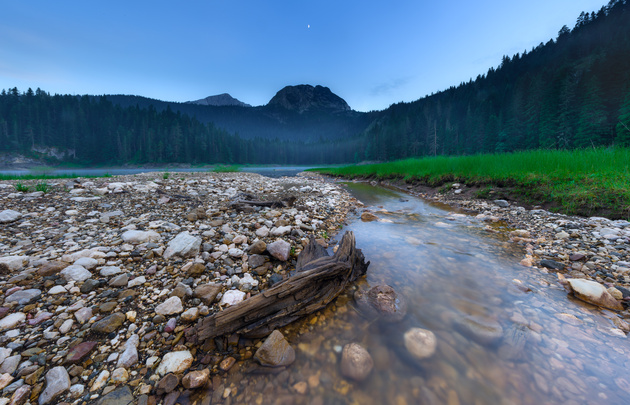
NIKON D810 / Nikon AF-S 18-35mm f / 3.5-4.5G ED Nikkor INSTALLATION: ISO 31, F20, 6 S
Technically, this frame is also a panorama. Like the previous shot, it is made of three vertical frames.
NIKON D810 / Nikon AF-S Nikkor 35mm f / 1.4G SETTINGS: ISO 100, F1.4, 1/1250 S
- Viewing angle control. With panoramic shooting, we can easily increase the viewing angle of our lens. Lack of viewing angle is a problem familiar to every photographer. A simple life situation: during the tour you were in a beautiful, but cramped temple and want to capture all its decoration, the entire interior. Moving away to take a general plan will not work, because the walls of the building will interfere, and of the lenses you have only a "fifty dollars" ... What should I do? Take a panorama! So the viewing angle can be increased many times!
I accidentally made this shot during portrait photography. On the camera I had a Nikon AF-S 50mm f / 1.4G Nikkor. In order not to be distracted from my main work, I shot four vertical frames, from which I subsequently collected this panorama.
One of the shots taken for panorama
- Controlling perspective and perspective distortion. A simple property of perspective: the closer an object is to us, the larger it seems. In many types of shooting, this can play a trick on us, because the objects will lose their original proportions, lean to one side and the like. This is especially noticeable when shooting architecture. For example, I would like to rent a house not with some kind of kosokosym because of promising distortions, but quite direct. When gluing panoramas on a computer, we can work efficiently and without serious losses as a final frame with the perspective in the photo.
A frame taken with a wide angle lens. Due to perspective distortions, the house in the photo lost its natural proportions.
When gluing panoramas, the proportions of the architectural object are preserved. And also this is an example of a vertical panorama, sometimes it is called vertorama.
- Increased detail and resolution of the image.Experienced photographers know that permission is never superfluous! Yes, modern SLRs have a serious resolution: when the photographer works correctly, even with the simplest DSLRs, you can print images in 30x45 cm format. However, there are situations when even higher resolution is required. For example, landscapes are often printed in large formats. High resolution images are more convenient to edit - you always have a margin for maneuvering, framing. Want to increase the resolution of your frames several times? Take panoramas. Obviously, by adding several separate frames into one, we will increase the resolution of the final image. The larger the number of frames the panorama is, the greater the final resolution! And of course, the higher the resolution of your frames, the more powerful a computer will be needed to process them, and they themselves will take up a lot of space on the hard drive. If you do not need high resolution, you can always reduce it if you wish, reducing the images during processing. As you can see, I put this item in third, and not in first place, because I think that in general, controlling the viewing angle and perspective is much more important in the work of the photographer. Especially today, when there are cameras with a resolution of 36 megapixels (Nikon D810 ) and more.
The image size is 12416x8278, about 103 megapixels. What modern photographic equipment can provide a photographer with such a resolution and viewing angle? Any, if the photographer knows how to work with panoramas. By the way, this is also an example of a panorama made by a telephoto lens. It is shot on a Nikon D810 and a Nikon 85mm f / 1.4D AF Nikkor lens.
- Depth of field control. Another not-so-obvious panorama option. We can take frames with a very shallow depth of field, blur the background a lot. How to take a picture with a wide enough viewing angle, but with a shallow depth of field typical of a telephoto? To do this, you just need to shoot a panorama on a telephoto lens with an open aperture. If you don’t have a portrait lens that greatly blurred the background, then one of the recipes for you is to take a panorama on the open aperture and at maximum zoom with the lens that you have. This method works great when shooting static objects - all kinds of details. For example, flowers. With proper dexterity, even production portraits can be shot this way, the main thing is to ask your model not to move while you are making a series of frames for a panorama.
Panoramic gluing of frames shot with the Nikon AF-S 24–85 mm f / 3.5–4.5G ED VR Nikkor not the fastest (albeit high-quality) zoom. Individual shots were taken with a focal length of about 70 mm, aperture - F5.6. Thanks to panoramic gluing, I achieved a serious blurring of the background and pleasant bokeh, which is not always possible to expect from a similar class of optics.
The portrait is assembled from two frames made on a Nikon 85mm f / 1.4D AF Nikkor lens, so it's square. Thanks to panoramic gluing, it was possible to obtain an interesting blurring of the background and an unusual aspect ratio of the frame without using framing.
What is needed for panoramic shooting?
What equipment is needed for panoramic shooting? Let's find out.- Any camera with manual settings. Desirable mirror. It is with him that you will feel confident when shooting: it will allow you to configure all the parameters and give high quality images. In addition, DSLRs do not have a delay when the shutter is released (the so-called shutter lag), which means that shooting a panorama will be much faster and there will be less chance to make a mistake. For panoramic shooting, both “cropped” devices (for example, Nikon D5300 or Nikon D7200) and full-frame cameras such as Nikon D750, Nikon D610, Nikon D810 are equally suitable. Note that Nikon DSLRs do not have a built-in automatic panoramic mode (serious photographers are not interested in it, because if you look at the SLR, you can assemble the panorama yourself). But incompact devices from Nikon, this mode is available. If you are a amateur photographer and want to indulge in panoramas, you can pay attention to the hyperzamas like the Nikon COOLPIX P900 or the waterproof compact Nikon COOLPIX AW130.
- Any lens. There is a stereotype that panoramas can only be taken with lenses with a focal length of about 50 mm, since such images have the least potential distortion and are easier to assemble later. This is true only if you are going to glue panoramas manually. However, today no one does this (this is as rare as leech treatment). A lot of computer programs have been created for the automated gluing of panoramas. The lens for shooting panoramas should be selected based on the genre in which you will shoot. Everything is as usual here: wide-angle lenses are more suitable for landscape, and for portrait it is better to use special portrait lenses. And the requirements for optics when shooting panoramas are the same as when shooting ordinary single frames. It should not give vignetting, distortion, chromatic aberration. An important requirement for the lens, which will be used when shooting panoramas, is the sharpness over the entire field of the frame (at least on closed apertures). Many lenses sin in that they give a sharp image only in the center of the frame, and begin to “soap” along the edges. Such lenses are not suitable for panoramic shooting, because what was the edge of one of the glued pictures may well turn out to be the center of your future panorama.
Panorama taken with a strong vignetting lens. The black stripes at the joints of individual frames are especially noticeable in the sky. Vignetting (darkening the image at the edges of the frame) is also harmful when shooting panoramas, because it is important to achieve uniform exposure throughout the frame. Taking pictures with vignetting into a panorama is much more difficult. However, moderate vignetting, as well as slight distortion, is treated when processing images in RAW format.
The lens should provide image sharpness over the entire field of the frame. In addition, he should not suffer from severe distortion - geometric distortion. Having removed the panorama on the lens with distortion, in the final picture you risk getting, for example, a wave-like horizon or similar wave-like houses. In our example, geometric distortions can easily be seen on the boat mast.
Nikon AF-S 18-35mm f / 3.5-4.5G ED Nikkor
Nikon 70-200mm f / 4G ED AF-S VR Nikkor
- Programs for automatic gluing panoramas . So, you shot a few frames and want to glue a panorama from them. A simple combination in the photo editor will not give the proper results - the joints will be visible. Gluing panoramas - the task is not so simple, but easily automated. There are many special programs created for automatic gluing of images. Perhaps the most famous of them are PTGui and Autopano Giga. The well-known Adobe Lightroom (since version 6) is able to glue panoramic frames to everyone. At the same time, it can glue panoramas directly from RAW images, creating a panoramic RAW file. This allows you to continue to work with the panoramic image as with a regular RAW, applying all known processing methods to it. Among the free solutions are the Hugin program and the brainchild of Microsoft - Image Composite Editor . A separate lesson will be devoted to gluing panoramas in our rubric “How it is shot”.
- Tripod . So that all the frames shot for a panorama can be collected, they must be shot from one point. A constant shooting point will be provided by a tripod. In addition, for panoramic shooting, a tripod is needed for exactly the same reasons as with conventional shooting, for example, landscape. After all, you often have to shoot at slow shutter speeds. Nevertheless, with a certain share of dexterity and suitable conditions for shooting a panorama, it is quite possible to take it off hand. To do this, you need to set the shutter speed suitable for handheld shooting and just take all the shots from one point. In this article, all panoramic shots with people are made with hands.
