12 TRICKS TO SUCCEED WITH YOUR NEXT BLACK AND WHITE PHOTOGRAPHY
12 TRICKS TO SUCCEED WITH YOUR NEXT BLACK AND WHITE PHOTOGRAPHY
What will Black and white have so that almost 200 years after the first photograph, (200 years of advances, of plates, of developers, enlargers and reels; of the passage from analog to digital and what remains…) we continue so close to him ?. How can it be, if we see in color, we dream in color, we dress in colors, if the world is in color!?, Why does black and white wake up something so deep in us and overwhelm us so intimately and deeply, even more than many color images?
It may be because black and white is not just the addition or absence of color, or the passage from one to another. There is a whole world of universal associations and feelings shared around these colors. White is the sum of the colors, the positive, the light, the purity, the innocence, it is clean and the one with the greatest sensitivity towards the light. Black, on the contrary, is the absence of color (although at the same time a color in itself), we associate it with mystery, death, evil, and at the same time elegance and nobility. And the gray, which walks from one to another, to neutrality, sadness, melancholy, doubt ... It is what we know as color psychology (or color theory); In short, how colors act on feelings and reason.
And having said that, how could it not cause deep sensations in us to see in a single image the combination of all this symbology so inherent in the human being, so instinctive, so universal?
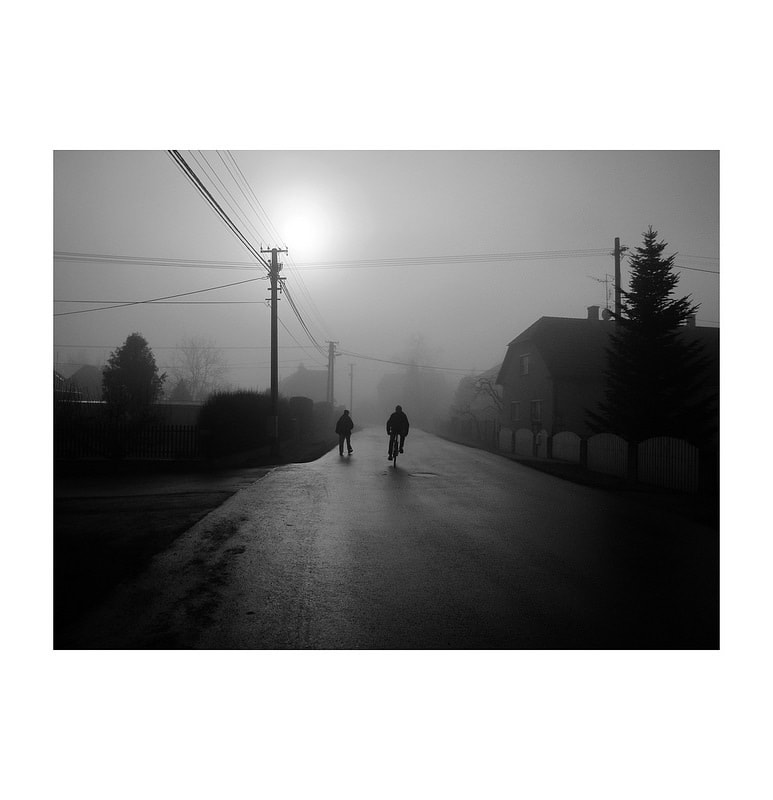
Monsoon in india
And now that we have the Why more or less, let's see the How? With some tips that you can use when considering solving a black and white image:
1 TRAIN YOUR GAZE
Photographing in analog, had (or has) many disadvantages with respect to digital (it is more expensive, more cumbersome, etc.), but one of the clearest disadvantages was when choosing the reel. Black and white or color? Black and white All right, there you had 36 black and white photographs, like it or not. Would you like to have taken that color image? Bad luck. Either you were loaded with two cameras, or that fantastic color image, you weren't going to have it. With the digital era, we solve that problem, but we enter another. Unless you choose a black and white mode of your camera, which is not highly recommended (I'll explain why later), we always see the images in color. That makes, or has done, that training our eye for black and white photography has become something much more complicated. That limitation that the reel gave you, was both the best ally to get used to 'see in black and white', to get used to this exercise of abstraction that requires learning to see in grayscale. Am I painting it too black? Do not worry, the solution is very easy and within your reach. In the following points I leave you some tricks that you can use to learn to see in black and white.
Train your photographic look in black and white
2 CHOOSE A GOOD TOPIC
In my view, there are no good or bad subjects for color photography or black and white photography. Each moment, each image is likely to be a good black and white or color image, it depends on the 'grace' of each one, your style or what you want to convey. But yes, if you want to train your look in black and white, you will have to immerse yourself in it.
Do not wait to get home to think in front of the computer if that image will be better in color or black and white; That image must be black and white.
Suggest a work, a series of some theme that inspires you and make it complete in black and white. You will see how some images you like and others not so much.
Examine the ones you like and think about what you like about them, and continue along that line until you have a series that satisfies you in black and white, from beginning to end.
Repeat as many times as necessary.
Example of part of a series in Black and White (I)Example of part of a black and white photographic series (II)Example of part of a black and white photographic series (III)Example of part of a black and white photographic series (IV)
3 LEARN TO USE COLOR FILTERS
Black and white color filters have the ability to radically change the initial hue offered by the shot. They are based on complementary colors and basically what they do is selectively darken colors; clarifying its own color and emphasizing the opposite.
For example, if you have a somewhat boring blue sky, using a red filter in your image, the red will darken the blue, since they are complementary, and if you also have beautiful clouds, they will stand out over the sky that you have just darkened, offering a image with more tonal range, more contrast and, in short, more interesting.
Complementary colors
Some of the most used filters are:
Red filter: Its opposite is cyan blue. So it clarifies the red and darkens the blue (very useful for the skies in Black and White)
Yellow filter: Absorbs ultraviolet and blue light. They darken, like red, certain shades of blue, and are useful for lightening the skin in portraits, since the skin has a high degree of yellow.
Orange filter: Eliminates ultraviolet and blue light. It is mainly used to darken the green areas of the image (foliage)
Green filter: darkens red and certain shades of blue and lightens green and certain shades of yellow, useful to highlight the different greens of for example a landscape.
4 LEARN HOW TO TRANSLATE COLOR TO GRAYSCALE
Think that each color has its equivalent in gray scale. For example, a red does not have the same equivalence as a yellow. (they won't give you similar grays). Although we talk about black and white photography, we must take into account all the tonal variety between pure white and pure black. Learning how colors will be translated in grayscale will help you preview the image and its result; It will help you to know which areas will be lighter or darker not only depending on the light that reaches them, but depending on how the color will be translated in the grayscale.
“In the eye of my mind I visualize how a particular view and feeling can be printed on paper. If I feel euphoria, it will probably be a good photograph. It's something intuitive, a capacity that comes from a lot of practice ”Ansel Adams.
Grayscale color translation
5 PRACTICE WITH CONTRAST
In a black and white photograph, it is important that it contains (regardless of redundancy) black and white. That is, it must contain some pure white and pure black, because if the image is based only on intermediate tones, the result of your image will be a gray image, what we call 'pasted'.
If, on the contrary, your image lacks intermediate tones, (only white and only black), it is what we know as high contrast image. These types of images are characterized by having an almost zero intermediate tonal range. Well-used high-contrast photographs can be more impressive than the previous ones, although you must be clear about the message. Not all images will fit you better because you increase the contrast; It will depend on what you want to express in each image. Low contrast images are smoother and have more tonal range, and therefore, transmit less aggressiveness, less strength, than high contrast.
High contrast photographyLow contrast photography
6 USE THE 'COLOR' SYMBOLOGY
As I have already mentioned in the introduction, both white and black, as well as the intermediate gray scale, have a symbology. Using them in your images consciously will help you to give value to your message. For example, a black and white portrait with a homogeneous illumination across the face is not the same as a portrait with one half of the face in shadow and the other half illuminated, don't you think? Don't you think the message is radically different from one portrait to another? When we add the black, the dark, the lack of light, we consequently add that air of mystery, of evil, of the unknown ... so inherent in the color black. Or if on the contrary you decide to reflect the purity, the goodness, the innocence… the white color and the light, they will be the protagonists of your image. Do you remember the articleabout high and low key photographs? They are based on the same principle to convey different sensations or emotions.
High key photography
7 TAKE CARE OF THE COMPOSITION
This advice is especially required in black and white photographs. Think that you are stripping the image of color, and therefore of very valuable information, of a message, of a part of the history of that image. So you're going to have to make up for it somehow
Take advantage of geometry: Black and white is a great ally of geometric shapes. The lines , the perspective , the simple geometric objects in repetition, combine very well with the elegance and simplicity of black and white.
Don't forget the basic composition rules
Do not forget to break them when necessary
Black and white lines and geometry
8 SHOOT IN RAW
You will have heard this advice thousands of times. The explanation is simple, the RAW file, collects and stores all the information collected by the sensor, this means that the RAW format does not process the image, and therefore does not lose information. Of course, before you start using it as a possessed person, make sure you have a memory card with enough capacity (today it does not involve too much disbursement one of great capacity) because they take up much more space on your card than a format JPEG
What if my camera does not have RAW? Then shoot in color and do the processing later. The different color modes of the cameras (black and white, sepia, etc.) process the image and do not save the rest of the information, so if you use them, you will lose that information, and you will not be able to recover it later. The more information you have for processing, the more correction margin you will have.
9 TAKE CARE OF THE EXHIBITION
Exposing well is especially important in black and white photography, since the shadows in this type of image are more difficult to recover than in color; black and white tends to cause more noise in the image when trying to recover it, than a color image.
Get a gray card: The gray chart is a reference of pure gray (neutral) that reflects 18% of the light it receives, exactly the same configuration as most camera photometers. Its function is to determine the exposure accurately. For example, it sure happened to you sometime, in which you find yourself in a situation with high lights and white objects, for example. These scenes 'trick' the photometer into thinking that there is much more light than there really is (snow, deserts in full sun, etc.) let's say that the photometer thinks it is that medium gray for which it is programmed, but with a lot light, although you know that it is actually white. If in those situations you measure in your gray card, your camera's photometer (which is based on that same neutral gray tone),
If you do not have a gray card at that time, look at the scene for some medium gray that can serve as a reference.
If you still don't have any, you can use the palm of your hand and add +1 (you will have to do your own personal tests, because it will depend on your skin tone)
Shoot at low ISO: The grain is much more evident in black and white photographs, so whenever you can, shoot at an ISO as low as possible. If you want to add noise, it is better to do it in the post-processing of the image.
Take care of the exhibition
10 TAKE ADVANTAGE OF ALL THE HOURS OF THE DAY
Each moment of the day will provide you with an image type. The hours with softer lights are always the first and last hours of the day. These hours will offer you a wide intermediate tonal range, as well as cloudy days, which offer you a diffused light that will allow you to capture all the tones of the scene.
Intermediate hours, on the other hand, will offer you images with very marked shadows and high contrast between illuminated and dark areas. If you like high contrast photographs, you can take advantage of the opportunities offered by this type of natural lighting.
Take advantage of all the hours of the day
11 TEXTURES SPEAK
Textures tell us about many things, about the passage of time, youth, broken walls, new objects, newborns and old people, wrinkles and the passage of time. By stripping the color image, they take on special importance, bring realism, closeness, volume, touch. An object or subject with texture weighs more than one without it since it has more information. If you want to focus attention on some aspect, taking care of the texture is a good way to do it, along with a good composition, of course.
How do you get textures? Absolutely all objects and people have a texture, it can be smooth or rough, more pronounced or less, but everything has texture. The question is how do you reflect it in your image, and you do that based on the lighting. This can be natural or 'controlled'. In the first case, you will have to adapt to the lighting you have at the moment and anticipate the best time of day or the best angle. In the second case, you can create them directly in your personal 'laboratory'. Here is an article about lighting in portraits that can help you solve many doubts about it.
Textures in the details
12 AND FINALLY… LOOK FOR INSPIRATION
You have it easy. All the great classics in photography shot in black and white. All those who created the standards we follow today, all who broke them, adapted them, sought perfection, and found their style ... You all have them with a 'click' on your computer
Black and white is like a journey, a mysterious journey to the depths of things, to the raw, to the essence, it is a journey through feelings, through forms in their purest and timeless aspect. It is a journey that begins with you, with your memories, with your knowledge, with everything you ever read, with everything that moved you, with everything that made you be as you are and see how you see. It is a trip to the depths of yourself. If you manage to convey that magic that you carry with you, let yourself go, be yourself your black and white photographs will be a magnificent version of yourself.
I hope you enjoyed the article, and you know ... if you liked it, share it with your friends, friends, family ... and ultimately, with anyone likely to take the camera sometime