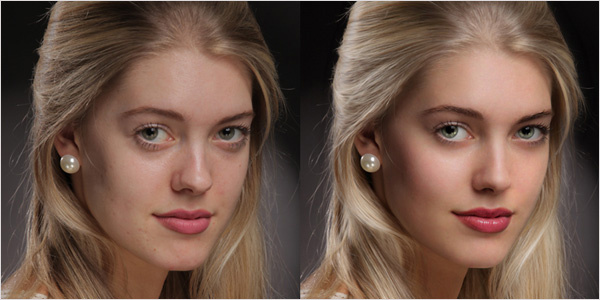
Nowadays, the art of photography at the peak of popularity: selfies, photo shoots, social networks. But, unfortunately, the camera is impartial, it captures all skin flaws. Therefore, pictures, especially portraits, are usually processed. This is called retouching. The most common queries are: how to remove oily sheen, how to remove acne, how to remove bruises under the eyes. In general, retouching improves the aesthetic component of the portrait. Professional retouching is a kind of art, you won’t be able to master it in the evening, for this you need to be trained. Currently, there are several methods for retouching photos. In this article, we will look at basic retouching techniques that will help you understand the processing principle. Open the portrait in Photoshop. Create a duplicate layer Ctrl + J . Before you begin, consider the photo at maximum magnification. So you will appreciate the amount of work. Look carefully for acne, spots, scars, redness. Decide for yourself what exactly you will eliminate. You can enlarge and reduce the photo for viewing by pressing Ctrl + and Ctrl- . In this picture, it is worth removing the bruises under the eyes, removing the redness on the skin and some bright spots. You should always start by cleansing your skin of pimples and red spots. The Healing Brush Tool is best suited for this . In the brush settings, set the parameter "Source" / Source , "Sample" / Sample , "Mode" / Mode , "Normal" / Normal . "Hardness" / Hardness leave 100%. The brush size is adjustable using the [ (decrease) and ] (increase) keys . We select a healthy skin area suitable for replacement and, holding the Alt key , make one click. Paint over unnecessary spots. The cross will indicate the donor site. It must be selected individually for each new treatment area. Otherwise, the result can only worsen the look. We carefully remove all minor defects. Do not touch freckles and moles. You can remove the capillaries near the wings of the nose. Try to keep your skin looking natural. When all the minor imperfections are eliminated, you can remove the redness on the skin, which makes the tone uneven. To do this, create an adjustment layer "Hue / Saturation" / Hue Saturation . Go to the list of adjustment layers on the bottom panel of the layer palette. Push In the list, select "Hue / Saturation . " In the dialog box, go to the red channel, take a dropper and click on the skin area where redness is visible. Limiters appear on the gradient. Raise the saturation and hue to about 70–73. To do this, slide the sliders to the right. In the image, the skin will turn green. Now, grabbing the stop on the gradient in the middle, shift it to the right until we notice that the green color remained only in areas with redness. Next, “Saturation” is taken to zero. And shift the color tone to the left until we see a normal, uniform skin tone. In this case, an indicator of +22 came up. Now we need to erase the mask of the adjustment layer everywhere except for the skin of the face, including on the iris and on the lips. We get to the mask of the adjustment layer, call "Brush" / Brush (key B). Set the black color, select the desired size and simply paint over the lips, iris and image with a brush, without touching the skin. Compare the result. You can learn more about Photoshop on the course at Fotoshkola.net Portrait Retouch. Simple solutions . "
Face retouching in Photoshop: how to remove bruises and brighten eyes

Before processing
After processing

